aws(学习笔记第三十九课) iot-msk-pipeline
文章目录
- aws(学习笔记第三十九课) iot-msk-pipeline
- 学习内容:
- 1. 整体架构
- 1.1 代码链接
- 1.2 代码调整
- 1.2 整体架构(概要)
- 1.3 整体架构(详细)
- 2. 代码解析
- 2.1 创建`IotProducerDestination`
- 2.2 创建`IotProducer`
- 2.3 创建`MSK client`的`EC2`
- 2.4 创建`MSK cluster`
- 2.5 创建`Main Stack`
- 2.5.1 创建需要的`subnet`
- 2.5.2 创建需要的`VPC`
- 2.5.3 创建需要的`cluster`和`client`
- 2.5.4 为`IOT destination`创建需要的`role`
- 2.5.5 创建`IOT Message Rule`
- 3. 执行测试
aws(学习笔记第三十九课) iot-msk-pipeline
- 使用
iot和msk
学习内容:
- 使用
iot和msk
1. 整体架构
1.1 代码链接
- 代码链接(iot-msk-lambda-pipeline)
1.2 代码调整
- 建立
cluster的时候,kafka_version=msk.KafkaVersion.V3_4_0,,需要指定高版本# MSK cluster with SASL/SCRAM authenticationself.cluster = msk.Cluster(self, "Cluster",cluster_name="iotCluster",kafka_version=msk.KafkaVersion.V3_4_0,vpc=vpc,encryption_in_transit=msk.EncryptionInTransitConfig(client_broker=msk.ClientBrokerEncryption.TLS),client_authentication=msk.ClientAuthentication.sasl(scram=True),) - 生成
scram secret# 1. 创建Secrets Manager密码(在CDK中)scram_secret = secretsmanager.Secret(self, "MSKScramSecret",secret_name="AmazonMSK_iotCluster_demo",generate_secret_string=secretsmanager.SecretStringGenerator(secret_string_template=json.dumps({"username": "admin"}),generate_string_key="password",exclude_characters='"@/\\', # 避免特殊字符冲突password_length=16)) - 将生成
scram secret指定到MSK Cluster,client_authentication的secret设定# MSK cluster with SASL/SCRAM authenticationself.cluster = msk.Cluster(self, "Cluster",cluster_name="iotCluster",kafka_version=msk.KafkaVersion.V3_4_0,vpc=vpc,encryption_in_transit=msk.EncryptionInTransitConfig(client_broker=msk.ClientBrokerEncryption.TLS),client_authentication=msk.ClientAuthentication.sasl(scram=True,secret=scram_secret), - 指定
client的kafka version的时候,需要指定高版本constants = {"KAFKA_DOWNLOAD_VERSION": "kafka_2.13-4.0.0","KAFKA_VERSION": "4.0.0","KAFKA_CLIENT_INSTANCE": "t2.xlarge","MSK_TOPIC": "topic","IOT_TOPIC": 'iot/topic' } - 伴随升版,
requirement.txt也需要改修aws-cdk-lib==2.101.0 constructs>=10.0.0,<11.0.0 aws-cdk.aws-msk-alpha==2.101.0a0 boto3>=1.28.0 - 新版本Kafka(2.2+)已弃用–zookeeper参数,改用–bootstrap-server
instance.user_data.add_commands这里需要改成如下,需要的client-ssl.properties在下面作成。./bin/kafka-topics.sh \--create \--bootstrap-server b-1.iotcluster.g9od7s.c4.kafka.ap-northeast-1.amazonaws.com:9096 \--topic topic \--partitions 3 \--replication-factor 2 \--command-config client-ssl.properties - export KAFKA_HEAP_OPTS=“-Xmx1G -Xms512M”
- 创建Java Keystore (JKS) 格式的truststore
其中,AmazonRootCA1.pem文件需要执行
wget https://www.amazontrust.com/repository/AmazonRootCA1.pem进行获得。keytool -importcert \-alias AmazonMSKCA \-file AmazonRootCA1.pem \-keystore kafka.client.truststore.jks \-storepass 123456 \-noprompt - 生成
client-ssl.propertiescat << EOF > client-ssl.propertiesbootstrap.servers=b-1.iotcluster.g9od7s.c4.kafka.ap-northeast-1.amazonaws.com:9096security.protocol=SSLssl.truststore.location=/path/to/kafka.client.truststore.jksssl.truststore.password=123456EOF - 导出
KAFKA_OPTS环境变量export KAFKA_OPTS="-Djavax.net.ssl.trustStore=~/kafka.client.truststore.jks -Djavax.net.ssl.trustStorePassword=123456" - 尝试
kafka-topics.sh的list命令./bin/kafka-topics.sh \--bootstrap-server b-1.iotcluster.g9od7s.c4.kafka.ap-northeast-1.amazonaws.com:9096 \--command-config client-ssl.properties \--list
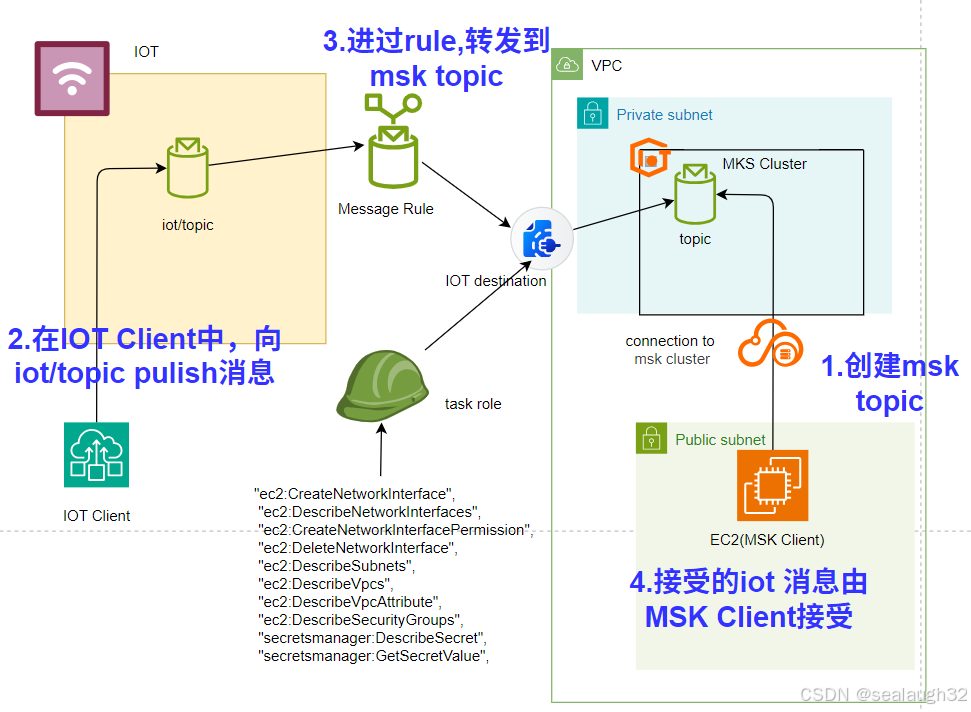
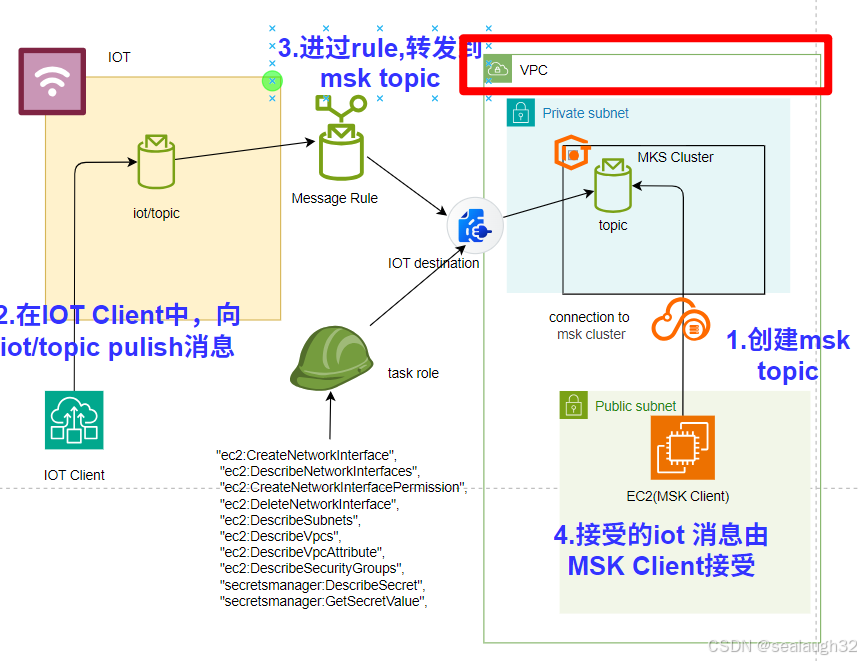
1.2 整体架构(概要)

* AWS Iot Core会生产event写入到Amazon MSK Broker的topic
* 客户端client会监视这个topic,如果有AWS Iot Core的message接受过来,就会接收到。
1.3 整体架构(详细)
2. 代码解析
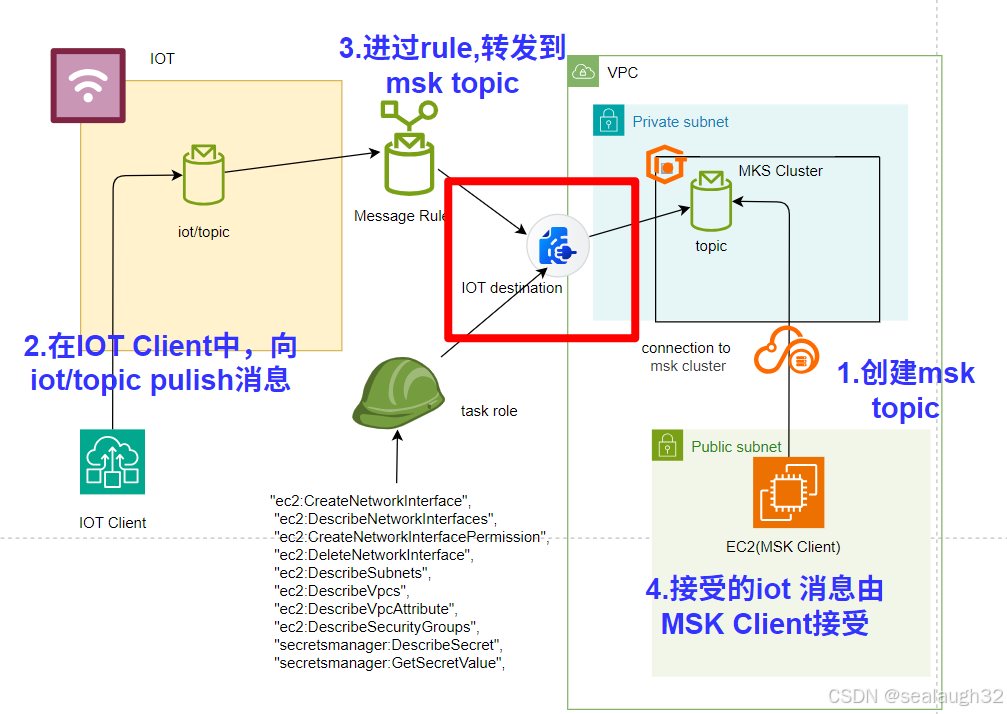
2.1 创建IotProducerDestination
这个destination用来指向msk vpc。
# Iot destination which points to the MSK VPC
class IotProducerDestination(NestedStack):def __init__(self,scope: Construct,construct_id: str,vpc_id,role_arn,subnet_ids,**kwargs):super().__init__(scope, construct_id, **kwargs)# Create Iot Messaging Destination for MSK Clusterdestination = iot.CfnTopicRuleDestination(self, "TopicDestination",vpc_properties=iot.CfnTopicRuleDestination.VpcDestinationPropertiesProperty(role_arn=role_arn,vpc_id=vpc_id,subnet_ids=subnet_ids))self.arn = destination.attr_arn
2.2 创建IotProducer
使用上面创建的destination,继续创建指向kafka的rule,使得发送给IOT destination的message都会重定向到MSK中。
# Iot producer that routes messages to the MSK cluster topic created by the client
class IotProducer(NestedStack):def __init__(self,scope: Construct,construct_id: str,vpc_id,role_arn,subnet_ids,bootstrap_brokers_sasl_scram,**kwargs):super().__init__(scope, construct_id, **kwargs)# Iot destinationdestination = IotProducerDestination(self, "IotProducerTopicDestination",role_arn=role_arn,vpc_id=vpc_id,subnet_ids=subnet_ids)# Create Iot Messaging Rule for MSK Cluster using the destination ARNrule = iot.CfnTopicRule(self, "TopicRule",topic_rule_payload=iot.CfnTopicRule.TopicRulePayloadProperty(actions=[iot.CfnTopicRule.ActionProperty(kafka=iot.CfnTopicRule.KafkaActionProperty(destination_arn=destination.arn,topic=constants["MSK_TOPIC"],client_properties= {'bootstrap.servers': bootstrap_brokers_sasl_scram,'sasl.mechanism': 'SCRAM-SHA-512','security.protocol': 'SASL_SSL','sasl.scram.username': "${get_secret('AmazonMSK_iotCluster_demo', 'SecretString', 'username', '" + role_arn + "')}",'sasl.scram.password': "${get_secret('AmazonMSK_iotCluster_demo', 'SecretString', 'password', '" + role_arn + "')}"}))],sql='SELECT * FROM "' + constants["IOT_TOPIC"] + '"'))
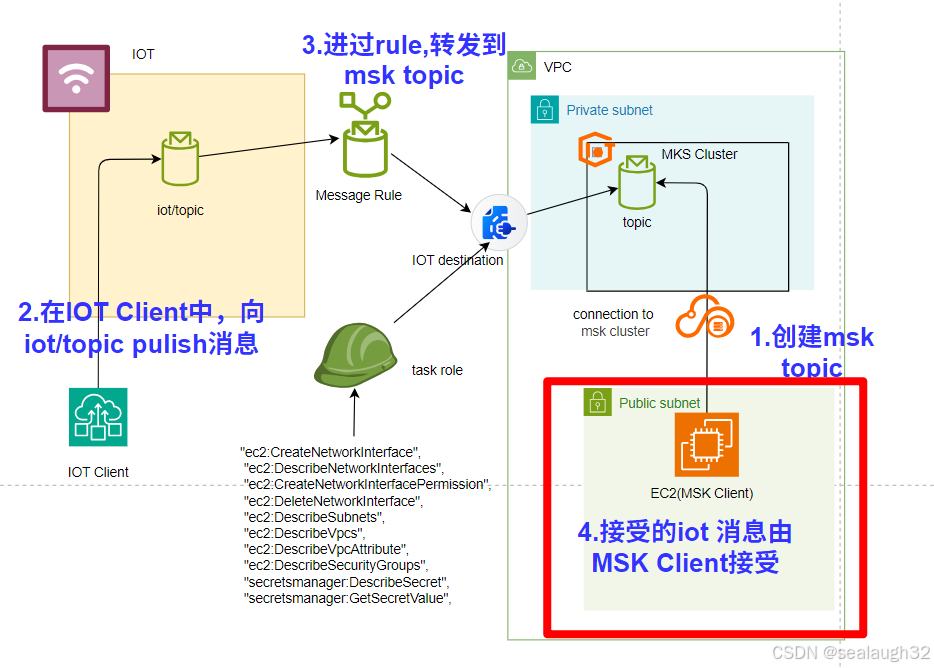
2.3 创建MSK client的EC2
# Ec2 instance that creates the kafka topic and can be used to consume MSK messages
class MSKClient(NestedStack):def __init__(self,scope: Construct,construct_id: str,vpc,client_subnet,zookeeper,**kwargs):super().__init__(scope, construct_id, **kwargs)# Amazon Linux AMIamzn_linux = ec2.MachineImage.latest_amazon_linux(generation=ec2.AmazonLinuxGeneration.AMAZON_LINUX_2,edition=ec2.AmazonLinuxEdition.STANDARD,virtualization=ec2.AmazonLinuxVirt.HVM,storage=ec2.AmazonLinuxStorage.GENERAL_PURPOSE)# MSK client Rolerole = iam.Role(self, "InstanceSSM", assumed_by=iam.ServicePrincipal("ec2.amazonaws.com"))# AWS managed policy added to MSK client rolerole.add_managed_policy(iam.ManagedPolicy.from_aws_managed_policy_name("AmazonSSMManagedInstanceCore"))# MSK Clientinstance = ec2.Instance(self, "Instance",instance_type=ec2.InstanceType(constants["KAFKA_CLIENT_INSTANCE"]),machine_image=amzn_linux,vpc = vpc,vpc_subnets=client_subnet,role = role,)# Ec2 security group in the MSK VPCclient_security_group = ec2.SecurityGroup(self, 'InstanceSecurityGroup', vpc=vpc)# Enable connection from anywhere on port 22client_security_group.add_ingress_rule(ec2.Peer.ipv4('0.0.0.0/0'),ec2.Port.tcp(22),)instance.add_security_group(client_security_group)# Commands to install dependencies and create the kafka topicinstance.user_data.add_commands(# "yum install java-1.8.0 -y","yum install java-11-amazon-corretto -y",f'wget https://archive.apache.org/dist/kafka/{constants["KAFKA_VERSION"]}/{constants["KAFKA_DOWNLOAD_VERSION"]}.tgz',f"tar -xzf {constants['KAFKA_DOWNLOAD_VERSION']}.tgz",f"./{constants['KAFKA_DOWNLOAD_VERSION']}/bin/kafka-topics.sh --create --zookeeper {zookeeper} --replication-factor 2 --partitions 1 --topic {constants['MSK_TOPIC']}",)
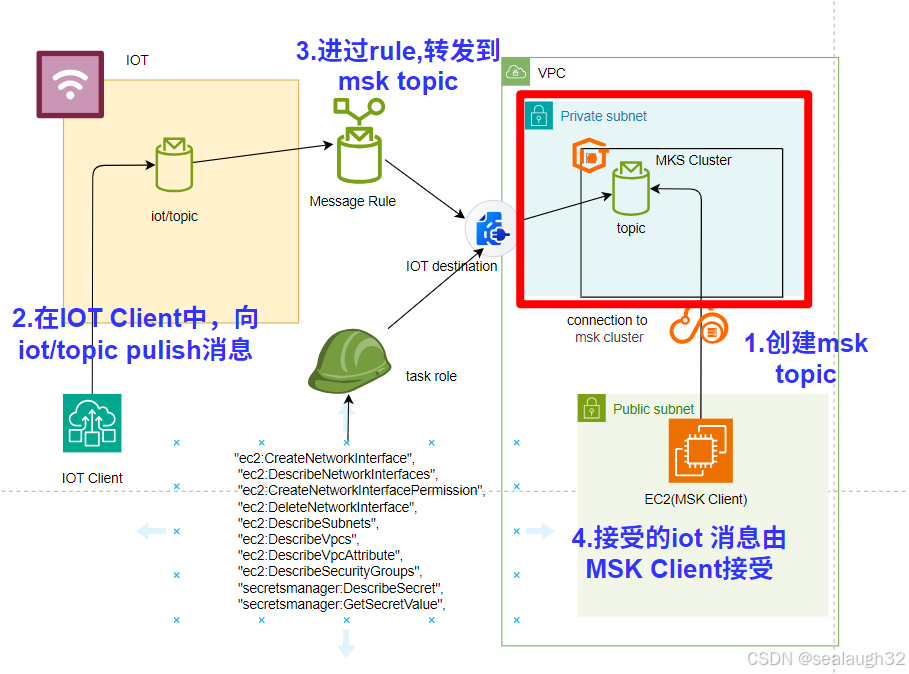
2.4 创建MSK cluster
# MSK Cluster and client
class MskBroker(NestedStack):def __init__(self, scope: Construct, construct_id: str, vpc, client_subnet, **kwargs):super().__init__(scope, construct_id, **kwargs)# MSK cluster with SASL/SCRAM authenticationself.cluster = msk.Cluster(self, "Cluster",cluster_name="iotCluster",kafka_version=msk.KafkaVersion.V3_4_0,vpc=vpc,encryption_in_transit=msk.EncryptionInTransitConfig(client_broker=msk.ClientBrokerEncryption.TLS),client_authentication=msk.ClientAuthentication.sasl(scram=True),)# Enable MSK cluster connection on ports 2181 and 9096 for SASL/SCRAM authenticationself.cluster.connections.allow_from(ec2.Peer.ipv4("0.0.0.0/0"),ec2.Port.tcp(2181))self.cluster.connections.allow_from(ec2.Peer.ipv4("0.0.0.0/0"),ec2.Port.tcp(9096))# EC2 Instance in the public subnet used to create the topicsclient = MSKClient(self, "MskClient",vpc=vpc,client_subnet=client_subnet,zookeeper=self.cluster.zookeeper_connection_string)
2.5 创建Main Stack
2.5.1 创建需要的subnet
# 1 Public Subnet and 2 Private Subnetssubnets = []# Public subnet used to host the MSK Clientsubnets.append(ec2.SubnetConfiguration(name = "MSKDemo-subnet-public1",subnet_type = ec2.SubnetType.PUBLIC,cidr_mask = 20))# Private subnet hosting one of the two MSK brokerssubnets.append(ec2.SubnetConfiguration(name = "MSKDemo-subnet-private1",subnet_type = ec2.SubnetType.PRIVATE_WITH_NAT,cidr_mask = 20))# Private subnet hosting one of the two MSK brokerssubnets.append(ec2.SubnetConfiguration(name = "MSKDemo-subnet-private2",subnet_type = ec2.SubnetType.PRIVATE_ISOLATED,cidr_mask = 20))

2.5.2 创建需要的VPC
# VPC in which the MSK cluster and client are locatedvpc = ec2.Vpc(self, "MskVpc",cidr="10.0.0.0/16",nat_gateways=1,max_azs=2,subnet_configuration = subnets)
2.5.3 创建需要的cluster和client
# MSK cluster and an EC2 Instance used to create the topicsmsk_cluster = MskBroker(self, 'MSKBroker',vpc=vpc,client_subnet=ec2.SubnetSelection(subnet_type=ec2.SubnetType.PUBLIC)).cluster
2.5.4 为IOT destination创建需要的role
# Policies needed for Iot to send messages to MSKiot_task_policy = iam.PolicyStatement(actions=["ec2:CreateNetworkInterface","ec2:DescribeNetworkInterfaces","ec2:CreateNetworkInterfacePermission","ec2:DeleteNetworkInterface","ec2:DescribeSubnets","ec2:DescribeVpcs","ec2:DescribeVpcAttribute","ec2:DescribeSecurityGroups","secretsmanager:DescribeSecret","secretsmanager:GetSecretValue"],resources=["*"])# Role passed to the Iot destinationiot_task_role = iam.Role(self, "IotTaskRole",assumed_by=iam.ServicePrincipal('iot.amazonaws.com'))# Add the IAM policies above to the task roleiot_task_role.add_to_policy(iot_task_policy)
2.5.5 创建IOT Message Rule
# Create the Iot Messaging destination and ruleiot_producer = IotProducer(self, 'IotProducer',vpc_id=vpc.vpc_id,role_arn=iot_task_role.role_arn,subnet_ids=vpc.select_subnets(subnet_type=ec2.SubnetType.PRIVATE_WITH_NAT).subnet_ids,bootstrap_brokers_sasl_scram=msk_cluster.bootstrap_brokers_sasl_scram)
3. 执行测试
接下来继续
IOT things -> IOT Core -> IOT Destination -> rule -> MSK cluster -> MSK client
的连接测试。