使用yolo用python检测人脸
使用yolo用python检测人脸
import cv2
import numpy as np
from ultralytics import YOLO
import mediapipe as mp
from mtcnn import MTCNNmodel = YOLO("yolo11m.pt") # 确保使用正确的YOLO模型路径# 初始化MediaPipe Face Mesh
mp_face_mesh = mp.solutions.face_mesh
face_mesh = mp_face_mesh.FaceMesh(static_image_mode=False,max_num_faces=20,refine_landmarks=True,min_detection_confidence=0.5,min_tracking_confidence=0.5
)
NOSE_TIP_IDX = 1 # MediaPipe鼻尖关键点索引# 初始化MTCNN检测器
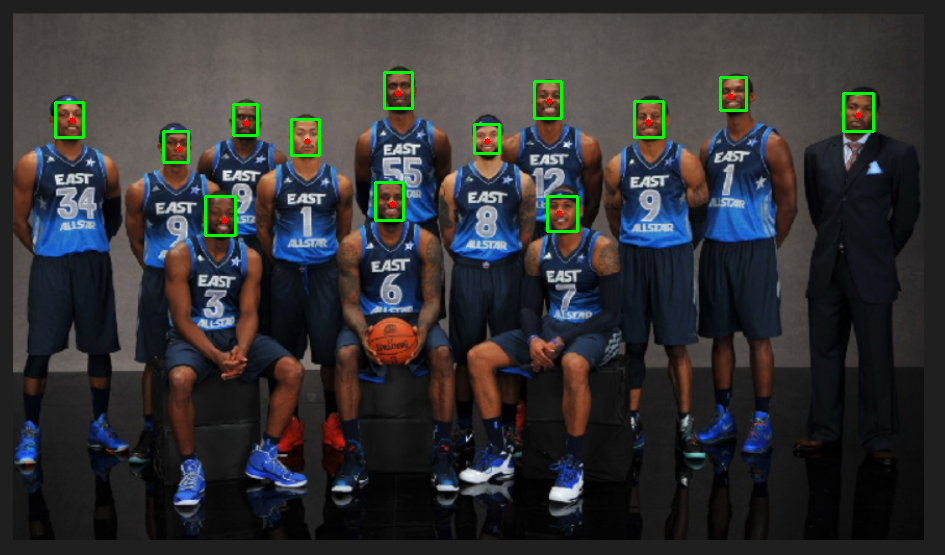
mtcnn_detector = MTCNN()def detect_faces_and_nose(image_path):img = cv2.imread(image_path)if img is None:print("Error: Image not found!")return# Step 1: 使用YOLO检测人物results = model.predict(img, classes=0, verbose=False) # classes=0对应'person'for box in results[0].boxes:# 获取人物框坐标x1_p, y1_p, x2_p, y2_p = map(int, box.xyxy[0].tolist())person_roi = img[y1_p:y2_p, x1_p:x2_p]# Step 2: 在人物ROI中使用MTCNN检测人脸person_roi_rgb = cv2.cvtColor(person_roi, cv2.COLOR_BGR2RGB)faces = mtcnn_detector.detect_faces(person_roi_rgb)for face in faces:# 获取MTCNN人脸框坐标(相对于人物ROI)x, y, w, h = face['box']# 转换为原图坐标x1_f = x1_p + xy1_f = y1_p + yx2_f = x1_f + wy2_f = y1_f + h# Step 3: 在MTCNN人脸框内使用MediaPipe检测鼻尖face_roi = person_roi[y:y+h, x:x+w]face_roi_rgb = cv2.cvtColor(face_roi, cv2.COLOR_BGR2RGB)results_mp = face_mesh.process(face_roi_rgb)if results_mp.multi_face_landmarks:for face_landmarks in results_mp.multi_face_landmarks:nose_local = face_landmarks.landmark[NOSE_TIP_IDX]h_roi, w_roi = face_roi.shape[:2]nose_x = int(nose_local.x * w_roi) + x1_fnose_y = int(nose_local.y * h_roi) + y1_fprint(f"鼻尖位置: {nose_x}:{nose_y}")cv2.circle(img, (nose_x, nose_y), 3, (0, 0, 255), -1)# 绘制MTCNN的人脸框(绿色)cv2.rectangle(img, (x1_f, y1_f), (x2_f, y2_f), (0, 255, 0), 2)# 可选:绘制YOLO的人物框(红色)# cv2.rectangle(img, (x1_p, y1_p), (x2_p, y2_p), (0, 0, 255), 2)# 保存并显示结果cv2.imwrite("output.png", img)cv2.imshow("Result", img)cv2.waitKey(0)cv2.destroyAllWindows()if __name__ == "__main__":detect_faces_and_nose("test.png")上面的图中出现了重叠的人脸框,说明1个人脸重复检测了
import cv2
import numpy as np
from ultralytics import YOLO
import mediapipe as mp
from mtcnn import MTCNNmodel = YOLO("yolo11m.pt") # 确保使用正确的YOLO模型路径# 初始化MediaPipe Face Mesh
mp_face_mesh = mp.solutions.face_mesh
face_mesh = mp_face_mesh.FaceMesh(static_image_mode=False,max_num_faces=20,refine_landmarks=True,min_detection_confidence=0.5,min_tracking_confidence=0.5
)
NOSE_TIP_IDX = 1 # MediaPipe鼻尖关键点索引# 初始化MTCNN检测器
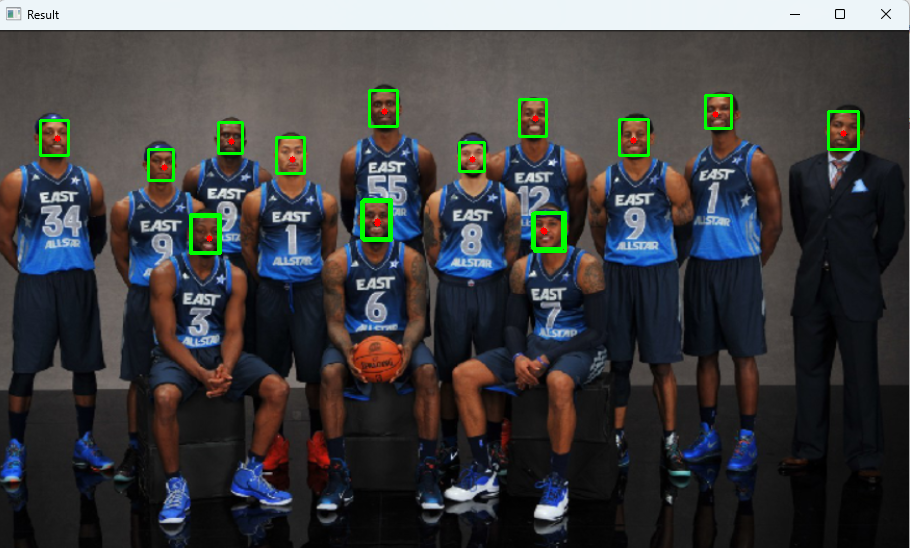
mtcnn_detector = MTCNN()def nms(boxes, scores, iou_threshold):"""非极大值抑制"""if len(boxes) == 0:return []x1 = boxes[:, 0]y1 = boxes[:, 1]x2 = boxes[:, 2]y2 = boxes[:, 3]areas = (x2 - x1 + 1) * (y2 - y1 + 1)order = scores.argsort()[::-1]keep = []while order.size > 0:i = order[0]keep.append(i)xx1 = np.maximum(x1[i], x1[order[1:]])yy1 = np.maximum(y1[i], y1[order[1:]])xx2 = np.minimum(x2[i], x2[order[1:]])yy2 = np.minimum(y2[i], y2[order[1:]])w = np.maximum(0.0, xx2 - xx1 + 1)h = np.maximum(0.0, yy2 - yy1 + 1)intersection = w * hiou = intersection / (areas[i] + areas[order[1:]] - intersection)inds = np.where(iou <= iou_threshold)[0]order = order[inds + 1]return keepdef detect_faces_and_nose(image_path):img = cv2.imread(image_path)if img is None:print("Error: Image not found!")return# 存储所有人脸信息和鼻尖坐标faces_info = []# Step 1: 使用YOLO检测人物results = model.predict(img, classes=0, verbose=False)print(f"检测到人数:{len(results[0].boxes)}")for box in results[0].boxes:x1_p, y1_p, x2_p, y2_p = map(int, box.xyxy[0].tolist())person_roi = img[y1_p:y2_p, x1_p:x2_p]# Step 2: 使用MTCNN检测人脸person_roi_rgb = cv2.cvtColor(person_roi, cv2.COLOR_BGR2RGB)faces = mtcnn_detector.detect_faces(person_roi_rgb)for face in faces:x, y, w, h = face['box']confidence = face['confidence']# 转换为原图坐标x1_f = x1_p + xy1_f = y1_p + yx2_f = x1_f + wy2_f = y1_f + h# Step 3: 检测鼻尖face_roi = person_roi[y:y+h, x:x+w]face_roi_rgb = cv2.cvtColor(face_roi, cv2.COLOR_BGR2RGB)results_mp = face_mesh.process(face_roi_rgb)nose_x, nose_y = None, Noneif results_mp.multi_face_landmarks:for face_landmarks in results_mp.multi_face_landmarks:nose_local = face_landmarks.landmark[NOSE_TIP_IDX]h_roi, w_roi = face_roi.shape[:2]nose_x = x1_f + int(nose_local.x * w_roi)nose_y = y1_f + int(nose_local.y * h_roi)break # 只取第一个检测结果# 保存人脸信息faces_info.append((x1_f, y1_f, x2_f, y2_f, confidence, nose_x, nose_y))# 应用NMS去重if faces_info:boxes = np.array([[x1, y1, x2, y2] for (x1, y1, x2, y2, _, _, _) in faces_info])scores = np.array([score for (_, _, _, _, score, _, _) in faces_info])keep_indices = nms(boxes, scores, iou_threshold=0.3)# 绘制保留的结果for idx in keep_indices:x1_f, y1_f, x2_f, y2_f, _, nose_x, nose_y = faces_info[idx]cv2.rectangle(img, (x1_f, y1_f), (x2_f, y2_f), (0, 255, 0), 2)if nose_x is not None and nose_y is not None:cv2.circle(img, (nose_x, nose_y), 3, (0, 0, 255), -1)print(f"鼻尖位置: {nose_x}:{nose_y}")# 保存并显示结果cv2.imwrite("output.png", img)cv2.imshow("Result", img)cv2.waitKey(0)cv2.destroyAllWindows()if __name__ == "__main__":detect_faces_and_nose("test.png")