[ESP-IDF]:esp32-camera 使用指南 ESP32S3-OV2640 用例测试
![[LOGO]:CoreKSets](https://i-blog.csdnimg.cn/direct/731088657ae348d4a1f679ad3008534a.png)
【核知坊】:释放青春想象,码动全新视野。
我们希望使用精简的信息传达知识的骨架,启发创造者开启创造之路!!!
内容摘要:esp32-camera 组件为 ESP32 系列 SoC 提供了兼容的图像传感器驱动,同时提供了工具,将捕获的帧数据转换为常见的 BMP 和 JPEG 格式。该组件的设计适用于各种不同的图像传感器,并支持高质量的图像采集与处理。本文使用 VSCode + ESP-IDF v5.4 环境对 esp32-camera 进行部署。
关键词:esp32-camera VScode ESP-IDF OV2640
其他相关文章:
⛏。。。。
1.组件获取
Gitee 平台组件链接:esp32-camera: esp32 camera
下载压缩包或者拉取整个项目:
git clone https://gitee.com/esp-components/esp32-camera使用ESP-IDF官方例程:esp-idf: ESP-IDF 是由乐鑫官方推出的针对 ESP32 和 ESP32-S2 系列芯片的开发框架。ESP-IDF 国内镜像仓库,Issues 和 PRs 请仍旧提交到 github。重要:Gitee 中 ESP-IDF 仓库的使用,请先参看 https://gitee.com/EspressifSystems/esp-gitee-tools 中的说明文档。ESP-IDF 及其子模块,每日会自动同步若干次。 - Gitee.com
esp-idf: ESP-IDF 是由乐鑫官方推出的针对 ESP32 和 ESP32-S2 系列芯片的开发框架。ESP-IDF 国内镜像仓库,Issues 和 PRs 请仍旧提交到 github。重要:Gitee 中 ESP-IDF 仓库的使用,请先参看 https://gitee.com/EspressifSystems/esp-gitee-tools 中的说明文档。ESP-IDF 及其子模块,每日会自动同步若干次。 - Gitee.com
下载后将项目结构配置如下:
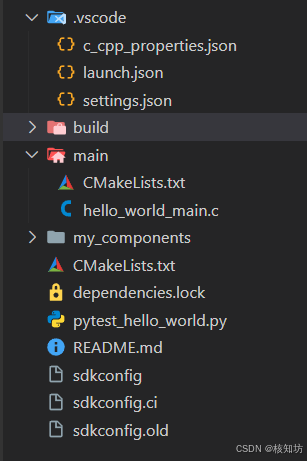
├─.vscode|CMakeLists.txt|sdkconfig├─main│ CMakeLists.txt│ hello_world_main.c└─my_components└─esp32-camera├─.github│ └─workflows├─conversions│ ├─include│ └─private_include├─driver│ ├─include│ └─private_include├─examples│ └─camera_example│ └─main├─sensors│ └─private_include├─target│ ├─esp32│ ├─esp32s2│ │ └─private_include│ ├─esp32s3│ ├─jpeg_include│ └─private_include└─test└─picturesesp32-camera 支持的 SoC
该组件支持以下 ESP32 系列的 SoC:
-
ESP32
-
ESP32-S2
-
ESP32-S3
这些 SoC 在图像采集和处理的性能上有所不同,但该驱动程序的设计考虑到了不同设备的适配性。
esp32-camera 支持的图像传感器
该驱动支持多种图像传感器,涵盖了从低分辨率到高分辨率的广泛范围,适用于各种不同的应用场景。以下是部分支持的传感器及其特点:
| 传感器型号 | 最大分辨率 | 色彩类型 | 输出格式 | 镜头大小 |
|---|---|---|---|---|
| OV2640 | 1600 x 1200 | 彩色 | YUV(422/420)/YCbCr422,RGB565/555,8位压缩数据,8/10位Raw RGB数据 | 1/4" |
| OV3660 | 2048 x 1536 | 彩色 | Raw RGB数据,RGB565/555/444,CCIR656,YCbCr422,压缩 | 1/5" |
| OV5640 | 2592 x 1944 | 彩色 | RAW RGB,RGB565/555/444,CCIR656,YUV422/420,YCbCr422,压缩 | 1/4" |
| OV7670 | 640 x 480 | 彩色 | Raw Bayer RGB,处理后的Bayer RGB,YUV/YCbCr422,GRB422,RGB565/555 | 1/6" |
| OV7725 | 640 x 480 | 彩色 | Raw RGB,GRB 422,RGB565/555/444,YCbCr 422 | 1/4" |
| NT99141 | 1280 x 720 | 彩色 | YCbCr 422,RGB565/555/444,Raw,CCIR656,JPEG压缩 | 1/4" |
| GC032A | 640 x 480 | 彩色 | YUV/YCbCr422,RAW Bayer,RGB565 | 1/10" |
| GC0308 | 640 x 480 | 彩色 | YUV/YCbCr422,RAW Bayer,RGB565,灰度图像 | 1/6.5" |
| GC2145 | 1600 x 1200 | 彩色 | YUV/YCbCr422,RAW Bayer,RGB565 | 1/5" |
| BF3005 | 640 x 480 | 彩色 | YUV/YCbCr422,RAW Bayer,RGB565 | 1/4" |
| BF20A6 | 640 x 480 | 彩色 | YUV/YCbCr422,RAW Bayer,只有Y通道 | 1/10" |
| SC101IOT | 1280 x 720 | 彩色 | YUV/YCbCr422,Raw RGB | 1/4.2" |
| SC030IOT | 640 x 480 | 彩色 | YUV/YCbCr422,RAW Bayer | 1/6.5" |
| SC031GS | 640 x 480 | 单色 | RAW MONO,灰度图像 | 1/6" |
esp32-camera 关键特点与要求
-
PSRAM要求:
除了使用CIF或更低分辨率的JPEG时,驱动需要安装并激活PSRAM(外部静态随机存储器)。使用YUV或RGB时,由于写入PSRAM的速度较慢,可能会导致图像数据丢失,特别是在启用WiFi时。若需要RGB数据,建议先捕获JPEG格式的图像,再使用fmt2rgb888或fmt2bmp/frame2bmp进行转换。 -
帧缓冲区模式:
单帧缓冲区模式:驱动等待当前帧完成(VSYNC),然后启动I2S DMA进行数据传输。这种方式可以更好地控制系统,但获取帧的时间较长。双帧缓冲区模式及以上:I2S处于连续模式,每一帧都会被推送到队列中,应用程序可以更快地访问帧数据。这种方式会增加CPU和内存负担,但能提高帧率,建议仅在使用JPEG格式时启用。 -
性能优化:
对于ESP32-S系列芯片,推荐将外部时钟频率设置为16MHz,以启用EDMA模式,提高图像数据处理性能。
2. 硬件参数配置
请在修改前先进行一次编译,确保例程能够正确编译。编译通过后桌面底部打开 ESP-IDF 终端 进行硬件参数配置:
执行以下命令打开配置UI:
idf.py menuconfig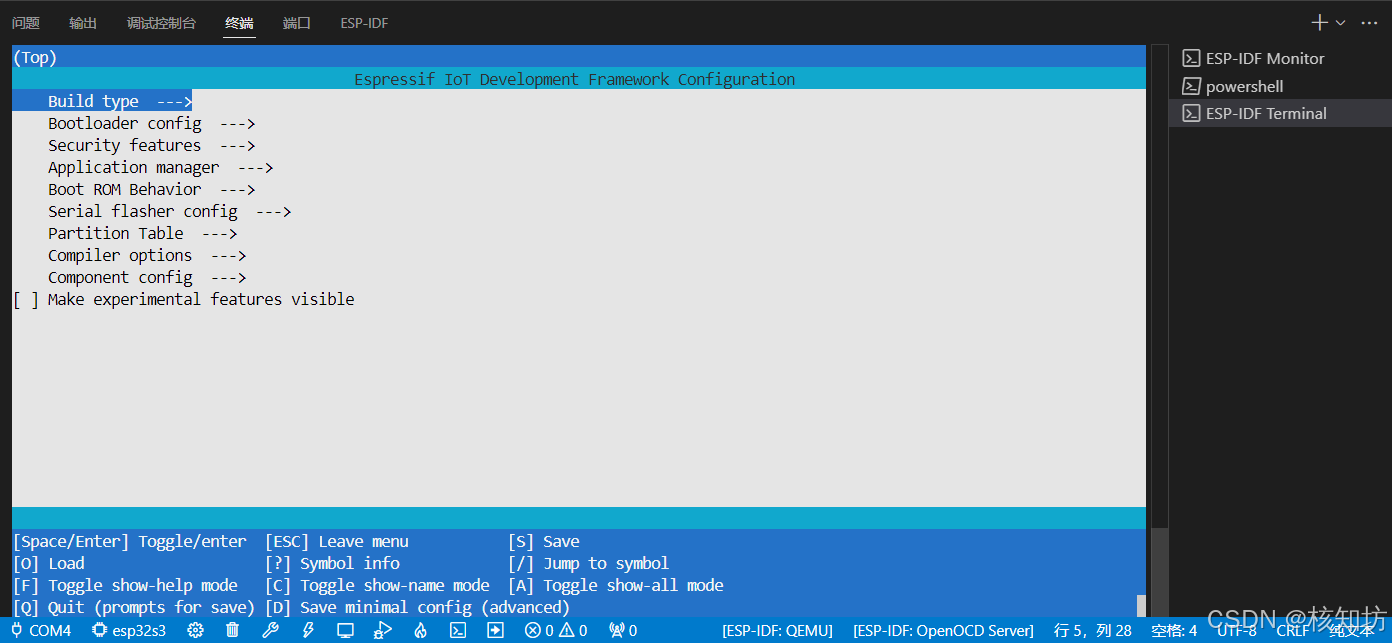
快捷键(英文键盘):
-
H 或 ESC 返回上一级
-
J 下一个
-
K 上一个
-
L 或 Enter 进入选项
-
Q 保存退出(Y/N)
-
Space 开启(星号*)/关闭 (无)
2.1 配置SPRAM(外部静态随机存储器)
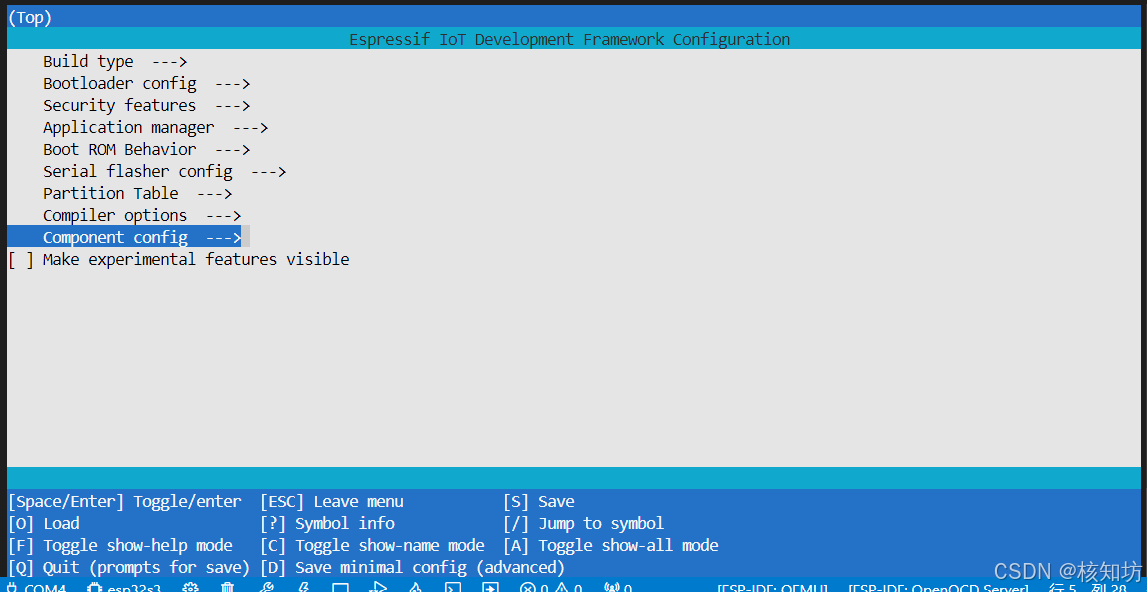
选择Component config 选项回车进入:
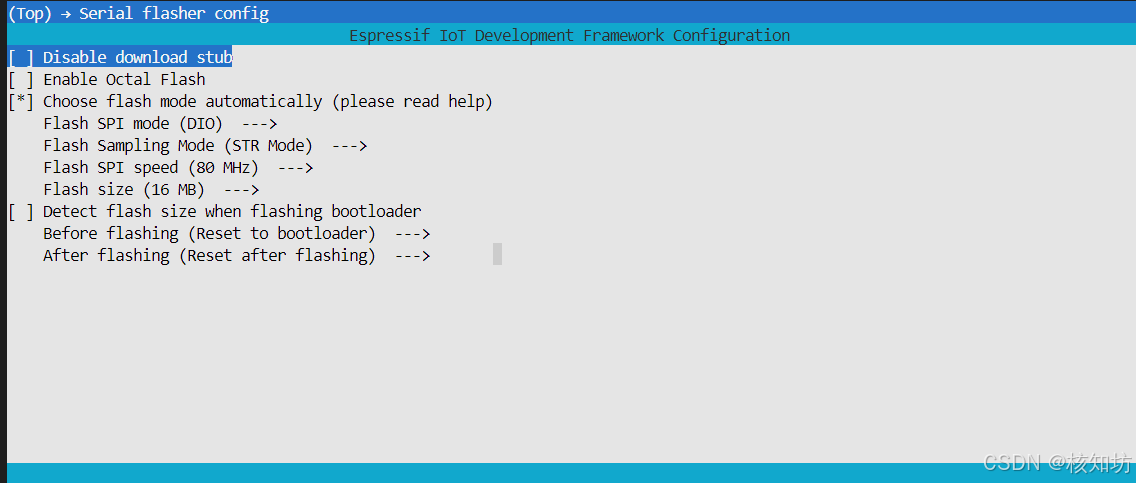
根据要求配置Serial Flasher config(可选):
返回往下找到 ESP-PSRAM 选项回车进入: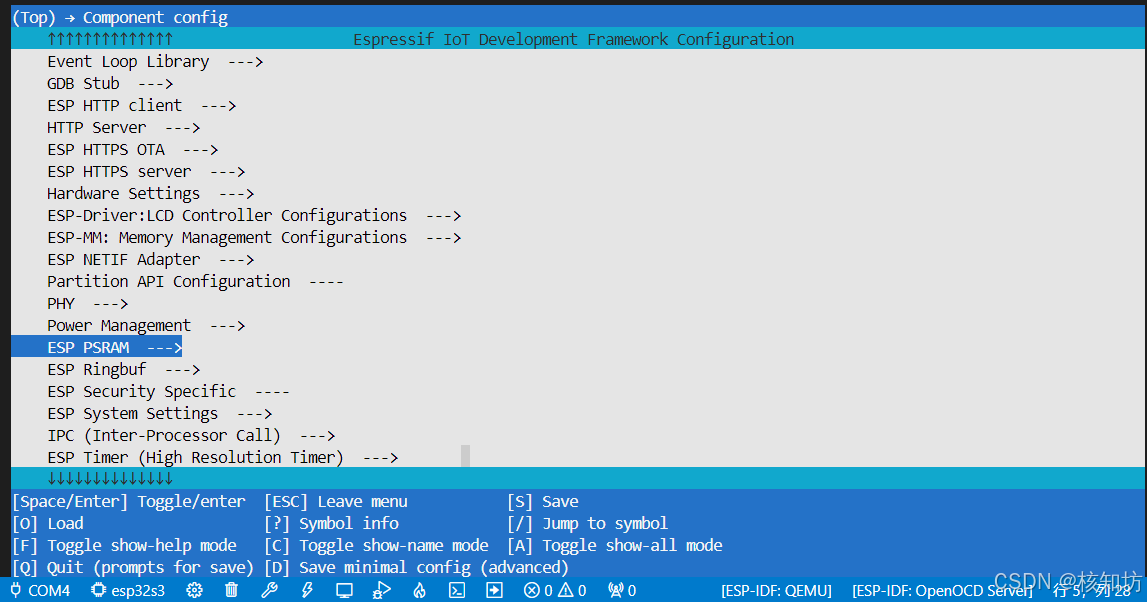
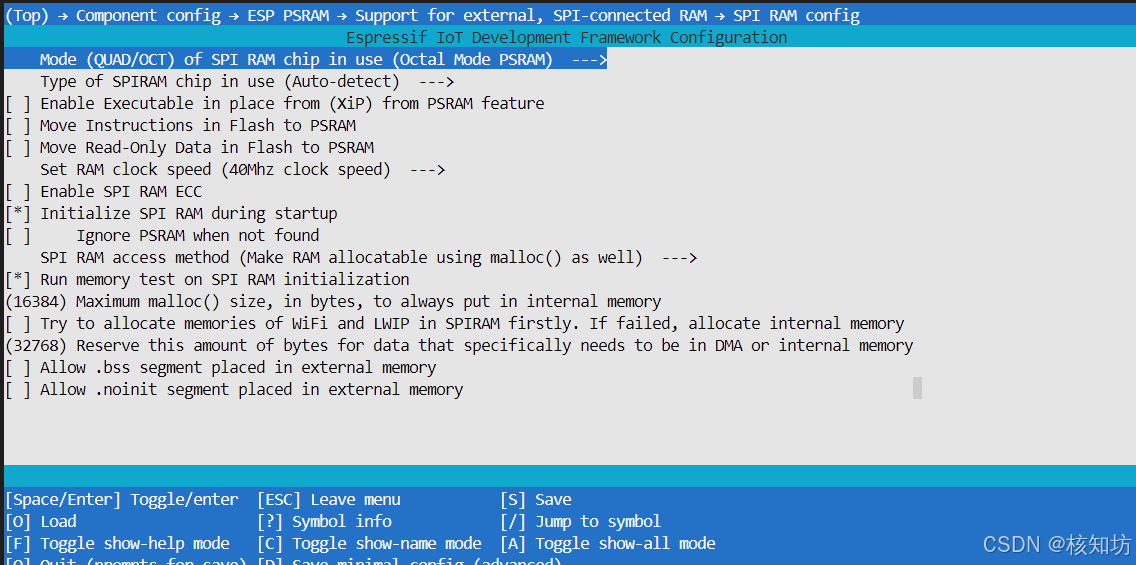
空格开启第一项:

进入SPI RAM config 选项:
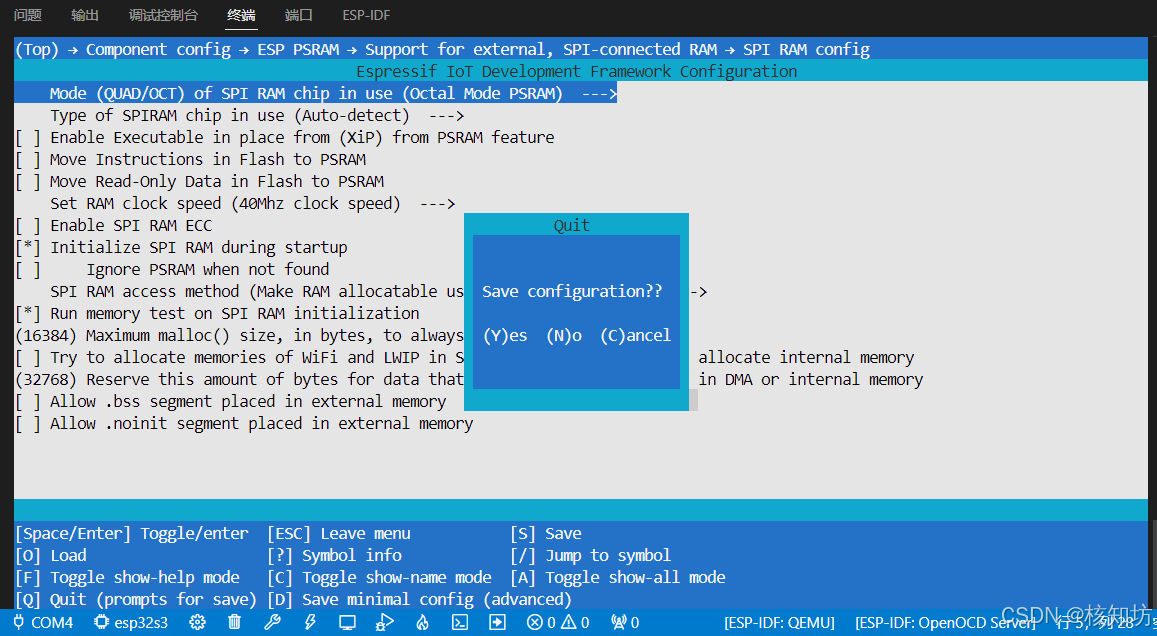
根据你的开发板选择合适的SPI 模式(QUAD/OCT),本文使用ESP32-S3 使用的OCT:
保存退出, 输入Y确认:
3.配置CmakeList.txt
根目录下的 CmakeList.txt 添加自定义的组件文件夹(建议把my_components放到ESP-IDF安装路径下,这样其他项目使用时直接引用,无需再复制):
# The following lines of boilerplate have to be in your project's# CMakeLists in this exact order for cmake to work correctlycmake_minimum_required(VERSION 3.16)set(EXTRA_COMPONENT_DIRS ${CMAKE_CURRENT_LIST_DIR}/my_components)include($ENV{IDF_PATH}/tools/cmake/project.cmake)project(hello_world)main文件夹下的 CmakeList.txt 主要配置 .c .h文件路径,引入esp32-camera依赖库:
idf_component_register(SRCS "hello_world_main.c"INCLUDE_DIRS "../my_components/esp32-camera/driver/include" "${IDF_PATH}/components/esp_driver_ledc/include""${IDF_PATH}/components/esp_driver_spi/include" "${IDF_PATH}/components/esp_driver_gpio/include" "${IDF_PATH}/components/esp_timer/include" "${IDF_PATH}/components/log/include" PRIV_REQUIRES spi_flash )
4.摄像头参数初始化
由于我使用的ESP32-S3-CAM (GOOUU版),摄像头引脚如下:
#define PWDN_GPIO_NUM -1#define RESET_GPIO_NUM -1#define XCLK_GPIO_NUM 15#define SIOD_GPIO_NUM 4#define SIOC_GPIO_NUM 5#define Y2_GPIO_NUM 11#define Y3_GPIO_NUM 9#define Y4_GPIO_NUM 8#define Y5_GPIO_NUM 10#define Y6_GPIO_NUM 12#define Y7_GPIO_NUM 18#define Y8_GPIO_NUM 17#define Y9_GPIO_NUM 16#define VSYNC_GPIO_NUM 6#define HREF_GPIO_NUM 7#define PCLK_GPIO_NUM 13配置结构体:
static camera_config_t camera_config;camera_config.ledc_channel = LEDC_CHANNEL_0;camera_config.ledc_timer = LEDC_TIMER_0;camera_config.pin_d0 = Y2_GPIO_NUM;camera_config.pin_d1 = Y3_GPIO_NUM;camera_config.pin_d2 = Y4_GPIO_NUM;camera_config.pin_d3 = Y5_GPIO_NUM;camera_config.pin_d4 = Y6_GPIO_NUM;camera_config.pin_d5 = Y7_GPIO_NUM;camera_config.pin_d6 = Y8_GPIO_NUM;camera_config.pin_d7 = Y9_GPIO_NUM;camera_config.pin_xclk = XCLK_GPIO_NUM;camera_config.pin_pclk = PCLK_GPIO_NUM;camera_config.pin_vsync = VSYNC_GPIO_NUM;camera_config.pin_href = HREF_GPIO_NUM;camera_config.pin_sccb_sda = SIOD_GPIO_NUM;camera_config.pin_sccb_scl = SIOC_GPIO_NUM;camera_config.pin_pwdn = PWDN_GPIO_NUM;camera_config.pin_reset = RESET_GPIO_NUM;camera_config.xclk_freq_hz = 10000000;camera_config.pixel_format = PIXFORMAT_JPEG;camera_config.frame_size = FRAMESIZE_VGA;camera_config.jpeg_quality = 10;camera_config.fb_count = 2;初始化摄像头:
// initialize the cameraesp_err_t err = esp_camera_init(&camera_config);if (err != ESP_OK){ESP_LOGE(TAG, "Camera Init Failed");return;}vTaskDelay(pdMS_TO_TICKS(20));创建数据帧,并使用esp_camera_fb_get获取, esp_camera_fb_return(fb),它的作用是 将已经获取并使用完的帧缓冲(frame buffer)归还给驱动程序进行复用,以节省内存和保证后续图像采集的正常进行。(注意:请不要在初始化后立即使用功能函数,请将功能函数放到while中或者任务中)
camera_fb_t *fb = NULL;while (1){printf("Hello world!\n");vTaskDelay(pdMS_TO_TICKS(500));fb = esp_camera_fb_get();if (!fb){ESP_LOGE(TAG, "Camera capture failed");continue;}esp_camera_fb_return(fb);ESP_LOGI(TAG, "fb->width=%d, fb->height=%d,fb->buf=%d, fb->len=%d",fb->width, fb->height,fb->buf[0], fb->len);}文章总结:
本文讲解了esp32-camera 的基础使用方法,并在 ESP32S3 开发板上使用 OV2640 进行了实际测试。
感谢阅览,如果你喜欢该内容的话,可以点赞,收藏,转发。由于 Koro 能力有限,有任何问题请在评论区内提出,Koro 看到后第一时间回复您!!!
其他精彩内容:
参考内容:
附录
//main.c
#include <stdio.h>
#include <inttypes.h>
#include "sdkconfig.h"
#include "freertos/FreeRTOS.h"
#include "freertos/task.h"
#include "esp_camera.h"
#include "esp_log.h"static const char *TAG = "MAIN";#define PWDN_GPIO_NUM -1
#define RESET_GPIO_NUM -1
#define XCLK_GPIO_NUM 15
#define SIOD_GPIO_NUM 4
#define SIOC_GPIO_NUM 5#define Y2_GPIO_NUM 11
#define Y3_GPIO_NUM 9
#define Y4_GPIO_NUM 8
#define Y5_GPIO_NUM 10
#define Y6_GPIO_NUM 12
#define Y7_GPIO_NUM 18
#define Y8_GPIO_NUM 17
#define Y9_GPIO_NUM 16#define VSYNC_GPIO_NUM 6
#define HREF_GPIO_NUM 7
#define PCLK_GPIO_NUM 13void app_main(void)
{// Device : ESP32-S3  OV2640  开启 SPIRAM  OctalSPI 模式 // idf.py menuconfig static camera_config_t camera_config;camera_config.ledc_channel = LEDC_CHANNEL_0;camera_config.ledc_timer = LEDC_TIMER_0;camera_config.pin_d0 = Y2_GPIO_NUM;camera_config.pin_d1 = Y3_GPIO_NUM;camera_config.pin_d2 = Y4_GPIO_NUM;camera_config.pin_d3 = Y5_GPIO_NUM;camera_config.pin_d4 = Y6_GPIO_NUM;camera_config.pin_d5 = Y7_GPIO_NUM;camera_config.pin_d6 = Y8_GPIO_NUM;camera_config.pin_d7 = Y9_GPIO_NUM;camera_config.pin_xclk = XCLK_GPIO_NUM;camera_config.pin_pclk = PCLK_GPIO_NUM;camera_config.pin_vsync = VSYNC_GPIO_NUM;camera_config.pin_href = HREF_GPIO_NUM;camera_config.pin_sccb_sda = SIOD_GPIO_NUM;camera_config.pin_sccb_scl = SIOC_GPIO_NUM;camera_config.pin_pwdn = PWDN_GPIO_NUM;camera_config.pin_reset = RESET_GPIO_NUM;camera_config.xclk_freq_hz = 10000000;camera_config.pixel_format = PIXFORMAT_JPEG;camera_config.frame_size = FRAMESIZE_VGA;camera_config.jpeg_quality = 10;camera_config.fb_count = 2;// initialize the cameraesp_err_t err = esp_camera_init(&camera_config);if (err != ESP_OK){ESP_LOGE(TAG, "Camera Init Failed");return;}vTaskDelay(pdMS_TO_TICKS(20));camera_fb_t *fb = NULL;while (1){printf("Hello world!\n");vTaskDelay(pdMS_TO_TICKS(500));fb = esp_camera_fb_get();if (!fb){ESP_LOGE(TAG, "Camera capture failed");continue;}esp_camera_fb_return(fb);ESP_LOGI(TAG, "fb->width=%d, fb->height=%d, fb->buf=%d, fb->len=%d", fb->width, fb->height, fb->buf[0], fb->len);}
}// PS D:\BLOG_PROBLEM\hello_world>  & 'd:\Espressif\tools\python_env\idf5.4_py3.11_env\Scripts\python.exe' 'd:\Espressif\frameworks\esp-idf-v5.4\tools\idf_monitor.py' -p COM4 -b 115200 --toolchain-prefix xtensa-esp32s3-elf- --target esp32s3 'd:\BLOG_PROBLEM\hello_world\build\hello_world.elf'
// OG_PROBLEM\x5chello_world\x5cbuild\x5chello_world.elf';778f9491-c7c8-430c-9138-43b4a91929c2--- Warning: GDB cannot open serial ports accessed as COMx
// --- Using \\.\COM4 instead...
// --- esp-idf-monitor 1.5.0 on \\.\COM4 115200
// --- Quit: Ctrl+] | Menu: Ctrl+T | Help: Ctrl+T followed by Ctrl+H
// ESP-ROM:esp32s3-20210327
// Build:Mar 27 2021
// rst:0x1 (POWERON),boot:0xa (SPI_FAST_FLASH_BOOT)
// SPIWP:0xee
// mode:DIO, clock div:1
// load:0x3fce2810,len:0x15a0
// load:0x403c8700,len:0x4
// load:0x403c8704,len:0xd20
// load:0x403cb700,len:0x2ee4
// entry 0x403c8928
// I (27) boot: ESP-IDF v5.4-dirty 2nd stage bootloader
// I (27) boot: compile time Apr 24 2025 23:05:09
// I (27) boot: Multicore bootloader
// I (27) boot: chip revision: v0.2
// I (30) boot: efuse block revision: v1.3
// I (34) boot.esp32s3: Boot SPI Speed : 80MHz
// I (38) boot.esp32s3: SPI Mode       : DIO
// I (41) boot.esp32s3: SPI Flash Size : 16MB
// I (45) boot: Enabling RNG early entropy source...
// I (50) boot: Partition Table:
// I (52) boot: ## Label            Usage          Type ST Offset   Length
// I (59) boot:  0 nvs              WiFi data        01 02 00009000 00006000
// I (65) boot:  1 phy_init         RF data          01 01 0000f000 00001000
// I (72) boot:  2 factory          factory app      00 00 00010000 00100000
// I (78) boot: End of partition table
// I (81) esp_image: segment 0: paddr=00010020 vaddr=3c030020 size=0eae8h ( 60136) map
// I (100) esp_image: segment 1: paddr=0001eb10 vaddr=3fc93600 size=01508h (  5384) load
// I (101) esp_image: segment 2: paddr=00020020 vaddr=42000020 size=27c9ch (162972) map
// I (133) esp_image: segment 3: paddr=00047cc4 vaddr=3fc94b08 size=02928h ( 10536) load
// I (135) esp_image: segment 4: paddr=0004a5f4 vaddr=40374000 size=0f534h ( 62772) load
// I (150) esp_image: segment 5: paddr=00059b30 vaddr=600fe100 size=0001ch (    28) load
// I (157) boot: Loaded app from partition at offset 0x10000
// I (157) boot: Disabling RNG early entropy source...
// I (168) octal_psram: vendor id    : 0x0d (AP)
// I (168) octal_psram: dev id       : 0x02 (generation 3)
// I (168) octal_psram: density      : 0x03 (64 Mbit)
// I (170) octal_psram: good-die     : 0x01 (Pass)
// I (174) octal_psram: Latency      : 0x01 (Fixed)
// I (179) octal_psram: VCC          : 0x01 (3V)
// I (183) octal_psram: SRF          : 0x01 (Fast Refresh)
// I (188) octal_psram: BurstType    : 0x01 (Hybrid Wrap)
// I (193) octal_psram: BurstLen     : 0x01 (32 Byte)
// I (197) octal_psram: Readlatency  : 0x02 (10 cycles@Fixed)
// I (202) octal_psram: DriveStrength: 0x00 (1/1)
// I (207) esp_psram: Found 8MB PSRAM device
// I (210) esp_psram: Speed: 40MHz
// I (213) cpu_start: Multicore app
// I (947) esp_psram: SPI SRAM memory test OK
// I (956) cpu_start: Pro cpu start user code
// I (956) cpu_start: cpu freq: 160000000 Hz
// I (956) app_init: Application information:
// I (956) app_init: Project name:     hello_world
// I (960) app_init: App version:      1
// I (964) app_init: Compile time:     Apr 24 2025 23:31:56
// I (969) app_init: ELF file SHA256:  61f6f5fe3...
// I (973) app_init: ESP-IDF:          v5.4-dirty
// I (977) efuse_init: Min chip rev:     v0.0
// I (981) efuse_init: Max chip rev:     v0.99
// I (985) efuse_init: Chip rev:         v0.2
// I (989) heap_init: Initializing. RAM available for dynamic allocation:
// I (995) heap_init: At 3FC985C0 len 00051150 (324 KiB): RAM
// I (1000) heap_init: At 3FCE9710 len 00005724 (21 KiB): RAM
// I (1006) heap_init: At 3FCF0000 len 00008000 (32 KiB): DRAM
// I (1011) heap_init: At 600FE11C len 00001ECC (7 KiB): RTCRAM
// I (1016) esp_psram: Adding pool of 8192K of PSRAM memory to heap allocator
// I (1024) spi_flash: detected chip: boya
// I (1026) spi_flash: flash io: dio
// I (1030) sleep_gpio: Configure to isolate all GPIO pins in sleep state
// I (1036) sleep_gpio: Enable automatic switching of GPIO sleep configuration
// I (1043) main_task: Started on CPU0
// I (1073) esp_psram: Reserving pool of 32K of internal memory for DMA/internal allocations
// I (1073) main_task: Calling app_main()
// I (1073) s3 ll_cam: DMA Channel=0
// I (1073) cam_hal: cam init ok
// I (1083) sccb-ng: pin_sda 4 pin_scl 5
// I (1083) sccb-ng: sccb_i2c_port=1
// I (1093) camera: Detected camera at address=0x30
// I (1093) camera: Detected OV2640 camera
// I (1093) camera: Camera PID=0x26 VER=0x42 MIDL=0x7f MIDH=0xa2
// I (1173) cam_hal: buffer_size: 16384, half_buffer_size: 1024, node_buffer_size: 1024, node_cnt: 16, total_cnt: 60
// I (1173) cam_hal: Allocating 61440 Byte frame buffer in PSRAM
// I (1183) cam_hal: Allocating 61440 Byte frame buffer in PSRAM
// I (1183) cam_hal: cam config ok
// I (1183) ov2640: Set PLL: clk_2x: 0, clk_div: 0, pclk_auto: 0, pclk_div: 8
// Hello world!
// I (1773) MAIN: fb->width=640, fb->height=480, fb->buf=255, fb->len=14231
// Hello world!
// I (2273) MAIN: fb->width=640, fb->height=480, fb->buf=255, fb->len=29794
// Hello world!
// I (2773) MAIN: fb->width=640, fb->height=480, fb->buf=255, fb->len=30281
// Hello world!
// I (3273) MAIN: fb->width=640, fb->height=480, fb->buf=255, fb->len=29282
// Hello world!
// I (3773) MAIN: fb->width=640, fb->height=480, fb->buf=255, fb->len=28217
// Hello world!
// I (4273) MAIN: fb->width=640, fb->height=480, fb->buf=255, fb->len=27177
// Hello world!
// I (4773) MAIN: fb->width=640, fb->height=480, fb->buf=255, fb->len=26266
// Hello world!
// I (5273) MAIN: fb->width=640, fb->height=480, fb->buf=255, fb->len=25270
// Hello world!
// I (5773) MAIN: fb->width=640, fb->height=480, fb->buf=255, fb->len=24113
// Hello world!
// I (6273) MAIN: fb->width=640, fb->height=480, fb->buf=255, fb->len=23053
// Hello world!
// I (6773) MAIN: fb->width=640, fb->height=480, fb->buf=255, fb->len=22014
// Hello world!
// I (7273) MAIN: fb->width=640, fb->height=480, fb->buf=255, fb->len=20770
// Hello world!
// I (7773) MAIN: fb->width=640, fb->height=480, fb->buf=255, fb->len=20222
// Hello world!
// I (8273) MAIN: fb->width=640, fb->height=480, fb->buf=255, fb->len=19994
// Hello world!
// --- Error: GetOverlappedResult failed (PermissionError(13, '鎷掔粷璁块棶銆?', None, 5))
// --- Waiting for the device to reconnect....................................