Ocelot的应用案例
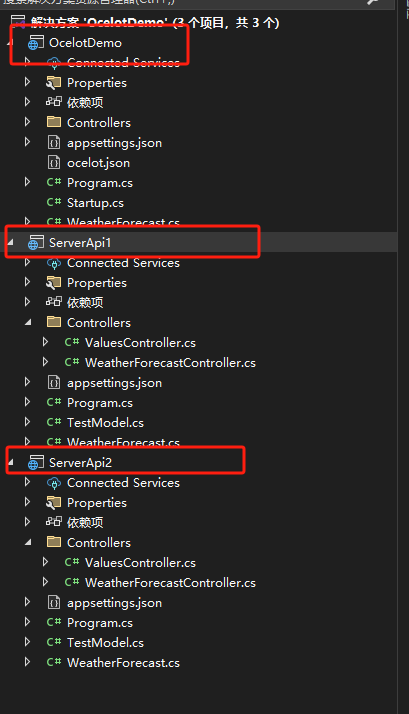
搭建3个项目,分别是OcelotDemo、ServerApi1和ServerApi2这3个项目。访问都是通过OcelotDemo进行轮训转发。
代码案例链接:https://download.csdn.net/download/ly1h1/90715035
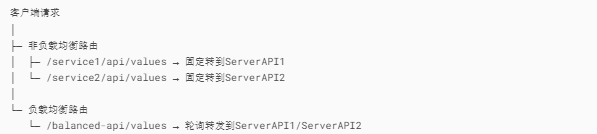
1.架构图
2.解决方案结构
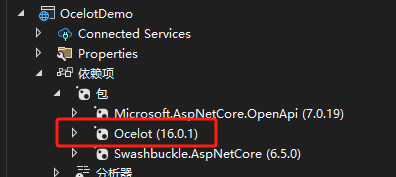
3.步骤一,添加Nuget包
4.步骤二,配置ocelot.json
{"Routes": [{"DownstreamPathTemplate": "/api/values/{action}","DownstreamScheme": "http","DownstreamHostAndPorts": [{"Host": "localhost","Port": 5000}, // ServerAPI1{"Host": "localhost","Port": 8016} // ServerAPI2],"UpstreamPathTemplate": "/balanced-api/values/{action}","UpstreamHttpMethod": [ "GET", "POST" ],"LoadBalancerOptions": {"Type": "RoundRobin" // 轮询策略}}],"GlobalConfiguration": {"BaseUrl": "http://localhost:8080"}
}
5.编写OcelotDemo的Program
using Ocelot.DependencyInjection;
using Ocelot.Middleware;var builder = WebApplication.CreateBuilder(args);
builder.Configuration.AddJsonFile("ocelot.json", optional: false, reloadOnChange: true);
builder.Services.AddOcelot(builder.Configuration);var app = builder.Build();
if (app.Environment.IsDevelopment())
{app.UseDeveloperExceptionPage();
}
await app.UseOcelot();
app.Run("http://localhost:8080");
5.步骤三,编写ServerApi1的接口
using Microsoft.AspNetCore.Mvc;
using ServerAPI1.Models;namespace ServerAPI1.Controllers
{[ApiController][Route("api/[controller]")][Produces("application/json")]public class ValuesController : ControllerBase{/// <summary>/// 获取服务基本信息/// </summary>[HttpGet("info")][ProducesResponseType(200)]public IActionResult GetInfo(){return Ok(new { Service = "ServerAPI1", Port = 5000 });}/// <summary>/// 计算服务 (A+B)/// </summary>/// <param name="model">输入参数</param>[HttpPost("calculate")][ProducesResponseType(200)][ProducesResponseType(400)]public IActionResult Calculate([FromBody] TestModel model){if (!ModelState.IsValid) return BadRequest(ModelState);return Ok(new { Result = 123 + 321, Input = model });}}
}---------------------------
using System.ComponentModel.DataAnnotations;namespace ServerAPI1.Models
{public class TestModel{[Required][StringLength(100)]public string AAA { get; set; }[StringLength(200)]public string BBB { get; set; }}
}
6.步骤四,编写ServerApi1的Program
var builder = WebApplication.CreateBuilder(args);// 添加Swagger
builder.Services.AddEndpointsApiExplorer();
builder.Services.AddSwaggerGen(c =>
{c.SwaggerDoc("v1", new() { Title = "ServerAPI1", Version = "v1" });
});builder.Services.AddControllers();
var app = builder.Build();// 配置Swagger
if (app.Environment.IsDevelopment())
{app.UseSwagger();app.UseSwaggerUI(c => c.SwaggerEndpoint("/swagger/v1/swagger.json", "ServerAPI1 v1"));
}app.UseRouting();
app.MapControllers();
app.Run("http://localhost:5000");
步骤五,编写Server2的接口
using Microsoft.AspNetCore.Mvc;
using ServerAPI2.Models;namespace ServerAPI2.Controllers
{[ApiController][Route("api/[controller]")][Produces("application/json")]public class ValuesController : ControllerBase{/// <summary>/// 获取服务元数据/// </summary>[HttpGet("info")][ProducesResponseType(200)]public IActionResult GetInfo(){return Ok(new { Service = "ServerAPI2", Port = 8016 });}/// <summary>/// 字符串转换服务/// </summary>/// <param name="model">输入参数</param>[HttpPost("calculate")][ProducesResponseType(200)][ProducesResponseType(400)]public IActionResult Transform([FromBody] TestModel model){if (!ModelState.IsValid) return BadRequest(ModelState);return Ok(new { Result = $"{model.AAA}-{model.BBB}".ToUpper() });}}
}
----------------------------
using System.ComponentModel.DataAnnotations;namespace ServerAPI2.Models
{public class TestModel{[Required][StringLength(100)]public string AAA { get; set; }[StringLength(200)]public string BBB { get; set; }}
}
7.步骤六,编写ServerAPI2的Program
var builder = WebApplication.CreateBuilder(args);// 添加Swagger
builder.Services.AddEndpointsApiExplorer();
builder.Services.AddSwaggerGen(c =>
{c.SwaggerDoc("v1", new() { Title = "ServerAPI2", Version = "v1" });
});builder.Services.AddControllers();
var app = builder.Build();// 配置Swagger
if (app.Environment.IsDevelopment())
{app.UseSwagger();app.UseSwaggerUI(c => c.SwaggerEndpoint("/swagger/v1/swagger.json", "ServerAPI2 v1"));
}app.UseRouting();
app.MapControllers();
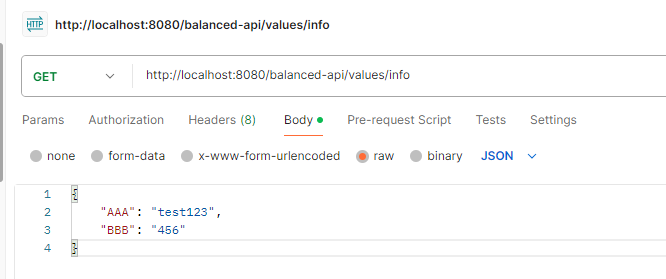
app.Run("http://localhost:8016");8.测试
采用PostMan直接访问http://localhost:8080/balanced-api/values/info
可实现Server1和Server2的轮询调用。
9.如果需要网关地址和服务是一对一
{"Routes": [{"DownstreamPathTemplate": "/api/values/{action}","DownstreamScheme": "http","DownstreamHostAndPorts": [{"Host": "localhost","Port": 5000}],"UpstreamPathTemplate": "/service1/api/values/{action}","UpstreamHttpMethod": [ "GET", "POST" ]},{"DownstreamPathTemplate": "/api/values/{action}","DownstreamScheme": "http","DownstreamHostAndPorts": [{"Host": "localhost","Port": 8016}],"UpstreamPathTemplate": "/service2/api/values/{action}","UpstreamHttpMethod": [ "GET", "POST" ]}],"GlobalConfiguration": {"BaseUrl": "http://localhost:8080"}
}