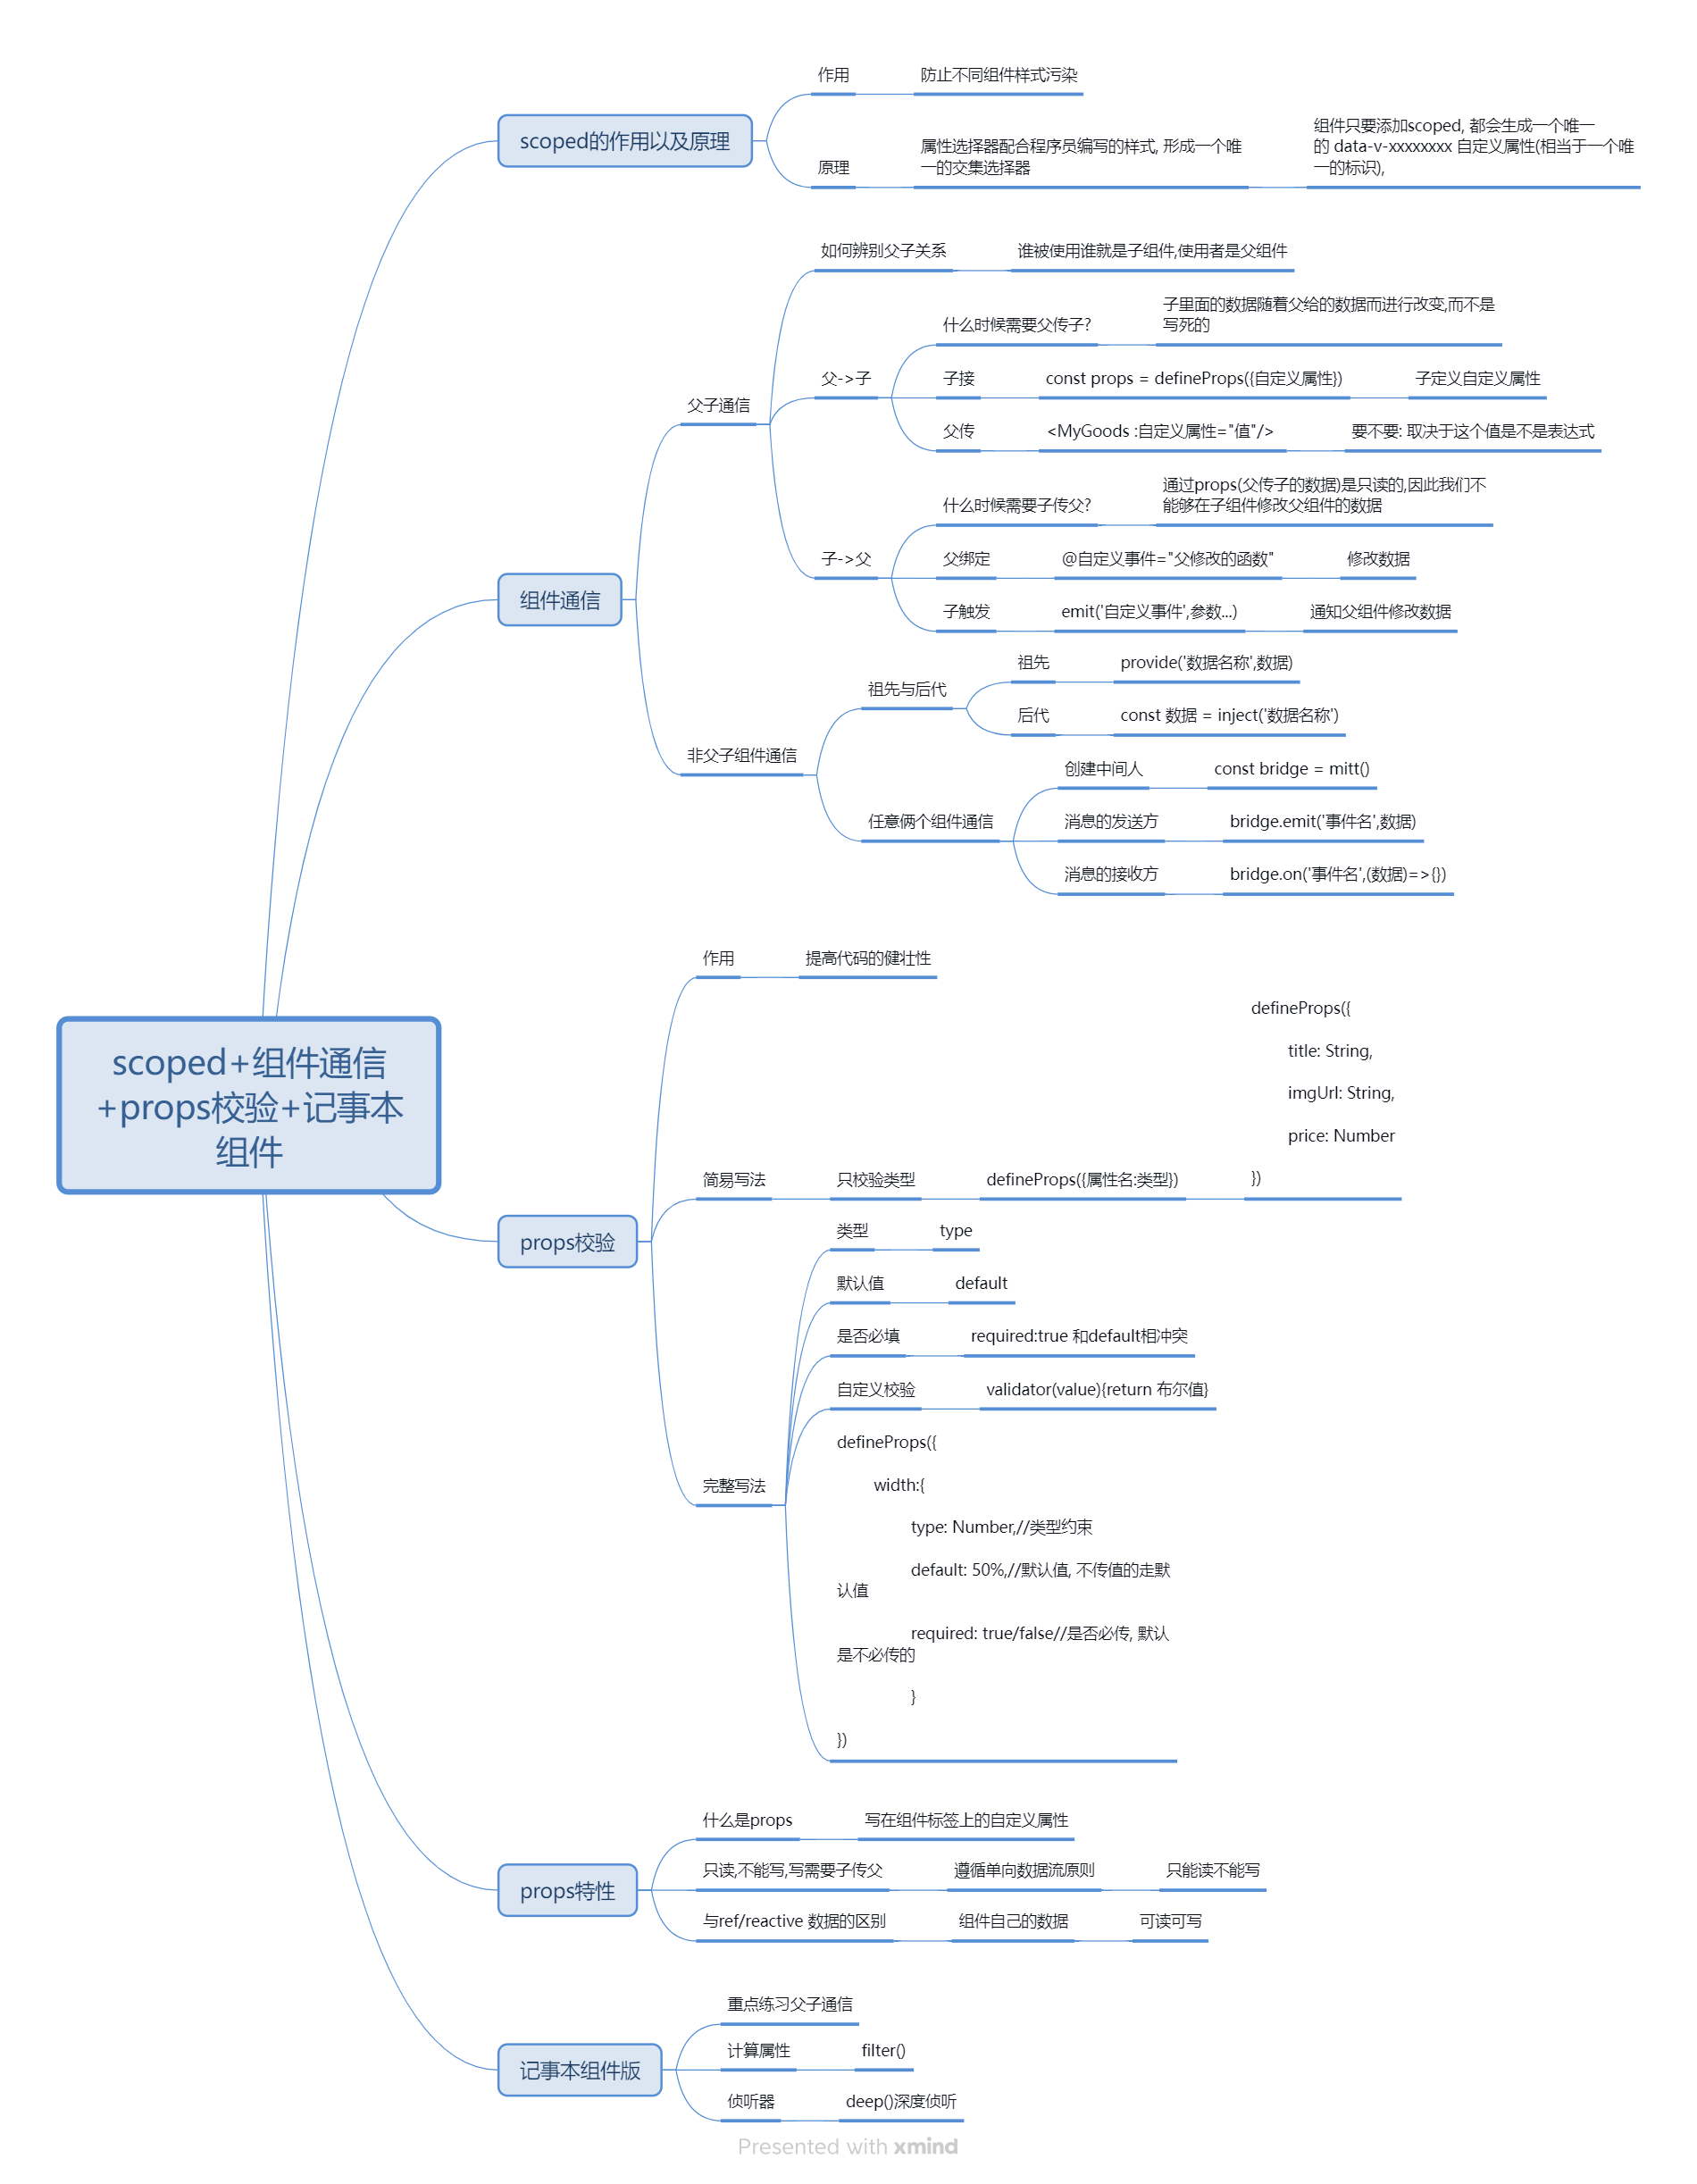
scoped+组件通信+props校验+记事本组件
一、scoped作用及原理
1. scoped 的作用
1> 默认写在任意一个 .vue 文件中 写在 style 中的样式是全局样式, 这样的话, 不仅会影响当前组件, 也会影响其他组件
2> 全局样式: 会影响每个 vue 文件, 存在样式污染/冲突问题 style 不添加 scoped, 默认就是全局.
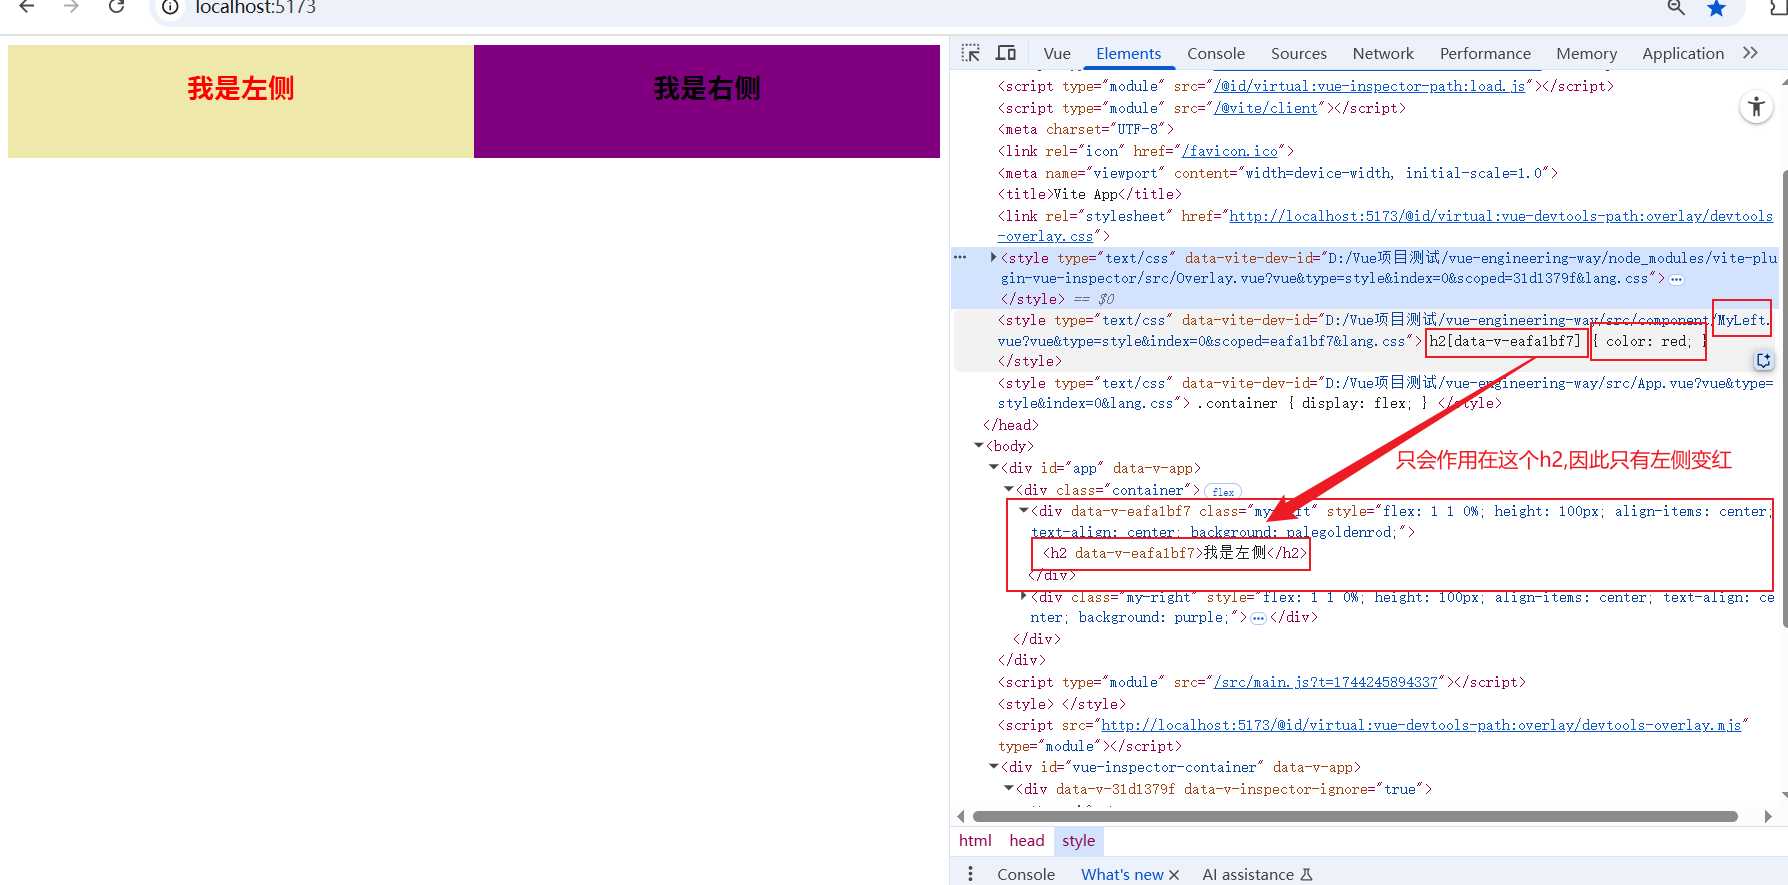
局部样式: 只会针对当前组件中的标签失效, 不会影响其他组件的标签, 如果想让样式变成局部样式, 那么需要给style加上 scoped 属性(全局->局部)
比如下面的案例, 我把scope去除后, 需求是只让左边字体变红, 但是发现左边对h2标签的操作污染了右侧, 说明对左侧的h2是全局样式
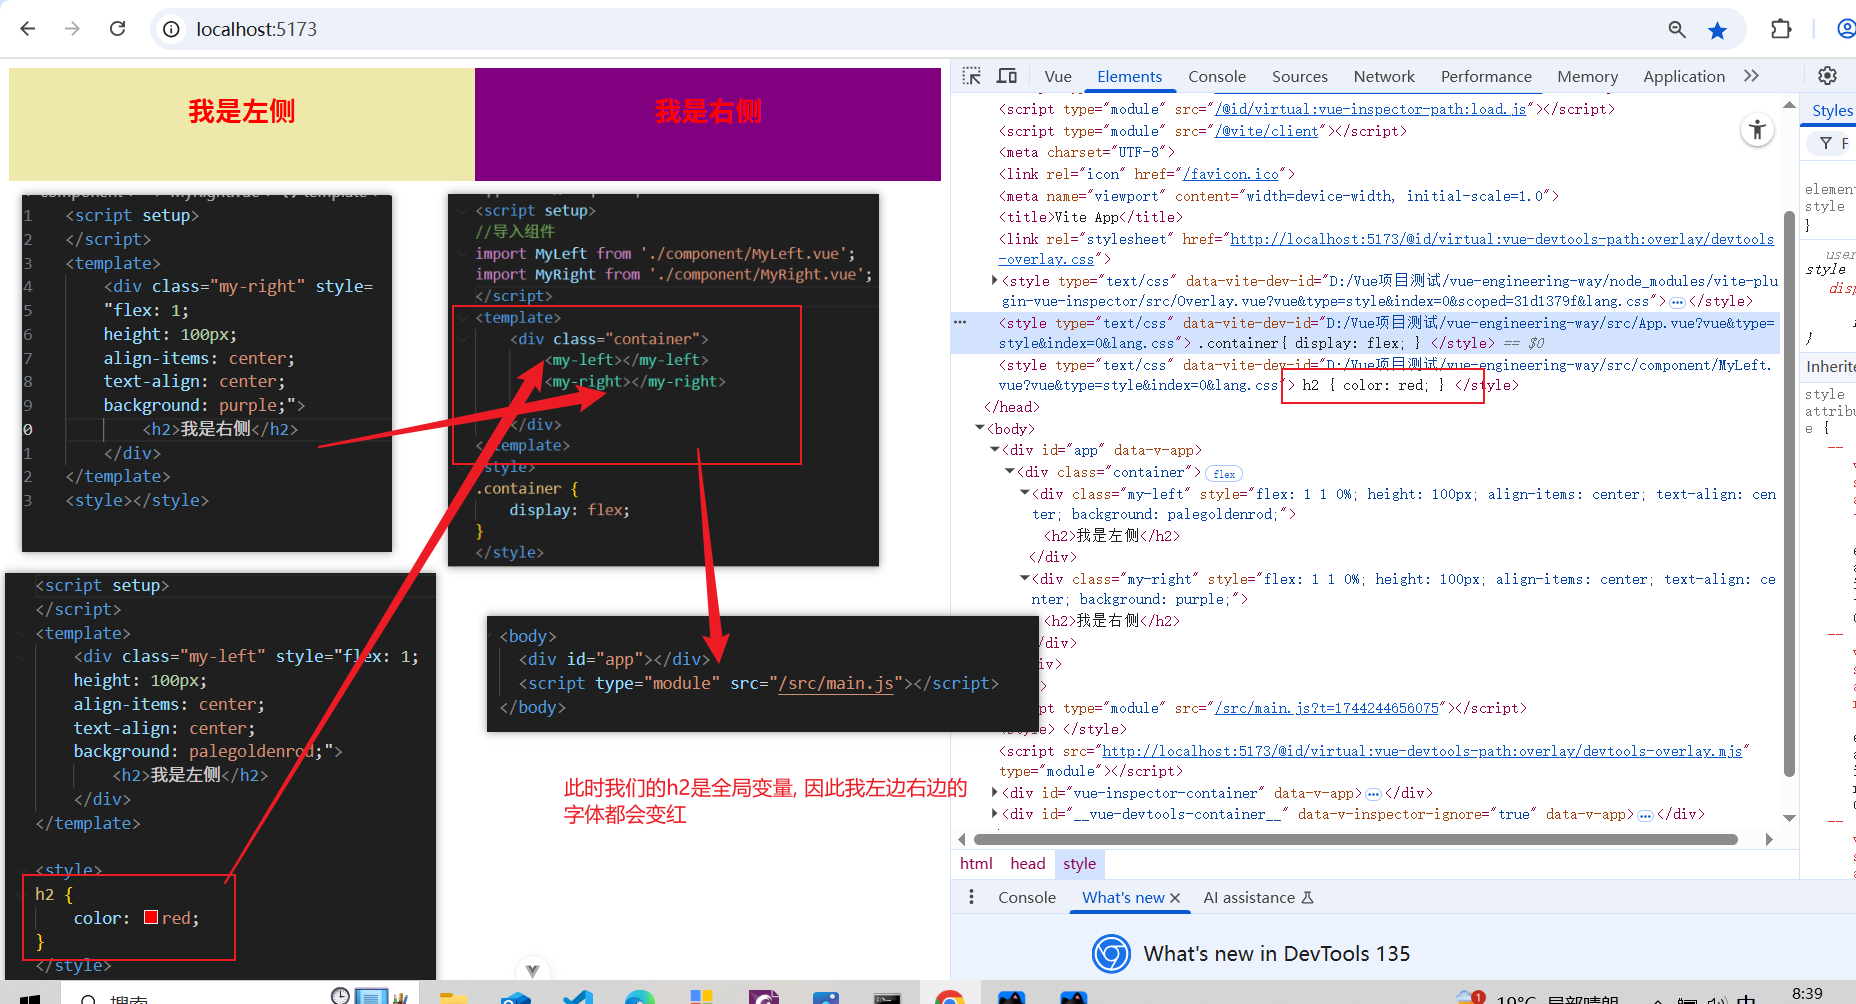
加上scoped, 发现针对的真实左侧字体进行修改, 并且样式变成了局部样式
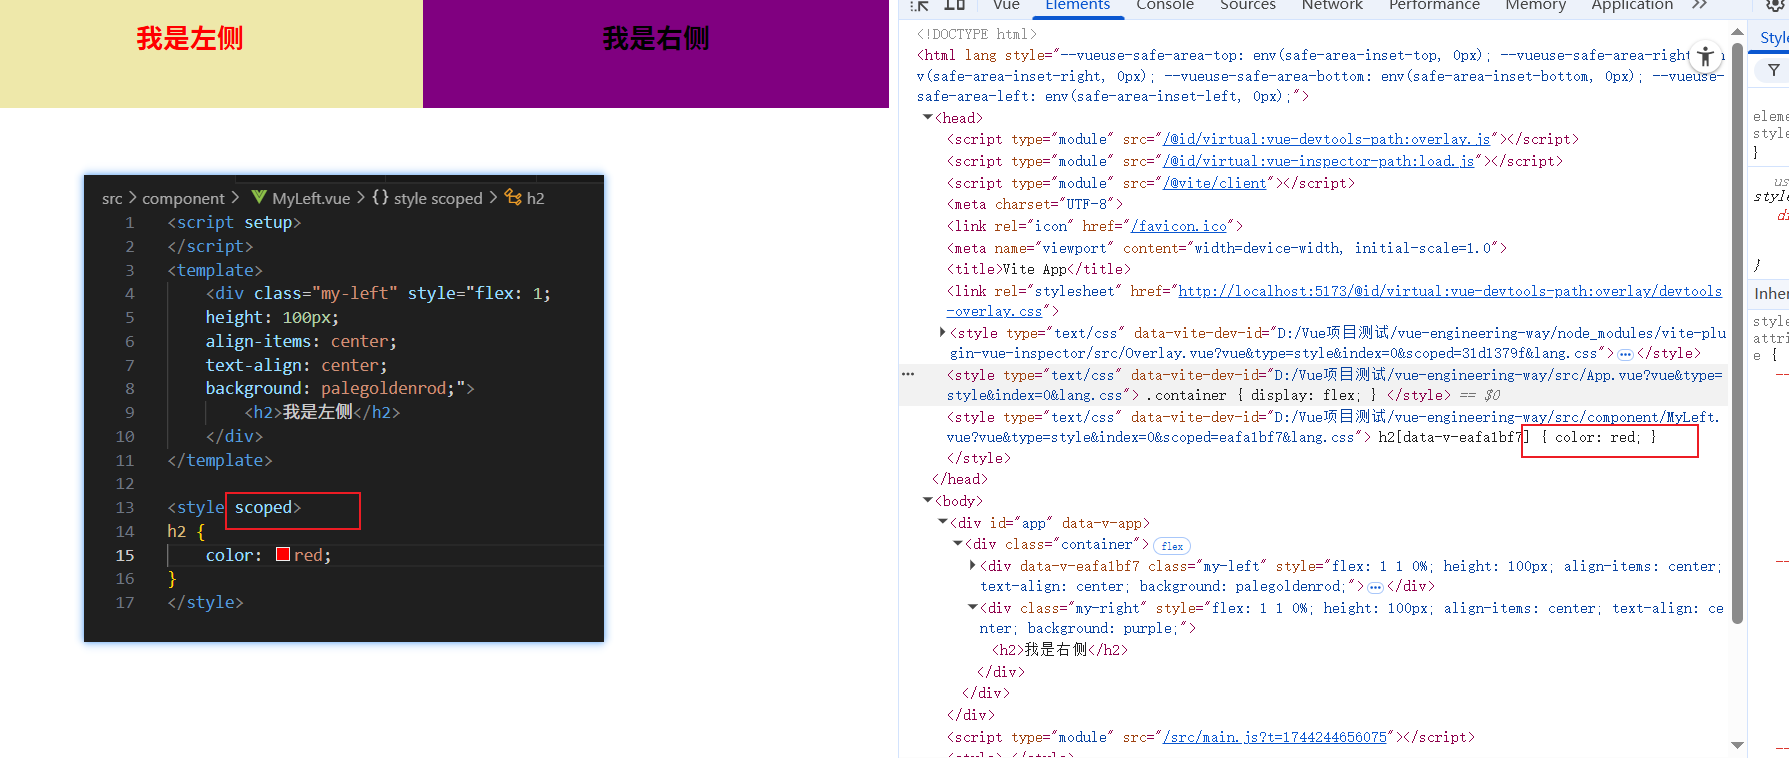
3> 作用: 防止不同组件(vue文件) 样式污染/冲突. 推荐给每个vue都加上scoped
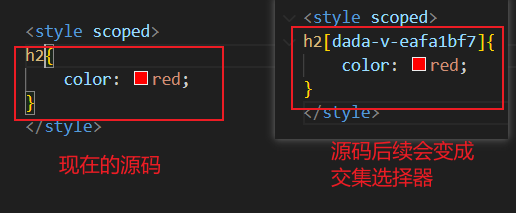
2. scoped 的原理
当给组件的style添加了scoped属性之后, 组件会发生如下变化
1> scoped 会给当前组件内的所有标签添加一个自定义属性, 名为 data-v-xxxxxxxx(8位随机字符串)
2> scoped 会用这个属性选择器(上面的data-v-xxxxxxxx)配合我们编写的选择器会形成一个交集选择器 比如刚刚的h2.[class]{}
注意: 每个组件只要添加scoped, 都会生成一个唯一的 data-v-xxxxxxxx 自定义属性(相当于一个唯一的标识), 换句话说, 每个组件生成的这个属性名都不同, 因此形成的交集选择器只能选中当前组件内的标签, 所以就保证了样式不会污染的问题.
源码后续会形成一个交集选择器
二、父子组件通信
1. 组件通信的介绍
1> 什么是组件通信: 一个组件把数据传递给另一个组件
2> 为什么需要组件通信: 以前把代码写在一起, 数据可以直接使用; 而由于今后开发vue3的项目是借助了组件化开发的思想, 不会把代码写在同一个文件中, 而是拆分成一系列的组件, 进而通过组件的组装, 拼装成完整的页面, 还要实现和以前一样的功能, 这里难免需要进行组件间的数据传递, 那么就需要组件通信了.(简而言之就是各个组件保持独立的同时保持通信)
- 每个组件时一个独立的模块, 这个组件的数据别的组件无法使用
- 别的组件需要用到当前组件的数据, 那么就需要组件通信了
3> 如何进行组件通信: 需要辨别俩个组件的关系, 进而选择不同的通信方案
- 父子组件通信: (重点)
父传子: props 自定义属性
子传父: emit 自定义事件
- 非父子组件通信:
祖先和后代: provide() + inject()
兄弟组件: eventBuss(事件总线)
跨组建通信方案: Pinia(状态管理)
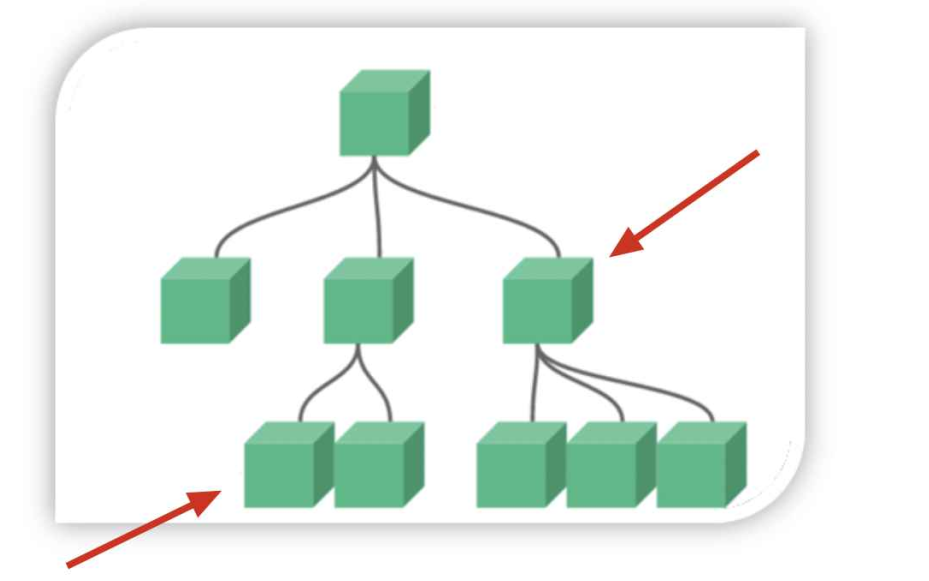
4> 如何辨别俩个组件的关系
- 父子关系: 谁被使用, 谁就是子组件, 当前调用其他组件的组件就是父组件
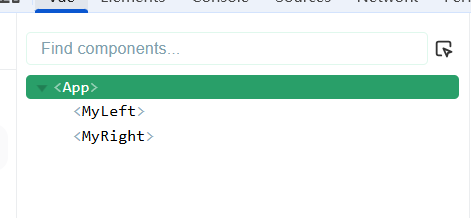
- 兄弟关系: 俩个组件时平级关系
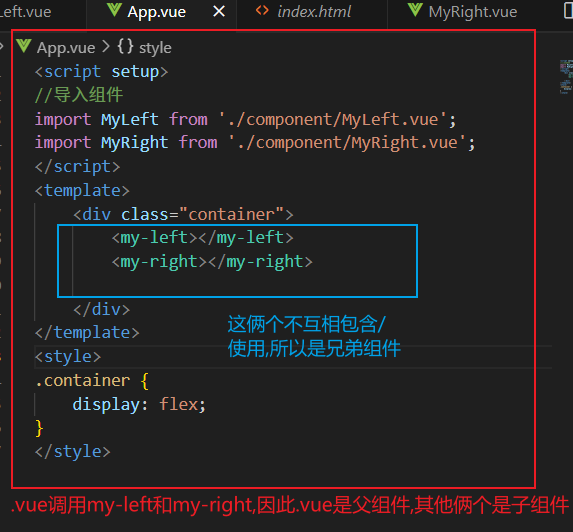
或者我们看vue调试工具
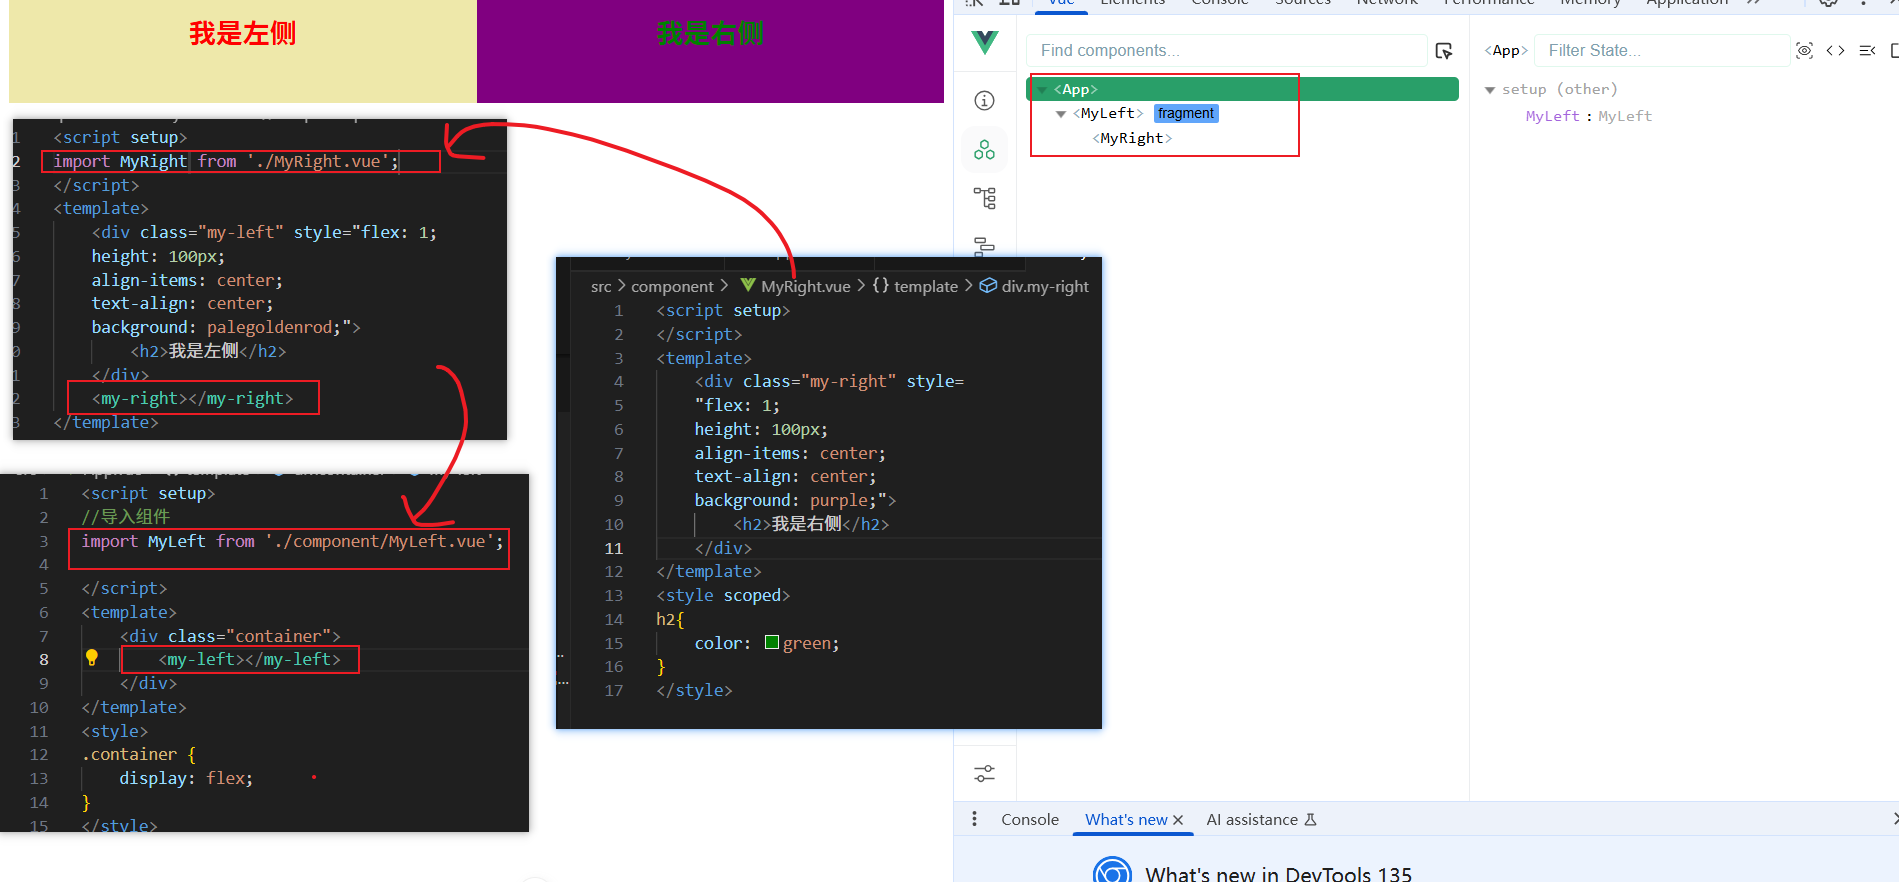
- 爷孙关系: 存在父调用子,子调用孙的调用关系
下面MyRight和App就是爷孙关系,通过父亲MyLeft联系
具体代码:
App.vue
<script setup>
//导入组件
import MyLeft from './component/MyLeft.vue';</script>
<template><div class="container"><my-left></my-left></div>
</template>
<style>
.container {display: flex;
}
</style>
MyLeft.vue
<script setup>
import MyRight from './MyRight.vue';
</script>
<template> <div class="my-left" style="flex: 1;height: 100px;align-items: center;text-align: center;background: palegoldenrod;"><h2>我是左侧</h2></div><my-right></my-right>
</template><style scoped>
h2{color: red;
}
</style>
MyRight.vue
<script setup>
</script>
<template><div class="my-right" style="flex: 1;height: 100px;align-items: center;text-align: center;background: purple;"><h2>我是右侧</h2></div>
</template>
<style scoped>
h2{color: green;
}
</style>
2. 父传子
概念:
父组件通过 props 把数据传递给子组件
什么时候需要父传子?
当子组件的数据不确定的时候(不是静态的, 子组件需要根据父组件的需求而变化)
步骤:
1> 子组件通过 defineProps() 接收自己需要的数据,进而使用数据(子接)
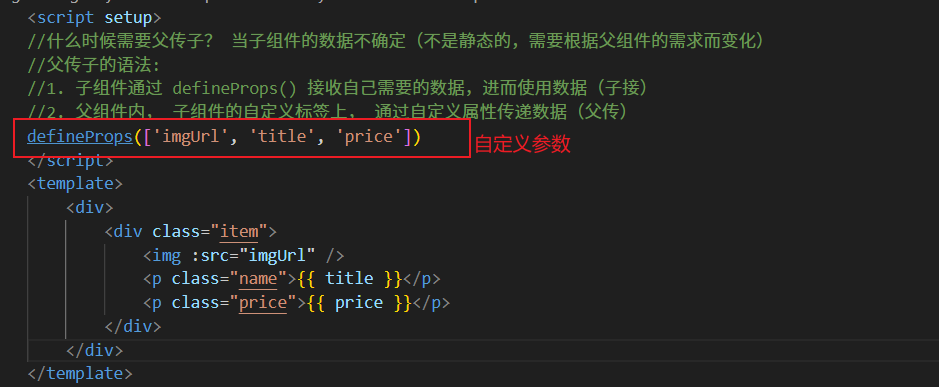
2> 父组件内,子组件的自定义标签上,通过自定义属性传递数据(父传)
整体流程
其实就相当于函数的调用, 我定义一个函数,然后定义几个形参, 我调用方再通过调用函数, 把实参传给函数, 然后函数处理完数据后把返回值再返回给调用方.
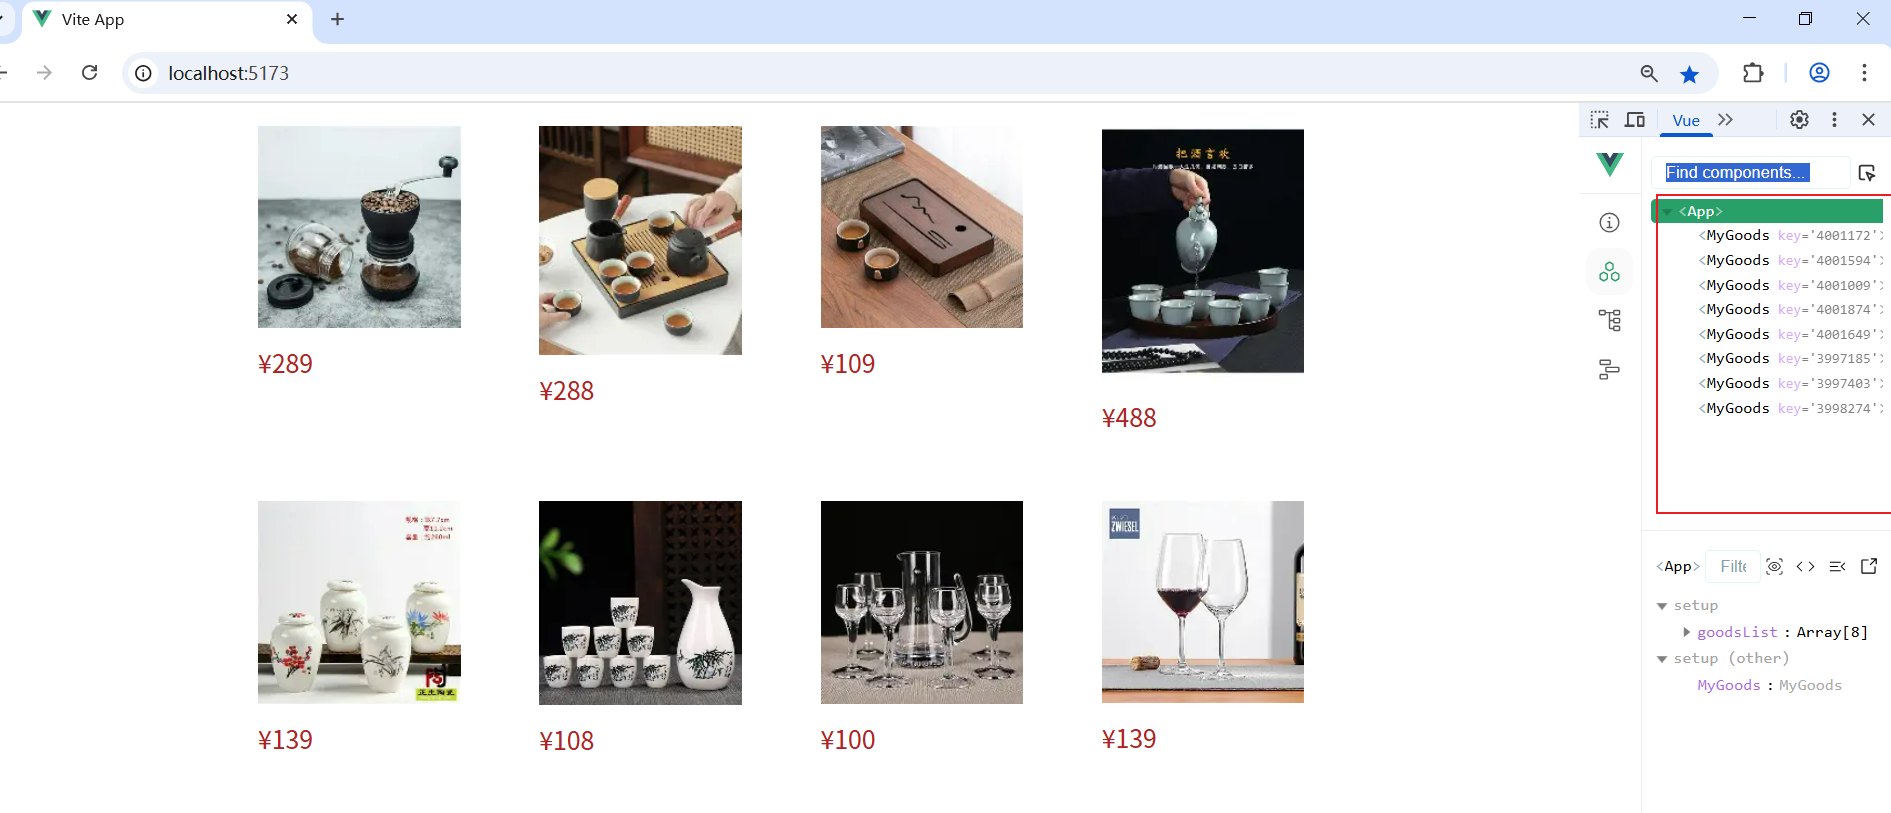
3. 配合循环独立传值
v-for遍历组件, 每次循环独⽴传值
我们把刚刚的goods对象写成一个数组, 然后使用v-for遍历数组,给我们的子组件进行传参,形成多个不同的商品
父组件: App.vue
<script setup>
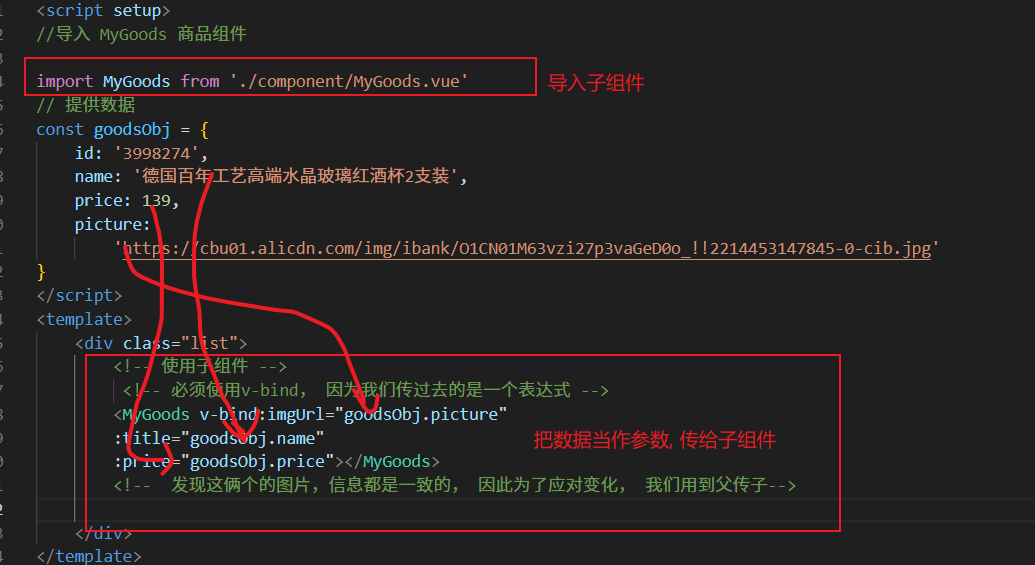
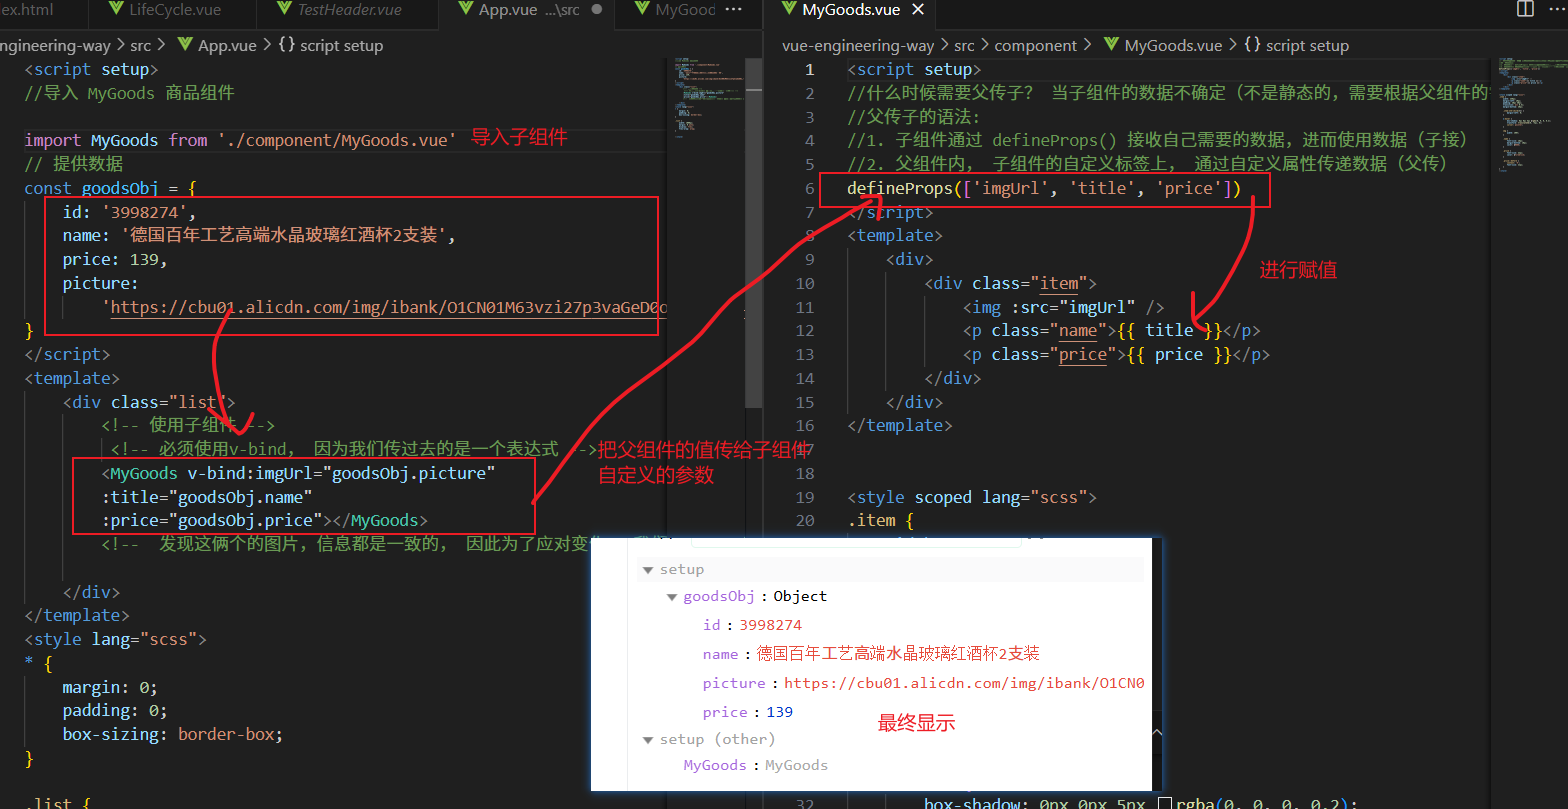
//导入 MyGoods 商品组件import MyGoods from './component/MyGoods.vue'
// 提供数据
const goodsList = [{id: '4001172',name: '称⼼如意⼿摇咖啡磨⾖机咖啡⾖研磨机',price: 289,picture:'https://tse3-mm.cn.bing.net/th/id/OIP-C.JCD2kzvzP00dSraFX_NKeAHaHa?w=183&h=183&c=7&r=0&o=7&cb=iwp&pid=1.7&rm=3'},{id: '4001594',name: '⽇式⿊陶功夫茶组双侧把茶具礼盒装',price: 288,picture:'https://tse1-mm.cn.bing.net/th/id/OIP-C.AOCBulpuOkzlWClLPhab9AHaHa?w=159&h=180&c=7&r=0&o=7&cb=iwp&pid=1.7&rm=3'},{id: '4001009',name: '⽵制⼲泡茶盘正⽅形沥⽔茶台品茶盘',price: 109,picture:'https://tse3-mm.cn.bing.net/th/id/OIP-C.zx0eDuySFaVwiLnAPTpupgHaHa?w=203&h=203&c=7&r=0&o=7&cb=iwp&pid=1.7&rm=3'},{id: '4001874',name: '古法温酒汝瓷酒具套装⽩酒杯莲花温酒器',price: 488,picture:'https://tse2-mm.cn.bing.net/th/id/OIP-C.uU32xt4IIVtCI2wRuicBpQHaJV?w=174&h=220&c=7&r=0&o=7&cb=iwp&pid=1.7&rm=3'},{id: '4001649',name: '⼤师监制⻰泉⻘瓷茶叶罐',price: 139,picture:'https://tse4-mm.cn.bing.net/th/id/OIP-C.0y2MhpQW_M7fwL523BqbsQHaHa?w=183&h=183&c=7&r=0&o=7&cb=iwp&pid=1.7&rm=3'},{id: '3997185',name: '与众不同的⼝感汝瓷⽩酒杯套组1壶4杯',price: 108,picture:'https://tse4-mm.cn.bing.net/th/id/OIP-C.NriTJYmUBrVPy9zYHaXa1AHaHa?w=187&h=188&c=7&r=0&o=7&cb=iwp&pid=1.7&rm=3'},{id: '3997403',name: '⼿⼯吹制更厚实⽩酒杯壶套装6壶6杯',price: 100,picture:'https://tse1-mm.cn.bing.net/th/id/OIP-C.wvt53HLH75XUYw2ggvUY5QAAAA?w=187&h=187&c=7&r=0&o=7&cb=iwp&pid=1.7&rm=3'},{id: '3998274',name: '德国百年⼯艺⾼端⽔晶玻璃红酒杯2⽀装',price: 139,picture: 'https://tse1-mm.cn.bing.net/th/id/OIP-C.pEhn4i9VACd2AacXzozESQHaHY?w=188&h=187&c=7&r=0&o=7&cb=iwp&pid=1.7&rm=3'}
]
</script>
<template><div class="list"><!-- 生成多个MyGoods 此时我们使用v-for 需要注意的是组件接收了数据,要给组件传值--><MyGoodsv-for="item in goodsList":key="item.id":imgUrl = "item.picture":title="item.title":price="item.price"></MyGoods></div>
</template>
<style lang="scss">
* {margin: 0;padding: 0;box-sizing: border-box;
}.list {width: 1000px;margin: 0 auto;display: flex;flex-wrap: wrap;
}
</style>子组件 MyGoods.vue
<script setup>
//什么时候需要父传子? 当子组件的数据不确定(不是静态的,需要根据父组件的需求而变化)
//父传子的语法:
//1. 子组件通过 defineProps() 接收自己需要的数据,进而使用数据(子接)
//2. 父组件内, 子组件的自定义标签上, 通过自定义属性传递数据(父传)
defineProps(['imgUrl', 'title', 'price'])
</script>
<template><div><div class="item"><img :src="imgUrl" /><p class="name">{{ title }}</p><p class="price">{{ price }}</p></div></div>
</template><style scoped lang="scss">
.item {width: 240px;margin-left: 10px;padding: 20px 30px;transition: all 0.5s;margin-bottom: 20px;.item:nth-child(4n) {margin-left: 0;}&:hover {box-shadow: 0px 0px 5px rgba(0, 0, 0, 0.2);transform: translate3d(0, -4px, 0);cursor: pointer;}img {width: 100%;}.name {font-size: 18px;margin-bottom: 10px;color: #666;}.price {font-size: 22px;color: firebrick;}.price::before {content: '¥';font-size: 22px;}
}
</style>
运行结果
总结父传子
1. 作用: 解决组件数据不确定问题, 也就是说, 今后封装子组件的时候, 如果数据不能写死, 就需要用到父传子
2. 语法和步骤
1> 子接
2> 父传
3. 组件可以配合 v-for 等指令使用, 注意给组件独立传值
4. 组件的好处: 各自独立, 便于复用
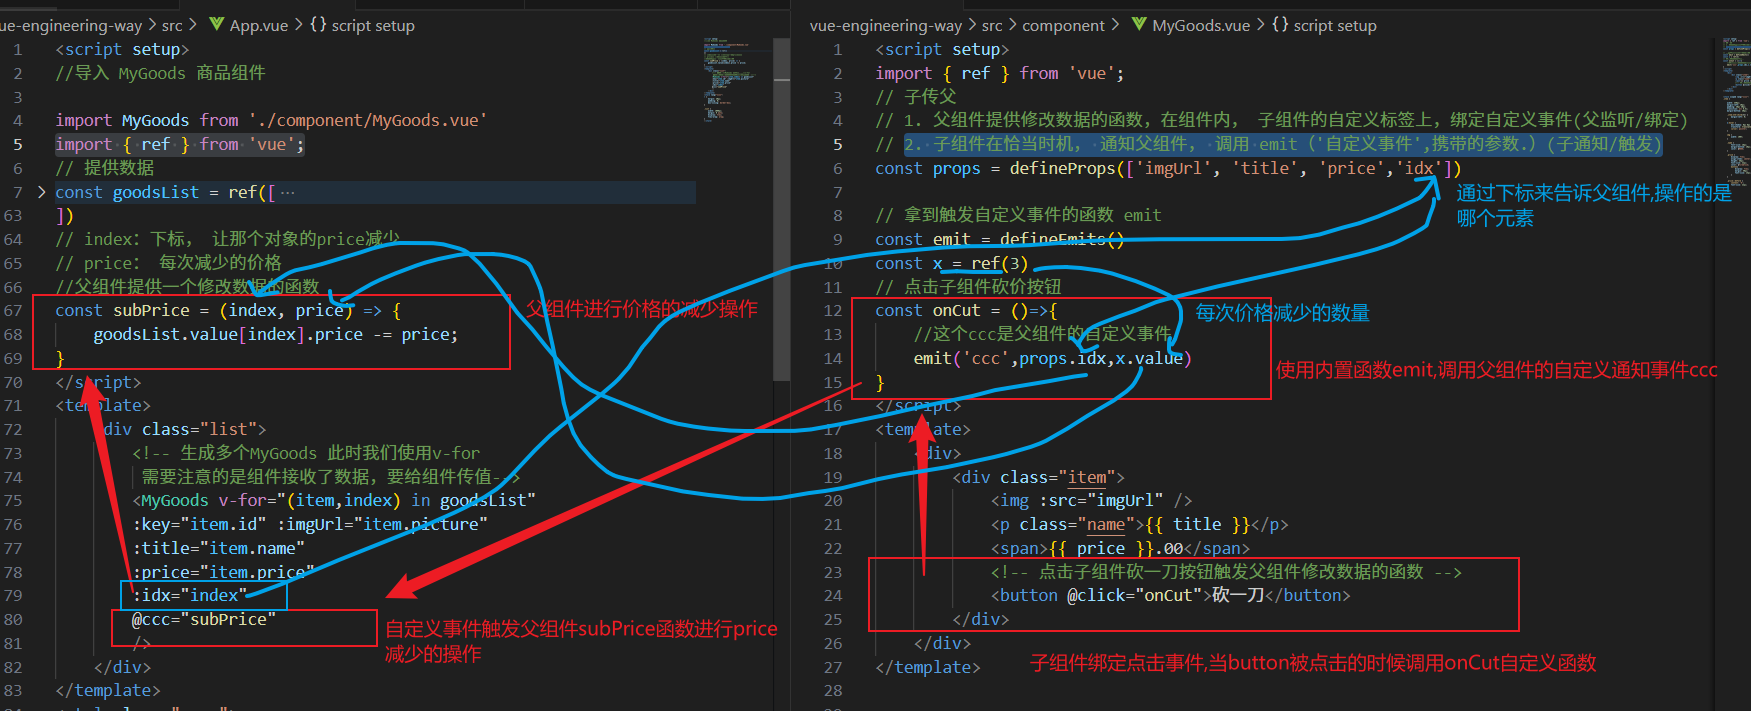
4. 子传父
为什么需要子传父?
我们通过一个需求来引入
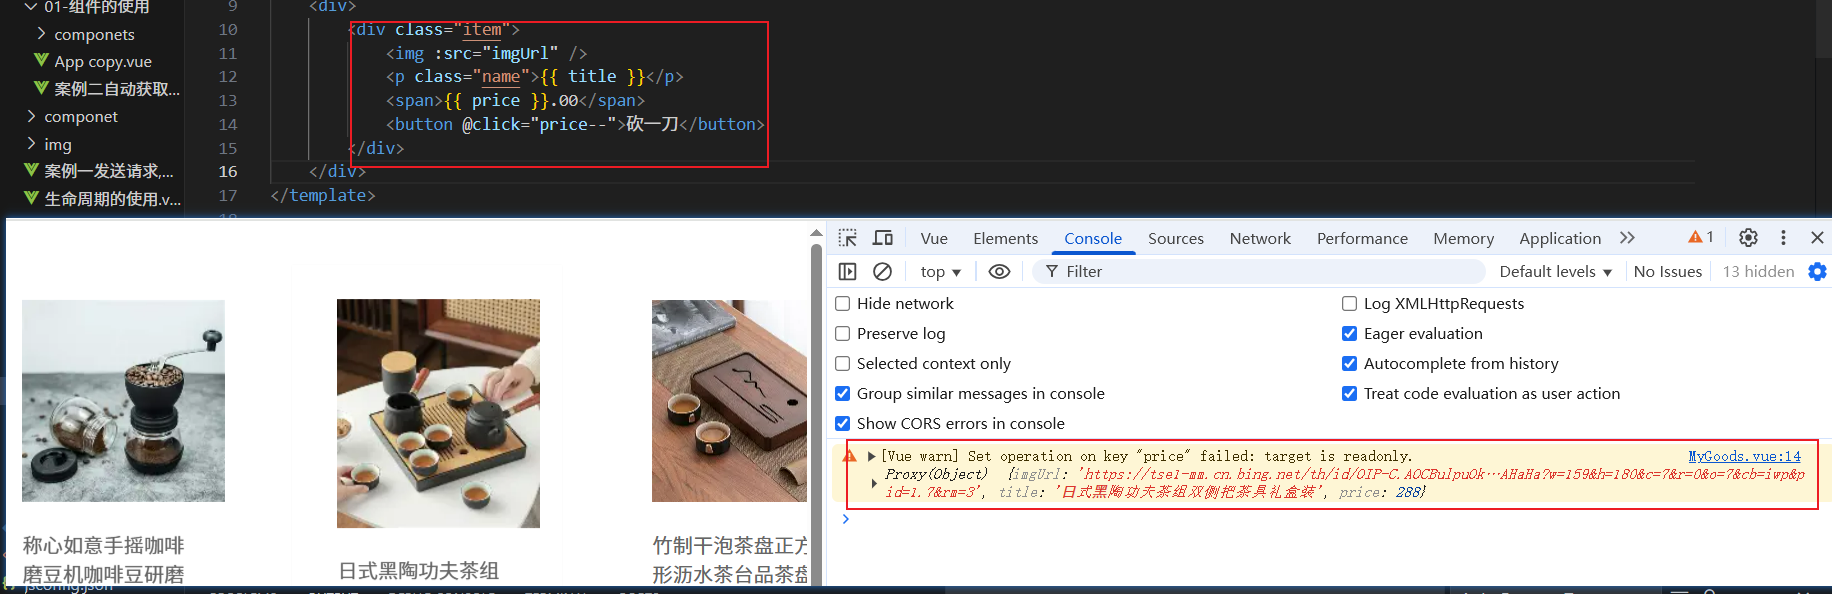
1. 需求: 在刚刚的商品列表里面,每个商品增加一个砍价功能, 点击一下就能够让价格降低
2. 问题: 对props 会报警告, 效果出不来.
原因: props(父传子的数据)是只读的,不能进行修改
3. 解决方案: 子传父, 它实际用来解决当子组件需要修改父组件数据的时候, 由于 父传子的 props 是只读的, 本质这个数据还是父组件的数据, 数据的操作权在父组件这里, 因此我们可以这样:
1> 父组件提供修改数据的方法
2> 子组件在恰当的时机, 通知父组件, 让父组件触发/调用父组件修改数据的 方法/函数
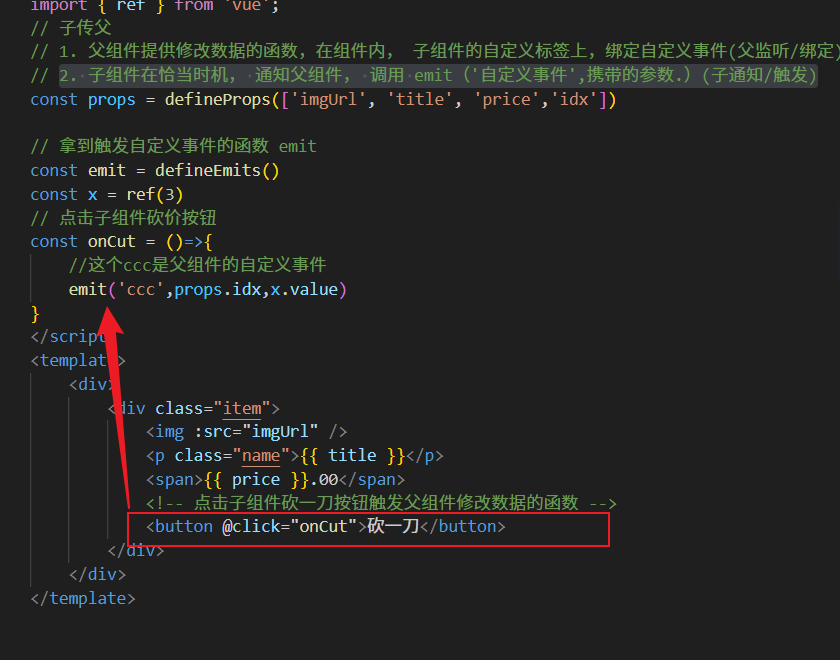
4. 子传父的语法/步骤
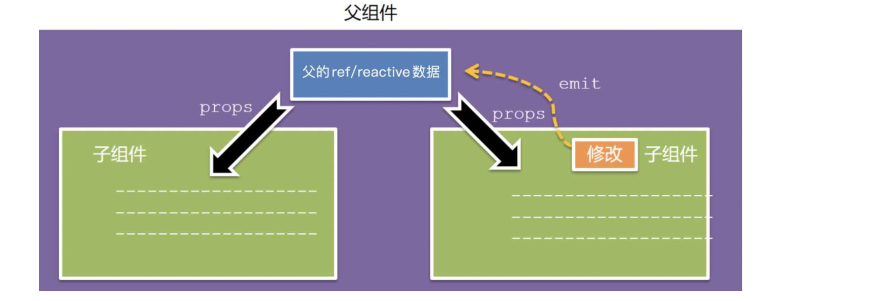
1> 父组件内, 子组件的自定义标签上, 绑定自定义事件, @自定义事件="父组件修改函数的数据"
2> 子组件在恰当的时机, 触发父组件自定义事件, 从而导致父组件修改数据函数的执行, 同时携带父组件函数需要的参数, emit('自定义事件',携带的参数...)
流程
1. 父组件提供修改数据的函数,在组件内,子组件的自定义标签上,绑定自定义事件(父监听/绑定)
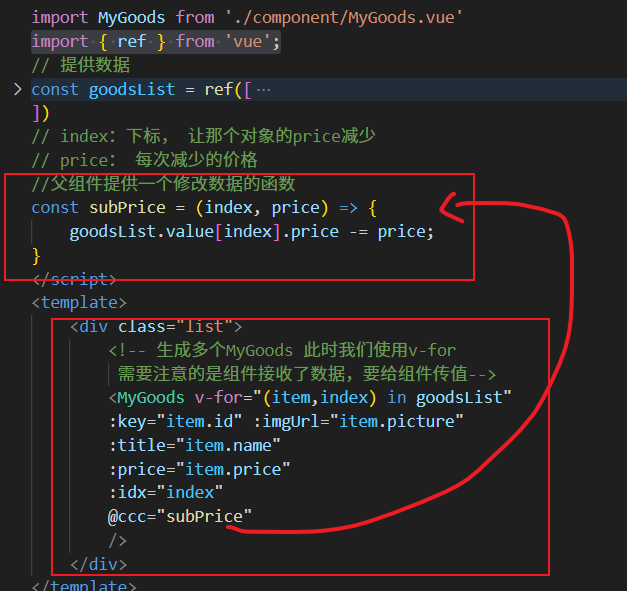
2. 子组件在恰当时机, 通知父组件, 调用 emit('自定义事件',携带的参数.)(子通知/触发)
总体流程: 子组件只是通知了父组件,然后把相应要用到的参数进行传入
具体的代码
App.vue
<script setup>
//导入 MyGoods 商品组件import MyGoods from './component/MyGoods.vue'
import { ref } from 'vue';
// 提供数据
const goodsList = ref([{id: '4001172',name: '称⼼如意⼿摇咖啡磨⾖机咖啡⾖研磨机',price: 289,picture:'https://tse3-mm.cn.bing.net/th/id/OIP-C.JCD2kzvzP00dSraFX_NKeAHaHa?w=183&h=183&c=7&r=0&o=7&cb=iwp&pid=1.7&rm=3'},{id: '4001594',name: '⽇式⿊陶功夫茶组双侧把茶具礼盒装',price: 288,picture:'https://tse1-mm.cn.bing.net/th/id/OIP-C.AOCBulpuOkzlWClLPhab9AHaHa?w=159&h=180&c=7&r=0&o=7&cb=iwp&pid=1.7&rm=3'},{id: '4001009',name: '⽵制⼲泡茶盘正⽅形沥⽔茶台品茶盘',price: 109,picture:'https://tse3-mm.cn.bing.net/th/id/OIP-C.zx0eDuySFaVwiLnAPTpupgHaHa?w=203&h=203&c=7&r=0&o=7&cb=iwp&pid=1.7&rm=3'},{id: '4001874',name: '古法温酒汝瓷酒具套装⽩酒杯莲花温酒器',price: 488,picture:'https://tse2-mm.cn.bing.net/th/id/OIP-C.uU32xt4IIVtCI2wRuicBpQHaJV?w=174&h=220&c=7&r=0&o=7&cb=iwp&pid=1.7&rm=3'},{id: '4001649',name: '⼤师监制⻰泉⻘瓷茶叶罐',price: 139,picture:'https://tse4-mm.cn.bing.net/th/id/OIP-C.0y2MhpQW_M7fwL523BqbsQHaHa?w=183&h=183&c=7&r=0&o=7&cb=iwp&pid=1.7&rm=3'},{id: '3997185',name: '与众不同的⼝感汝瓷⽩酒杯套组1壶4杯',price: 108,picture:'https://tse4-mm.cn.bing.net/th/id/OIP-C.NriTJYmUBrVPy9zYHaXa1AHaHa?w=187&h=188&c=7&r=0&o=7&cb=iwp&pid=1.7&rm=3'},{id: '3997403',name: '⼿⼯吹制更厚实⽩酒杯壶套装6壶6杯',price: 100,picture:'https://tse1-mm.cn.bing.net/th/id/OIP-C.wvt53HLH75XUYw2ggvUY5QAAAA?w=187&h=187&c=7&r=0&o=7&cb=iwp&pid=1.7&rm=3'},{id: '3998274',name: '德国百年⼯艺⾼端⽔晶玻璃红酒杯2⽀装',price: 139,picture: 'https://tse1-mm.cn.bing.net/th/id/OIP-C.pEhn4i9VACd2AacXzozESQHaHY?w=188&h=187&c=7&r=0&o=7&cb=iwp&pid=1.7&rm=3'}
])
// index:下标, 让那个对象的price减少
// price: 每次减少的价格
//父组件提供一个修改数据的函数
const subPrice = (index, price) => {goodsList.value[index].price -= price;
}
</script>
<template><div class="list"><!-- 生成多个MyGoods 此时我们使用v-for 需要注意的是组件接收了数据,要给组件传值--><MyGoods v-for="(item,index) in goodsList" :key="item.id" :imgUrl="item.picture" :title="item.name" :price="item.price":idx="index"@ccc="subPrice"/></div>
</template>
<style lang="scss">
* {margin: 20px;padding: 0;box-sizing: border-box;
}.list {width: 1000px;margin: 0 auto;display: flex;flex-wrap: wrap;
}
</style>
MyGoods.vue
<script setup>
import { ref } from 'vue';
// 子传父
// 1. 父组件提供修改数据的函数,在组件内, 子组件的自定义标签上,绑定自定义事件(父监听/绑定)
// 2. 子组件在恰当时机, 通知父组件, 调用 emit('自定义事件',携带的参数.)(子通知/触发)
const props = defineProps(['imgUrl', 'title', 'price','idx'])// 拿到触发自定义事件的函数 emit
const emit = defineEmits()
const x = ref(3)
// 点击子组件砍价按钮
const onCut = ()=>{//这个ccc是父组件的自定义事件emit('ccc',props.idx,x.value)
}
</script>
<template><div><div class="item"><img :src="imgUrl" /><p class="name">{{ title }}</p><span>{{ price }}.00</span><!-- 点击子组件砍一刀按钮触发父组件修改数据的函数 --><button @click="onCut">砍一刀</button></div></div>
</template><style scoped lang="scss">
.item {width: 240px;margin-left: 10px;padding: 20px 30px;transition: all 0.5s;margin-bottom: 20px;.item:nth-child(4n) {margin-left: 0;}&:hover {box-shadow: 0px 0px 5px rgba(0, 0, 0, 0.2);transform: translate3d(0, -4px, 0);cursor: pointer;}img {width: 100%;}.name {font-size: 18px;margin-bottom: 10px;color: #666;}.price {display: flex; align-items: center;height: 36px;font-size: 22px;color: firebrick;button{display: flex;margin: 50px;font-size: 14px;}}.price::before {content: '¥';font-size: 22px;}
}
</style>
5. 父子通信总结
父传子: 父组件 -> 子组件
1. 什么时候需要父传子: 当子组件的数据不能写死的时候,通过父组件提供的数据来响应,从而提高组件的灵活性和复用性
2. 父传子: props自定义属性传递方案
props: 写在标签上的自定义属性, 例如
<MyGoods: imgUrl = "item.picrure....>
这些都是props,因为都是自己取的名字, 所以称之为自定义属性. 一个组件标签行可以添加任意个数, 任意类型的props,前提是需要在组件内部使用 defineProps()接收, 只有接收了才可以传递过去
const props = defineProps(['imgUrl', 'title', 'price','idx'])
<MyGoods v-for="(item,index) in goodsList"
:key="item.id"
:imgUrl="item.picture"
:title="item.name"
:price="item.price"
:idx="index"
/>
步骤:
1> 子接(defineProps(["自定义属性名1","自定义属性名2"...])
2> 父传(自定义属性名="值:")
子传父: 子组件 -> 父组件
1. 什么时候需要子传父: 当子组件需要修改父组件数据的时候, 因为 props 是只读的, 只能看, 不能改.
2. 子传父: 自定义事件传递
1> 父监听/绑定: @自定义事件 = "父修改数据的函数"
2> 子触发/通知: emit('自定义事件',传递的参数..)
三、props校验
1. 为什么要校验?
提高代码的健壮性, 也就是子组件接收的是什么样的props, 那么父组件在传递的时候也必须按照这个规则来传递, 双方都得遵守的一种协议.
2. 语法 简易写法校验
只校验类型,下面是俩种接收方式
1> 数组接收法: defineProps(['imgUrl','title','price'])
- 优点: 简单, 上手快
- 缺点: 无法对props做校验, 健壮性差
2> 对象接收法:
defineProps({
title: String,
imgUrl: String,
price: Number
})
- 优点: 可以对props做校验, 健壮性相对好一些
- 缺点: 写法相对复杂
我们写一个进度条组件来演示
子组件: MyProgress.vue
父组件: App.vue
运行结果
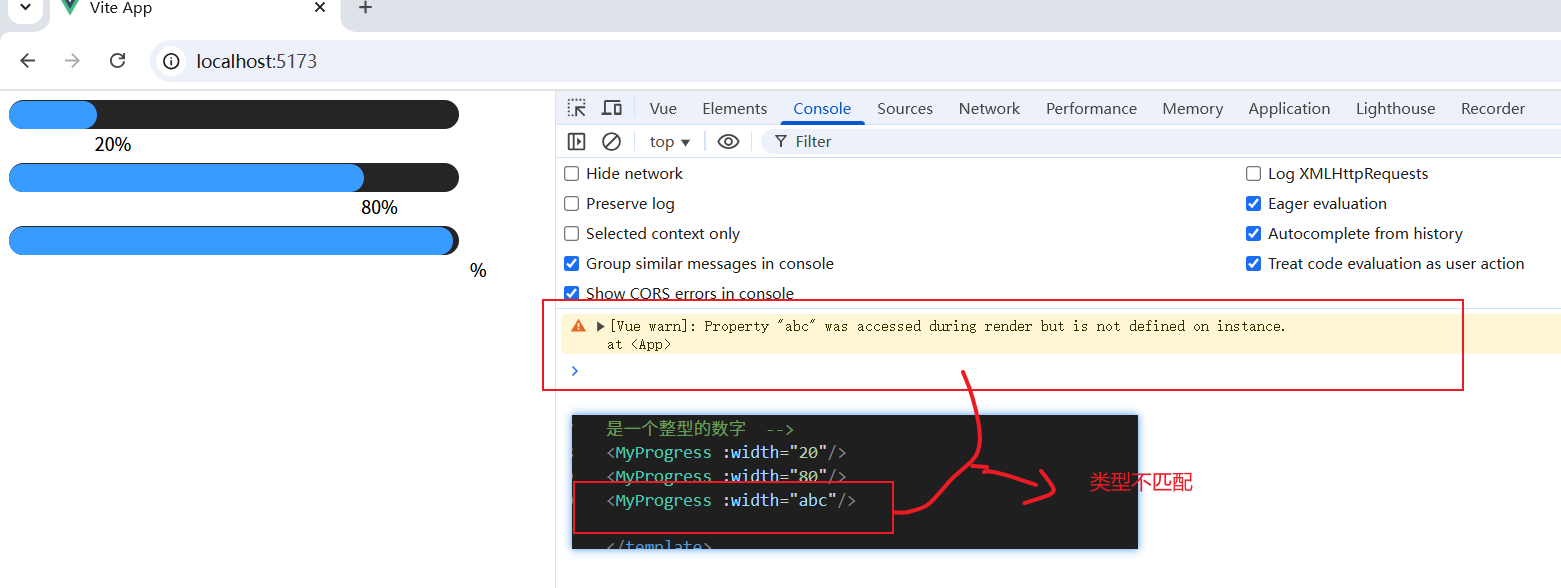
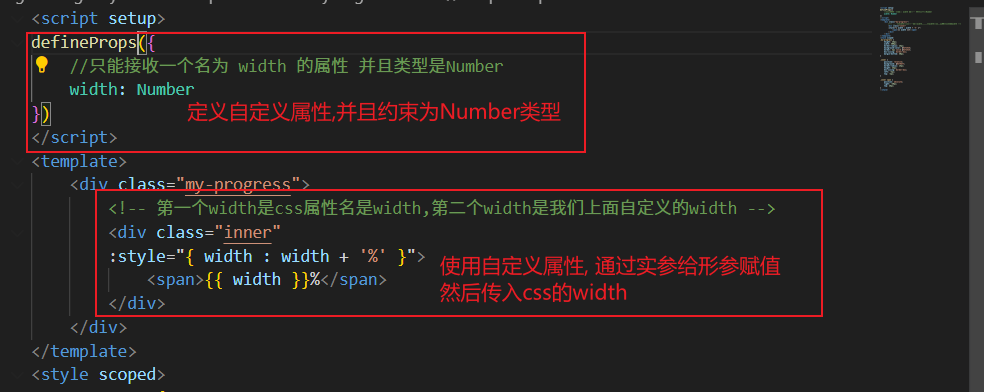
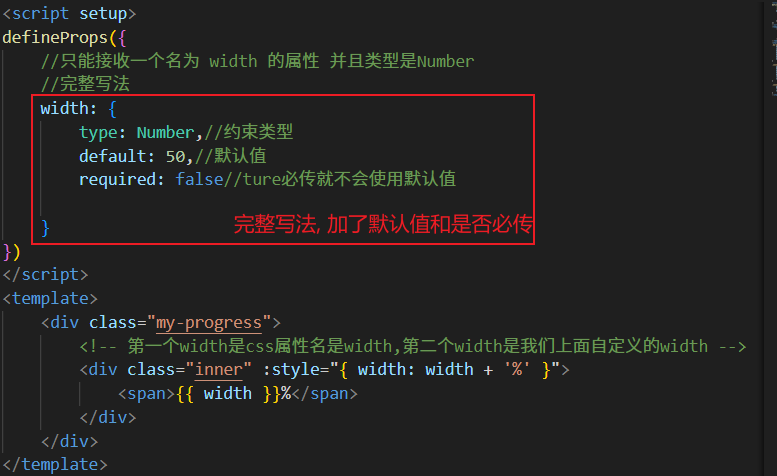
3. 语法 完整写法校验
1> 为什么需要用到完整写法?
因为简易写法达不到需求, 比如刚刚的进度条组件, 当 width 不传的时候, 是能正常显示 50% 的进度, 这个需求简易写法做不到, 所以需要 props 更多的写法.
2> 完整写法的语法:
defineProps({
属性名: {
type: 类型, // Number String Boolean ...
required: true, // 是否必填
default: 默认值, // 默认值// value: ⽗传⼦的值
validator(value) {
// ⾃定义校验逻辑
return 布尔值
}
}
})
MyProgress.vue
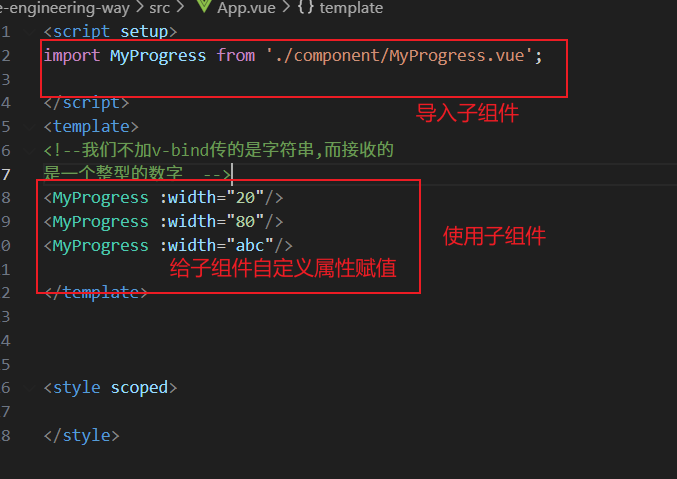
App.vue
具体代码
App.vue
<script setup>
import MyProgress from './component/MyProgress.vue'; </script>
<template>
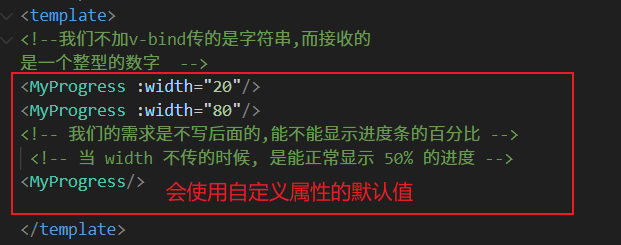
<!--我们不加v-bind传的是字符串,而接收的
是一个整型的数字 -->
<MyProgress :width="20"/>
<MyProgress :width="80"/>
<!-- 我们的需求是不写后面的,能不能显示进度条的百分比 --><!-- 当 width 不传的时候, 是能正常显示 50% 的进度 -->
<MyProgress/></template><style scoped></style>MyProgress.vue
<script setup>
defineProps({//只能接收一个名为 width 的属性 并且类型是Number//完整写法width: {type: Number,//约束类型default: 50,//默认值required: false//ture必传就不会使用默认值}
})
</script>
<template><div class="my-progress"><!-- 第一个width是css属性名是width,第二个width是我们上面自定义的width --><div class="inner" :style="{ width: width + '%' }"><span>{{ width }}%</span></div></div>
</template>
<style scoped>
.my-progress {height: 26px;width: 400px;border-radius: 15px;background-color: #272425;border: 3px solid #272425;box-sizing: border-box;margin-bottom: 30px;
}.inner {position: relative;background: #379bff;border-radius: 15px;height: 25px;box-sizing: border-box;left: -3px;top: -2px;
}.inner span {position: absolute;right: -30px;top: 26px;
}
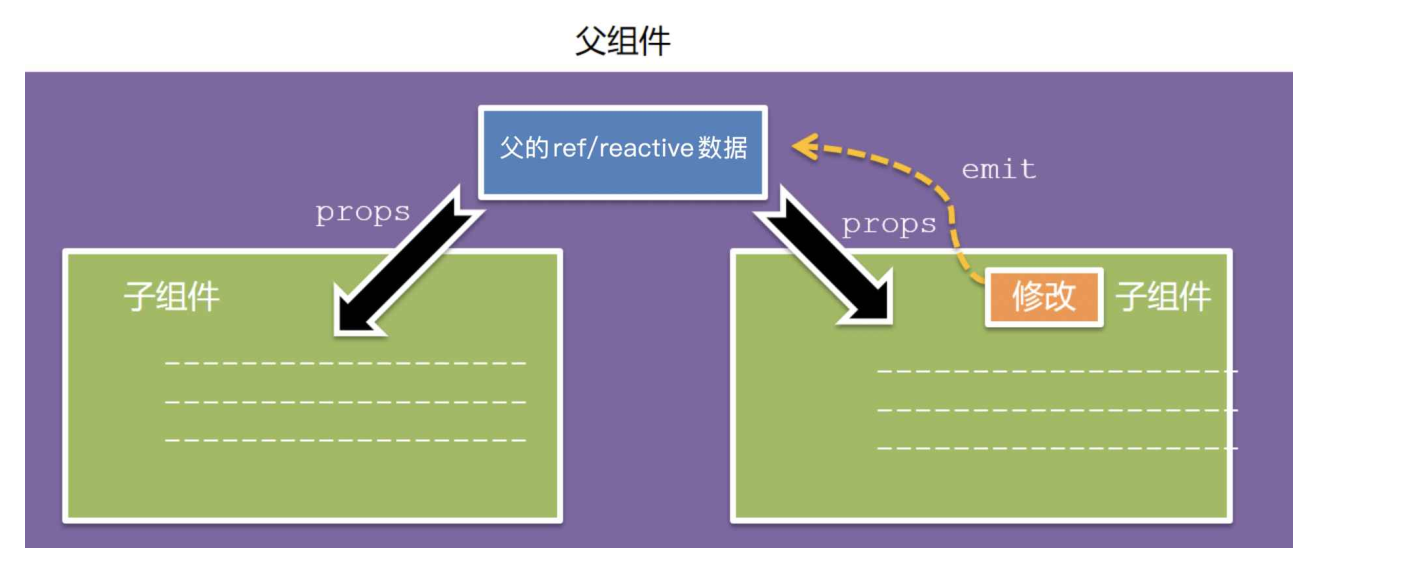
</style>4. 组件的 ref/reactive 数据 和 props 的区别
1> 相同点: 都可以为组件提供数据, 进而使用
2> 不同点:
- ref/reactive数据: 是组件自己的数据, 组件既可以获取, 也可以修改(可读可写)
- props数据: 本质是由父组件提供的数据, 子组件拿到这个数据之后, 只能获取, 不能修改(只读的), 遵循单向数据流原则.(单向数据流: 子组件的props数据是来源于父组件的, 当父组件的数据修改了, 会影响子组件的props,这个方向只能是父->子流向. 父->子)如果子组件想要修改父组件的数据, 需要用到子传父的通信规则(通过emit)
- computed数据: 基于现有的数据计算得到新数据, 带缓存的特性.
- watch: 监视数据的变化, 当数据变了, 可以针对的做DOM操作或异步操作.
总结一句话: 谁的数据,谁负责
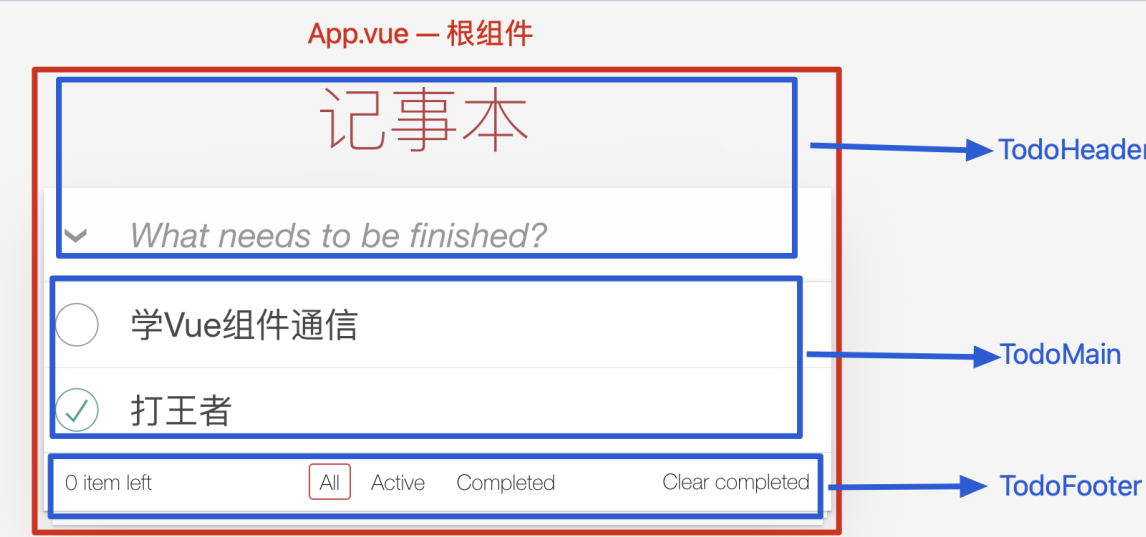
四、记事本组件版
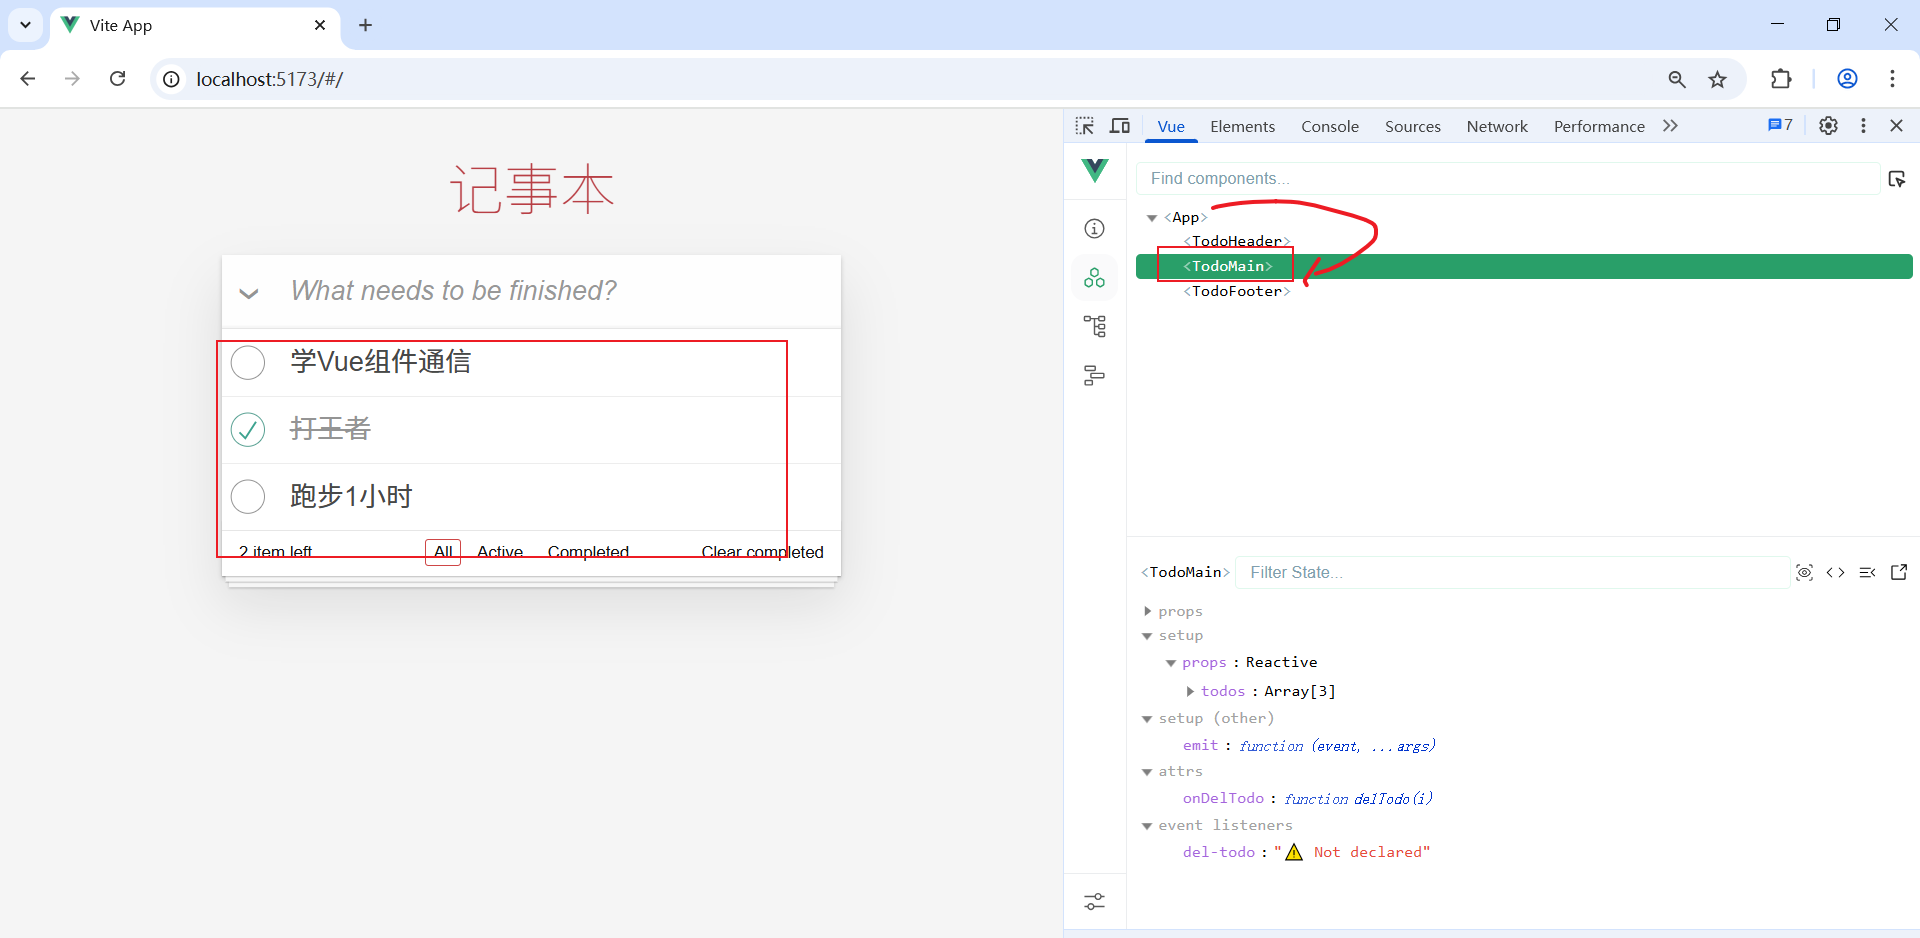
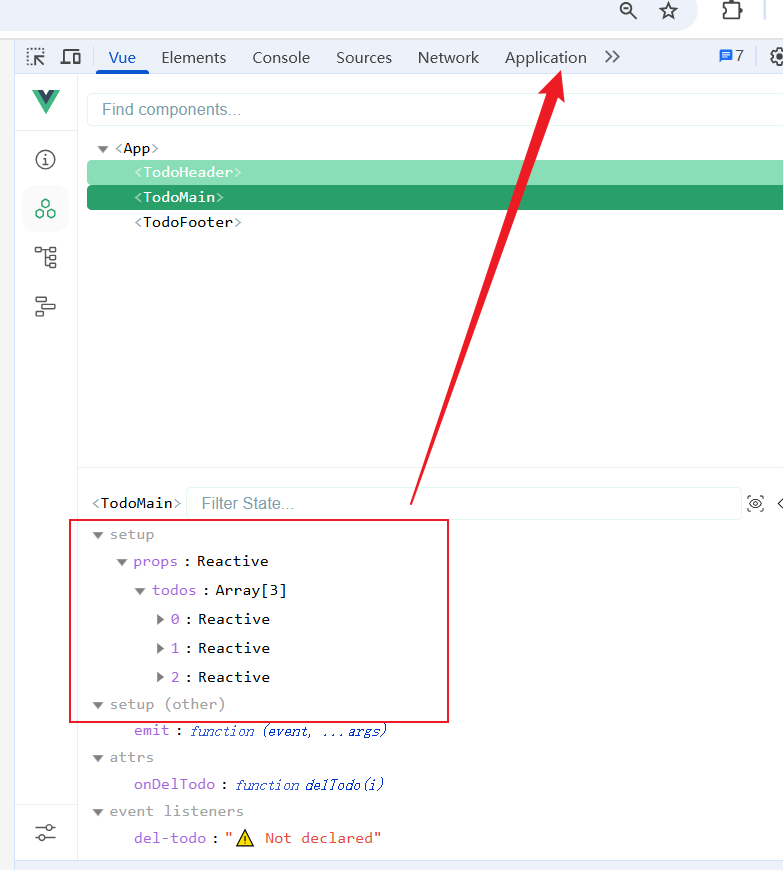
拆分成 3 个组件, TodoHeader、TodoMain、TodoFooter, 如下图所⽰
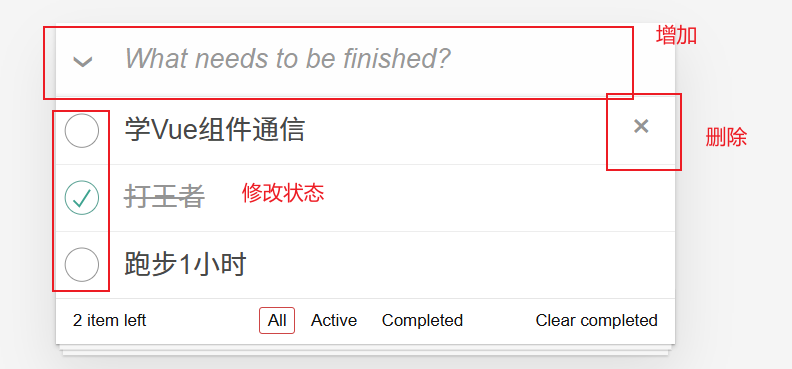
添加操作: 当按下enter后, 就会在数组里面增加一个对象(header)
删除操作: 点击x号按钮, 去除数组的响应对象(main)

底部功能以及持久化存储(footer)
1> 底部我们需要统计有多少项是未完成的
直接计算数组对象里面属性为finished然后取反即可
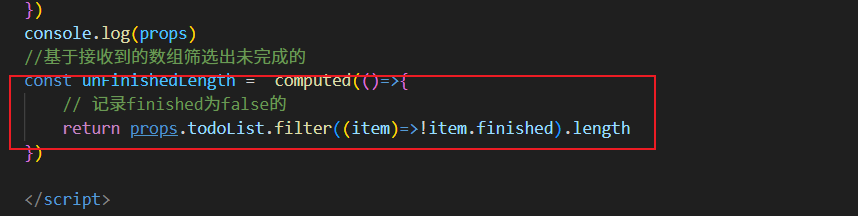
2> 点击clear completed 清空整个完成的任务项
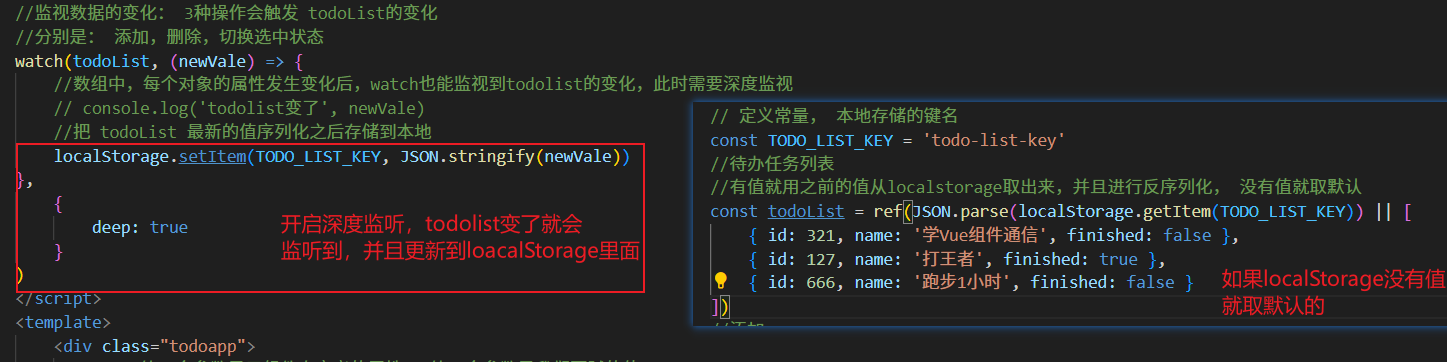
3> 实现数据持久化: 每次刷新,当前的数据状态能够保证
分析: 每次我们刷新后从父组件传过来给Main组件的的数组都是默认的数组,而我们当前的需求是每次刷新引用的数组是上一次的值,而不是用默认的数组
也就是我们每次要把main里面的todolist的值放在application里面的localstorage进行存储,后面刷新就取出里面的值进行渲染.
此时修改todolist会涉及3个操作, 因此我们要对这三个地方进行监视
具体步骤
总体代码
app.vue
<script setup>
import { ref, watch } from 'vue'
// 导入全局样式
import './assets/style.css'
// 导入 3 个子组件
import TodoFooter from './component/TodoFooter.vue';
import TodoHeader from './component/TodoHeader.vue';
import TodoMain from './component/TodoMain.vue';
// 定义常量, 本地存储的键名
const TODO_LIST_KEY = 'todo-list-key'
//待办任务列表
//有值就用之前的值从localstorage取出来,并且进行反序列化, 没有值就取默认
const todoList = ref(JSON.parse(localStorage.getItem(TODO_LIST_KEY)) || [{ id: 321, name: '学Vue组件通信', finished: false },{ id: 127, name: '打王者', finished: true },{ id: 666, name: '跑步1⼩时', finished: false }
])
//添加
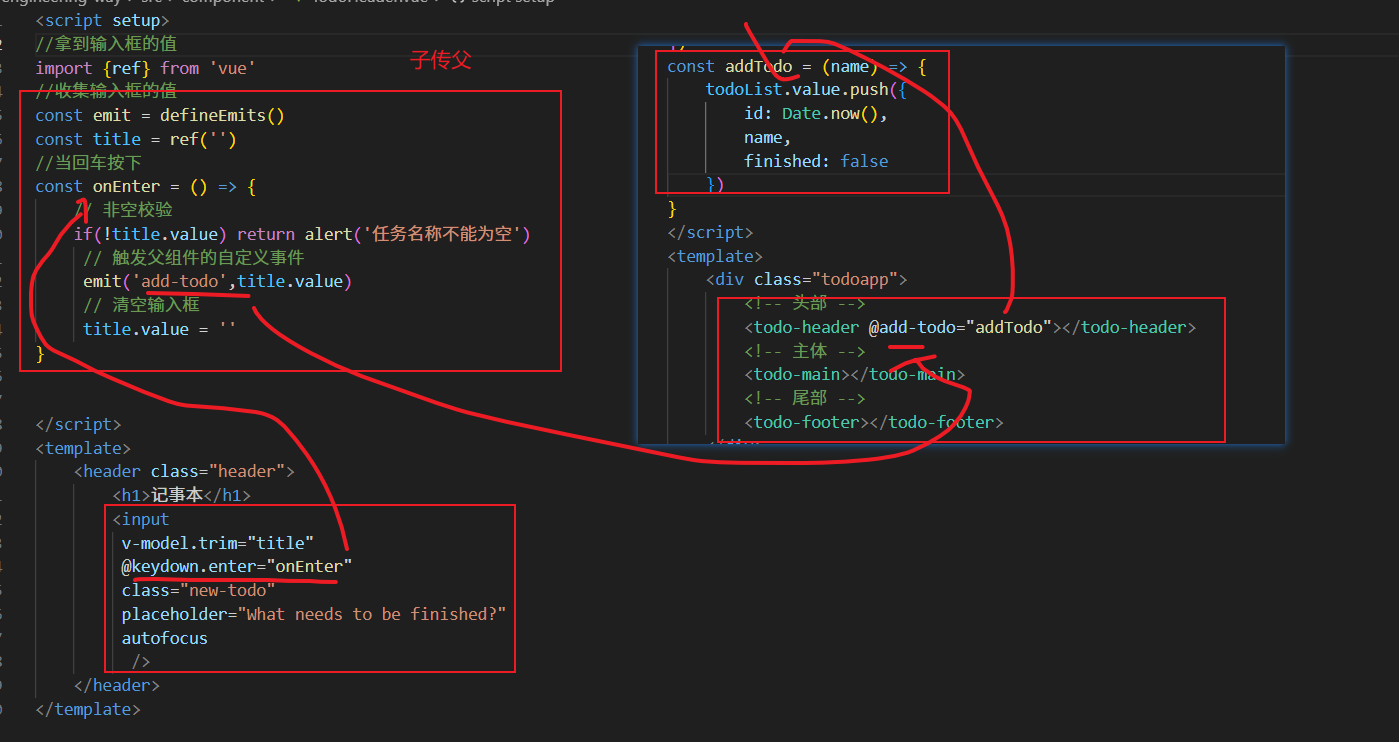
const addTodo = (name) => {todoList.value.push({id: Date.now(),name,finished: false})
}
//删除
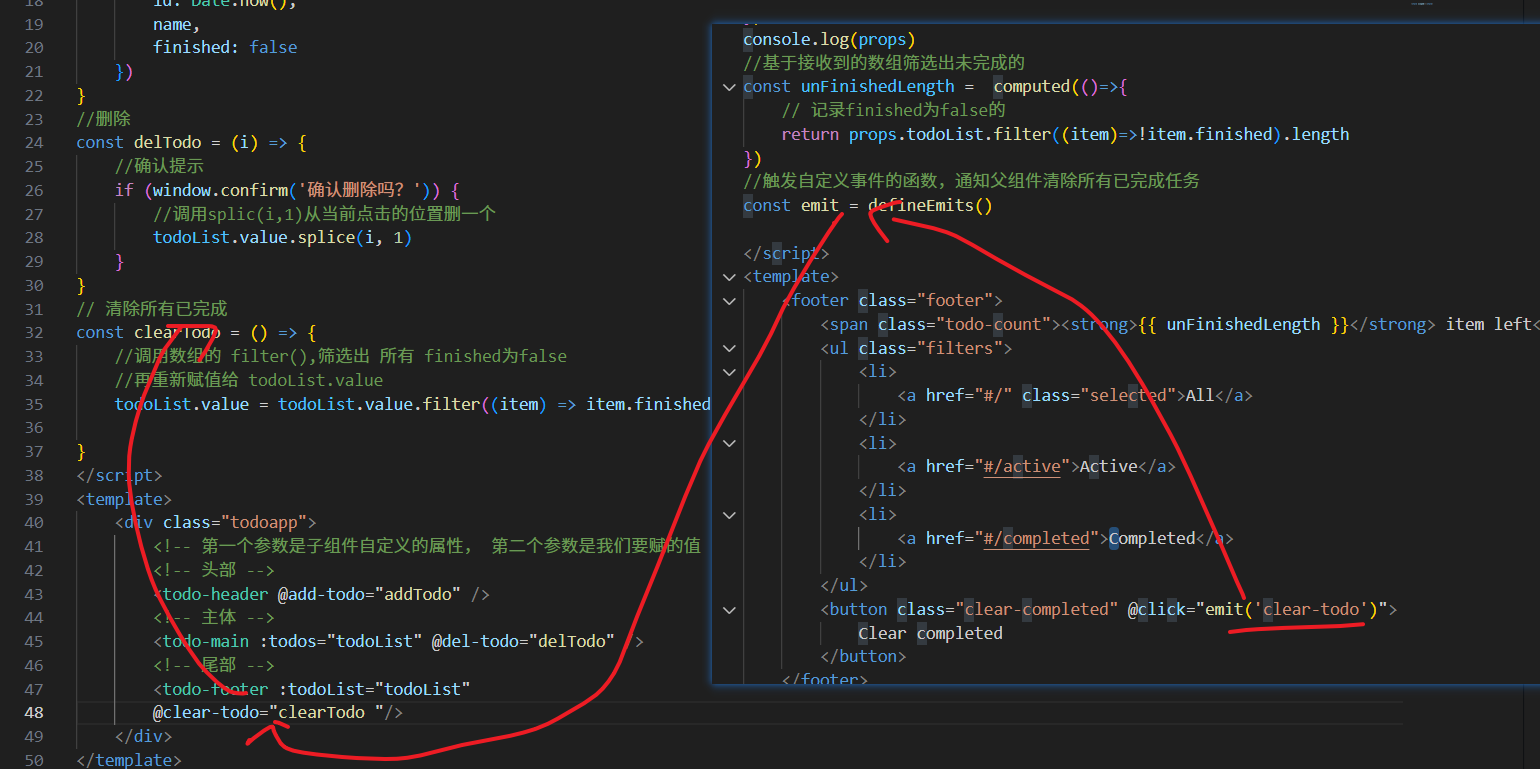
const delTodo = (i) => {//确认提示if (window.confirm('确认删除吗?')) {//调用splic(i,1)从当前点击的位置删一个todoList.value.splice(i, 1)}
}
// 清除所有已完成
const clearTodo = () => {//调用数组的 filter(),筛选出 所有 finished为false//再重新赋值给 todoList.valuetodoList.value = todoList.value.filter((item) => item.finished === false)}
//监视数据的变化: 3种操作会触发 todoList的变化
//分别是: 添加,删除,切换选中状态
watch(todoList, (newVale) => {//数组中,每个对象的属性发生变化后,watch也能监视到todolist的变化,此时需要深度监视// console.log('todolist变了', newVale)//把 todoList 最新的值序列化之后存储到本地localStorage.setItem(TODO_LIST_KEY, JSON.stringify(newVale))
},{deep: true}
)
</script>
<template><div class="todoapp"><!-- 第一个参数是子组件自定义的属性, 第二个参数是我们要赋的值 --><!-- 头部 --><todo-header @add-todo="addTodo" /><!-- 主体 --><todo-main :todos="todoList" @del-todo="delTodo" /><!-- 尾部 --><todo-footer :todoList="todoList" @clear-todo="clearTodo" /></div>
</template><style scoped></style>ToFooter.vue
<script setup>
import { computed} from 'vue'
//子接收
const props = defineProps({todoList:{type: Array,default: ()=>[]}
})
console.log(props)
//基于接收到的数组筛选出未完成的
const unFinishedLength =  computed(()=>{// 记录finished为false的return props.todoList.filter((item)=>!item.finished).length
})
//触发自定义事件的函数,通知父组件清除所有已完成任务
const emit = defineEmits()</script>
<template><footer class="footer"><span class="todo-count"><strong>{{ unFinishedLength }}</strong> item left</span><ul class="filters"><li><a href="#/" class="selected">All</a></li><li><a href="#/active">Active</a></li><li><a href="#/completed">Completed</a></li></ul><button class="clear-completed" @click="emit('clear-todo')">Clear completed</button></footer>
</template>
TodoHeader.vue
<script setup>
//拿到输入框的值
import {ref} from 'vue'
//收集输入框的值
const emit = defineEmits()
const title = ref('')
//当回车按下
const onEnter = () => {// 非空校验if(!title.value) return alert('任务名称不能为空')// 触发父组件的自定义事件emit('add-todo',title.value)// 清空输入框title.value = ''
}</script>
<template><header class="header"><h1>记事本</h1><inputv-model.trim="title" @keydown.enter="onEnter"class="new-todo"placeholder="What needs to be finished?" autofocus/></header>
</template>
ToMain.vue
<!-- @format --><script setup>const props = defineProps({// 接收的数据名称  todostodos: {type: Array, // 数组类型default: () => [] // 默认值}})const emit = defineEmits()
</script><template><section class="main"><inputid="toggle-all"class="toggle-all"type="checkbox" /><label for="toggle-all">Mark all as complete</label><ul class="todo-list"><liv-for="(item, index) in props.todos":key="item.id":class="{ completed: item.finished }"><div class="view"><inputv-model="item.finished"class="toggle"type="checkbox" /><label>{{ item.name }}</label><buttonclass="destroy"@click="emit('del-todo', index)"></button></div></li></ul></section>
</template>
五、非父子组件通信(实际用的不多,但是面试会考)
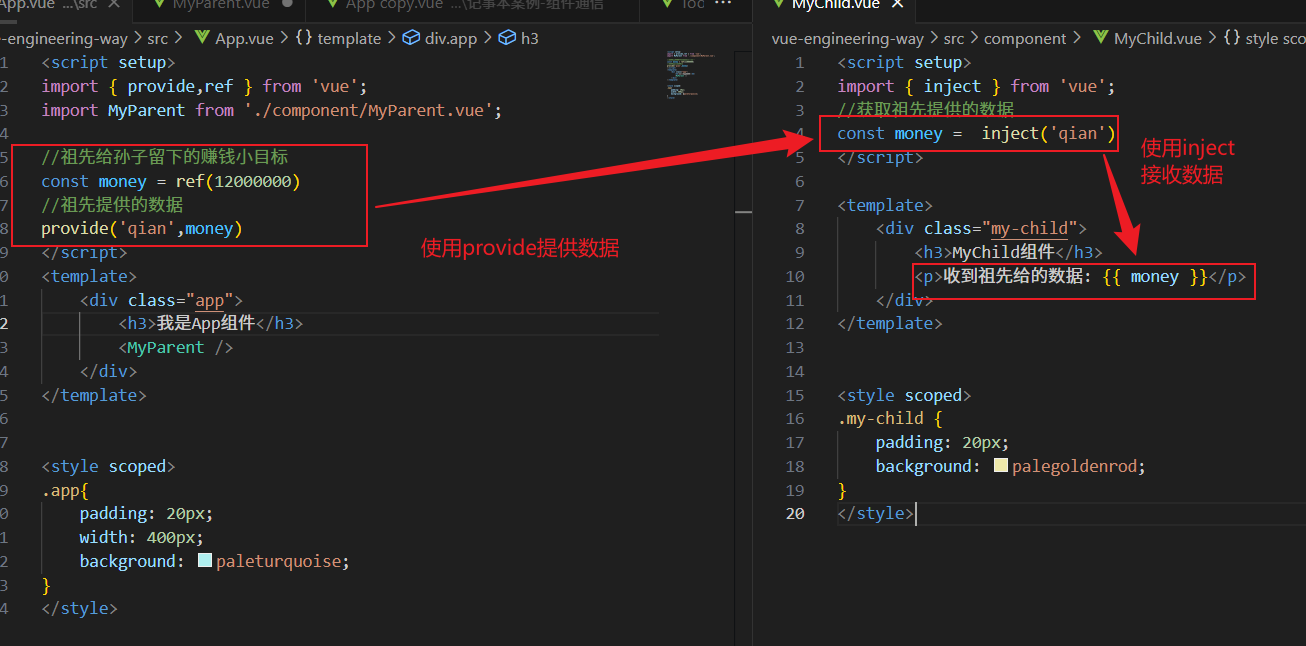
1. 祖先传后代-provide & inject
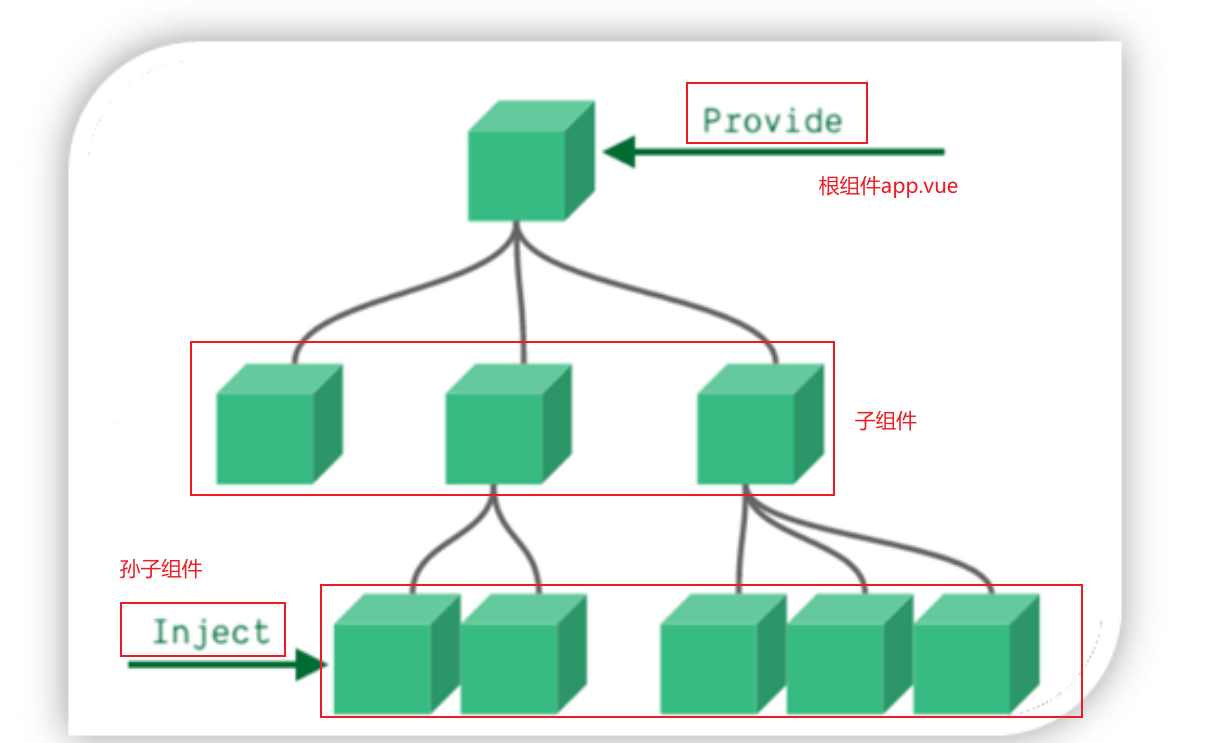 祖先组件给后代组件传值(通信):
1. 祖先组件提供数据: provide('数据名称',数据)
2. 后代组件获取数据: const 数据 = inject('数据名称')
整体流程
具体代码
孙子组件MyChild.vue
<script setup>
import { inject } from 'vue';
//获取祖先提供的数据
const money =  inject('qian')
</script><template><div class="my-child"><h3>MyChild组件</h3><p>收到祖先给的数据: {{ money }}</p></div>
</template><style scoped>
.my-child {padding: 20px;background: palegoldenrod;
}
</style>
父亲组件MyParent.vue
<script setup>
import MyChild from './MyChild.vue';
</script>
<template><div class="my-parent"><h3>MyParent组件</h3><MyChild/></div>
</template><style scoped>
.my-parent {padding: 20px;background: plum;
}
</style>
根组件: App.vue
<script setup>
import { provide,ref } from 'vue';
import MyParent from './component/MyParent.vue';	//祖先给孙子留下的赚钱小目标
const money = ref(12000000)
//祖先提供的数据
provide('qian',money)
</script>
<template><div class="app"><h3>我是App组件</h3><MyParent /></div>
</template><style scoped>
.app{padding: 20px;width: 400px;background: paleturquoise;
}
</style>
2. 任意俩个组件通信- EventBus
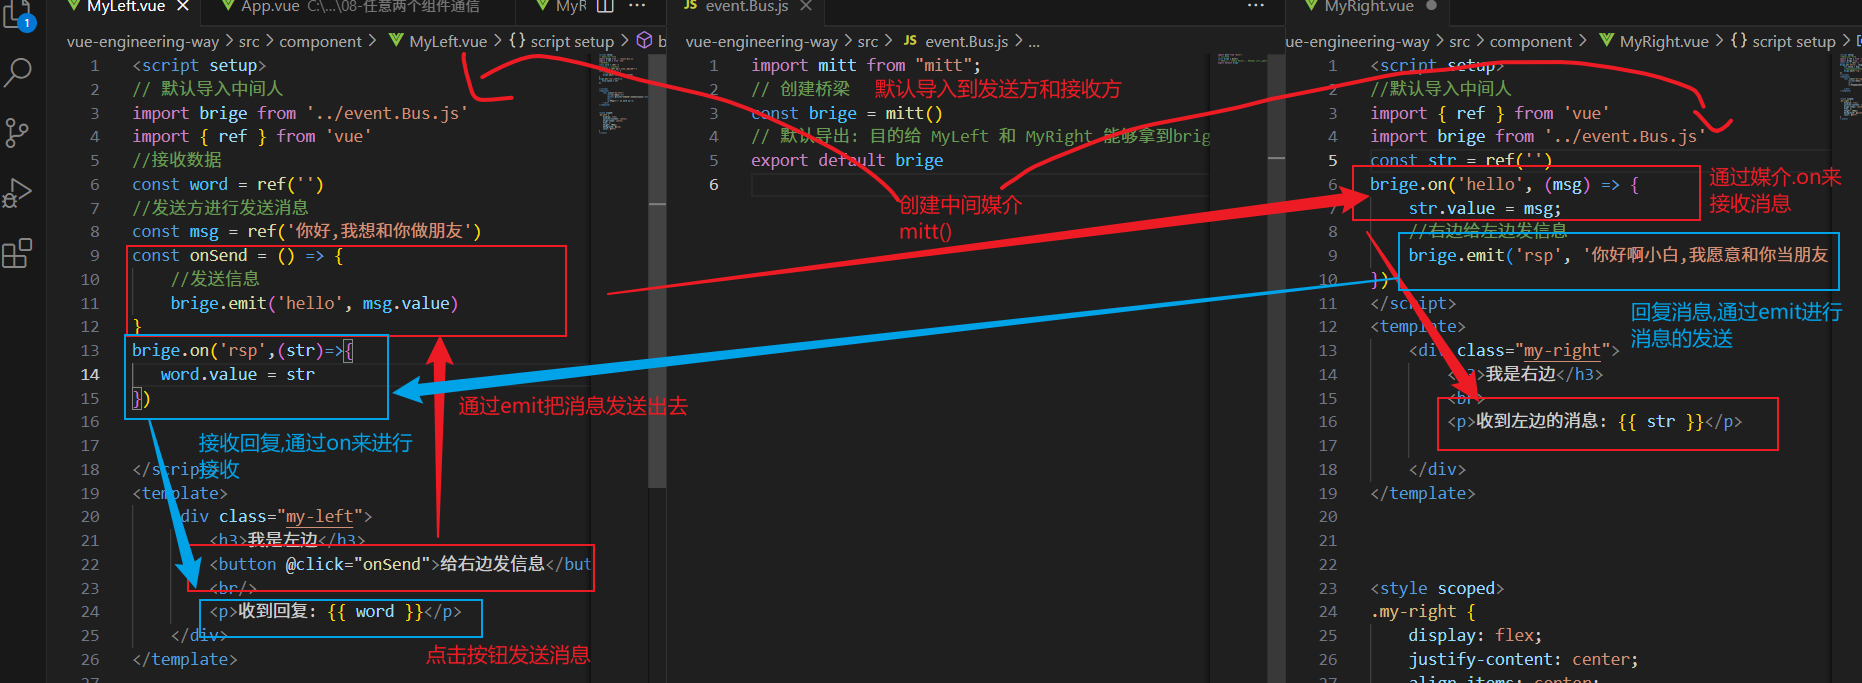
下面不能够使用父子和爷孙进行传递数据,此时就引出任意俩个组件之间进行通信
任意俩个组件通信: EventBus(事件总线)
以俩个兄弟组件通信为例子:
前提: 需要一个中间者(桥梁)
1. 创建一个中间者模块 -- 桥梁
2. 确定消息的发送方: 桥梁.emit('事件名称',数据)
3. 确定消息的接收方: 桥梁.on('事件名称',(数据)=>{
})
具体步骤
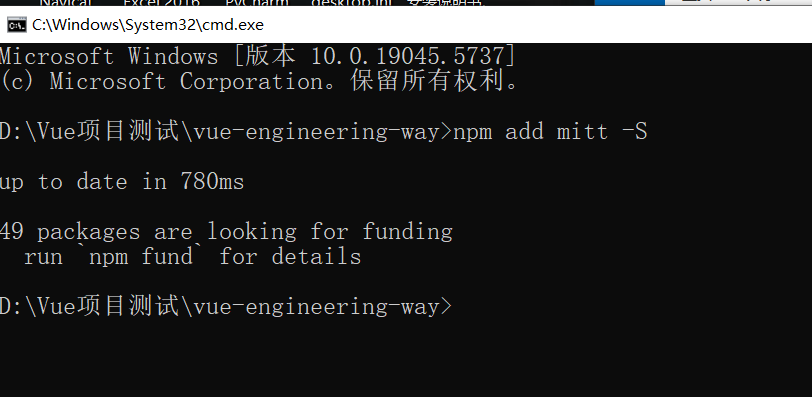
1. 下载 mitt 模块包,并创建公共中间⼈模块(类似媒婆和中介)
npm add mitt -S
具体的流程走向
代码:
MyLeft.vue
<script setup>
// 默认导入中间人
import brige from '../event.Bus.js'
import { ref } from 'vue'
//接收数据
const word = ref('')
//发送方进行发送消息
const msg = ref('你好,我想和你做朋友')
const onSend = () => {//发送信息brige.emit('hello', msg.value)
}
brige.on('rsp',(str)=>{word.value = str
})</script>
<template><div class="my-left"><h3>我是左边</h3><button @click="onSend">给右边发信息</button><br/><p>收到回复: {{ word }}</p></div>
</template><style scoped>
.my-left {display: flex;justify-content: center;align-items: center;flex: 1;height: 100px;background: plum;color: #fff;
}
</style>
event.Bus.js
import mitt from "mitt";
// 创建桥梁
const brige = mitt()
// 默认导出: 目的给 MyLeft 和 MyRight 能够拿到brige中间人
export default brige
MyRight.vue
<script setup>
//默认导入中间人
import { ref } from 'vue'
import brige from '../event.Bus.js'
const str = ref('')
brige.on('hello', (msg) => {str.value = msg;//右边给左边发信息brige.emit('rsp', '你好啊小白,我愿意和你当朋友')
})
</script>
<template><div class="my-right"><h3>我是右边</h3><br><p>收到左边的消息: {{ str }}</p></div>
</template><style scoped>
.my-right {display: flex;justify-content: center;align-items: center;flex: 1;height: 100px;background: paleturquoise;color: #fff;
}
</style>
App.vue
<script setup>
import MyLeft from './component/MyLeft.vue';
import MyRight from './component/MyRight.vue';
</script>
<template><div class="app"><MyLeft/><MyRight/></div>
</template><style scoped>
.app{display: flex;
}
</style>
六、总结