Linux系统管理与编程13:基于CentOS7.x的LAMP环境部署
兰生幽谷,不为莫服而不芳;
君子行义,不为莫知而止休。
一、实验目标
1.理解Apache服务器原理
2.掌握Apache服务器的配置文件
3.具备安装Mysql数据库能力
4.具备安装Apache服务器能力
5.具备PHP与数据库连接能力
6.具备Apache、Mysql、PHP的故障排除能力
二、实验拓扑
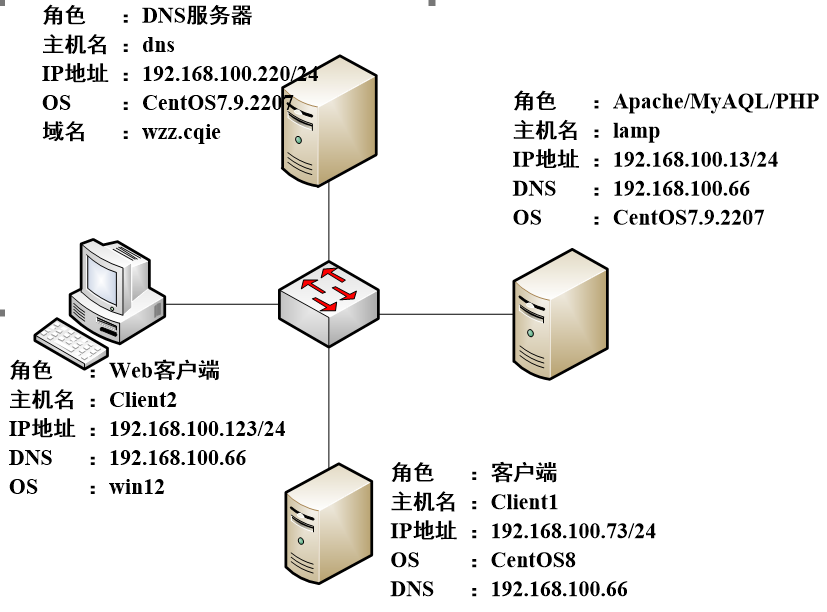
图4- 1
四台虚拟机按拓扑图搭建,准备好网络连接,每台Linux要架设好yum源(本地或Ali云均可)。
三、实训原理/流程
LAMP介绍
LAMP是由Linux, Apache, MySQL, PHP组成的,即把Apache、MySQL以及PHP安装在Linux系统上,组成一个环境来运行PHP的脚本语言。Apache是最常用的Web服务软件,而MySQL是比较小型的数据库软件。三个角色可以安装在一台机器上,也可以分开(但httpd和php要在一起的)
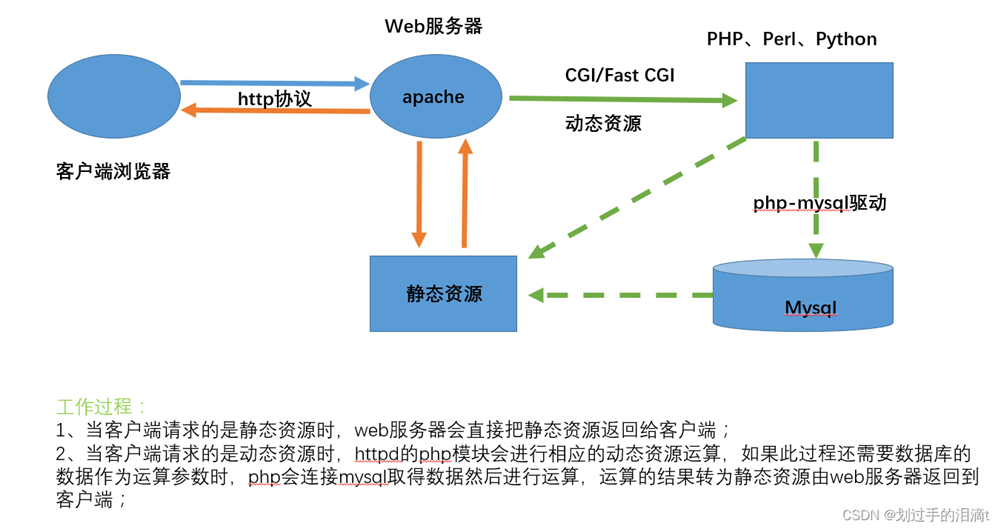
图4- 2
为什么需要LAMP?
手动逐个编译安装各个组件,需要输入各种命令,且有可能会中途出错。对于想要成功搭建 LAMP 建站环境来说,可以节约大量时间和精力。
LAMP 有什么优点?
LAMP 是最经典的建站环境之一,风靡世界十几年。而本脚本只需几个简单交互,选择需要安装的包,即可一路安装,无人值守。
1)项目背景 (以下所有配置以巫正中/wzz.cqie为实例,自行校正)
某企业的网络技术员,需发布搭建WEB服务对公司的文化、产品进行宣传。本次实验任务是实现基于Centos环境下Apache服务、Mysql数据与后台开发程序PHP的接口。(IP根据自己实际配置自行校正)
| 主 机 名 称 | 操作系统 | IP地址 |
| lamp | CentOS7.9 | 192.168.学号.13(自己定) |
| Client1 | CentOS7.9 | 192.168.学号.73(自己定) |
| Client2 | windows server 12 | 192.168.学号.123(自己定) |
2)任务要求:
1.安装并配置mysql数据库;
2.安装Apache服务;
3.安装PHP及相关组件;
4.客户端验证测试。
3)实验步骤:
重要提示:请确保虚拟机能正常连接到互联网!!!测试虚拟机是否连接互联网
| [root@www ~]# ping www.baidu.com -c 2 PING www.a.shifen.com (183.2.172.42) 56(84) bytes of data. 64 bytes from 183.2.172.42 (183.2.172.42): icmp_seq=1 ttl=128 time=48.3 ms 64 bytes from 183.2.172.42 (183.2.172.42): icmp_seq=2 ttl=128 time=42.1 ms |
(1)关闭防火墙
| [root@www ~]# systemctl status firewalld ● firewalld.service - firewalld - dynamic firewall daemon Loaded: loaded (/usr/lib/systemd/system/firewalld.service; enabled; vendor preset: enabled) Active: active (running) since Fri 2024-11-22 22:12:48 EST; 4h 14min ago Docs: man:firewalld(1) Main PID: 983 (firewalld) Tasks: 2 (limit: 4329) Memory: 38.2M CGroup: /system.slice/firewalld.service └─983 /usr/libexec/platform-python -s /usr/sbin/firewalld --nofork --nopid 11月 22 22:12:47 www systemd[1]: Starting firewalld - dynamic firewall daemon... 11月 22 22:12:48 www systemd[1]: Started firewalld - dynamic firewall daemon. 11月 22 22:12:48 www firewalld[983]: WARNING: AllowZoneDrifting is enabled. This is considered an insecure configuration option. It will be r> [root@www ~]# systemctl stop firewalld |
(2)关闭selinux
| sed -i 's/^SELINUX=.*/SELINUX=disabled/' /etc/selinux/config //或 [root@www ~]# vi /etc/selinux/config |
| # This file controls the state of SELinux on the system. # SELINUX= can take one of these three values: # enforcing - SELinux security policy is enforced. # permissive - SELinux prints warnings instead of enforcing. # disabled - No SELinux policy is loaded. SELINUX=disabled # SELINUXTYPE= can take one of these three values: # targeted - Targeted processes are protected, # minimum - Modification of targeted policy. Only selected processes are protected. # mls - Multi Level Security protection. SELINUXTYPE=targeted |
(3)重启设备并输入Sestatus查看状态
| [root@www ~]# sestatus SELinux status: enabled SELinuxfs mount: /sys/fs/selinux SELinux root directory: /etc/selinux Loaded policy name: targeted Current mode: enforcing Mode from config file: disabled Policy MLS status: enabled Policy deny_unknown status: allowed Memory protection checking: actual (secure) Max kernel policy version: 33 |
或getenforce
| [root@www ~]# getenforce Enforcing |
重启reboot
(4)安装Apache
1.安装Apache服务及扩展包
| yum -y install httpd httpd-manual mod_ssl mod_perl mod_auth_mysql |
| systemctl start httpd && systemctl enable httpd |
在浏览器地址栏输入 http://ip地址,运行,出现如下页面即安装成功
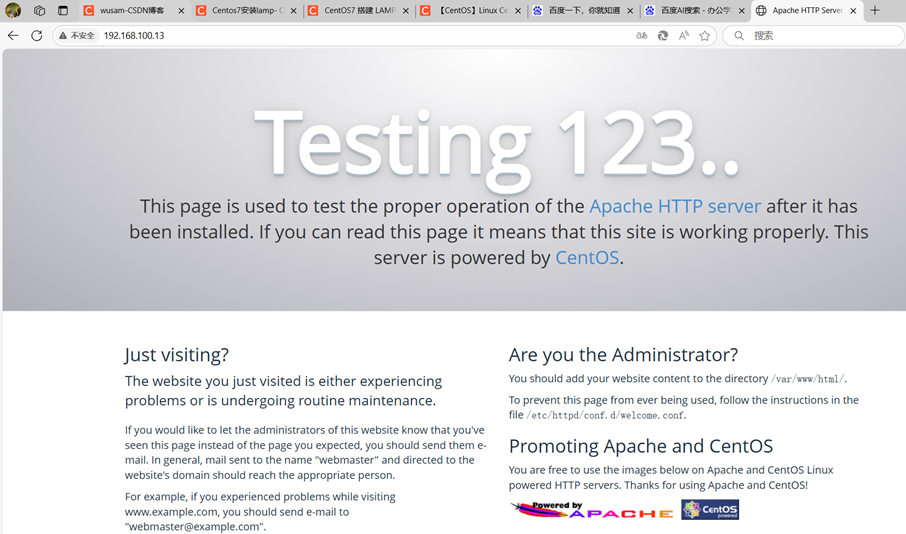
图4- 3
(5)安装MySQL
1.更新YUM源
| rpm -Uvh http://dev.mysql.com/get/mysql57-community-release-el7-9.noarch.rpm |
| yum -y install mysql-community-server |
如果出现错误:
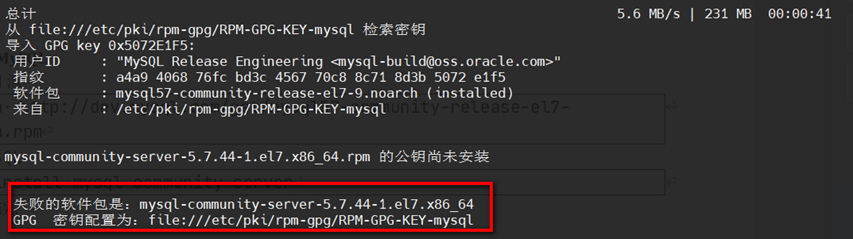
图4- 4
将其忽略掉:
| vi /etc/yum.repos.d/ mysql-community.repo …… [mysql57-community] name=MySQL 5.7 Community Server baseurl=http://repo.mysql.com/yum/mysql-5.7-community/el/7/$basearch/ enabled=1 gpgcheck=0 gpgkey=file:///etc/pki/rpm-gpg/RPM-GPG-KEY-mysql …… |
重新安装
3.查看MySQL版本号
| [root@lamp yum.repos.d]# mysql -V mysql Ver 14.14 Distrib 5.7.44, for Linux (x86_64) using EditLine wrapper |
4.启动mysql且开机自启
| systemctl start mysqld && systemctl enable mysqld && systemctl daemon-reload |
5.查看初始密码
| [root@lamp yum.repos.d]# grep "password" /var/log/mysqld.log 2025-04-21T09:11:53.822554Z 1 [Note] A temporary password is generated for root@localhost: L-nhlf1<qjhb |
6.配置MySQL的安全性(mysql root口令Admin@123456)
| mysql_secure_installation 重置root账号的密码 Enter password for user root: #输入上一步获取的root用户初始密码 The 'validate_password' plugin is installed on the server. The subsequent steps will run with the existing configuration of the plugin. Using existing password for root. Estimated strength of the password: 100 Do you wish to continue with the password provided?(Press y|Y for Yes, any other key for No) : Y 输入Y删除匿名用户账号 By default, a MySQL installation has an anonymous user, allowing anyone to log into MySQL without having to have a user account created for them. This is intended only for testing, and to make the installation go a bit smoother. You should remove them before moving into a production environment. Remove anonymous users? (Press y|Y for Yes, any other key for No) : Y #是否删除匿名用户,输入Y Success. 输入Y禁止root账号远程登录 Disallow root login remotely? (Press y|Y for Yes, any other key for No) : Y #禁止root远程登录,输入Y Success. 输入Y删除test库以及对test库的访问权限 Remove test database and access to it? (Press y|Y for Yes, any other key for No) : Y #是否删除test库和对它的访问权限,输入Y - Dropping test database... Success. 输入Y重新加载授权表 Reload privilege tables now? (Press y|Y for Yes, any other key for No) : Y #是否重新加载授权表,输入Y Success. All done! |
(6) 安装PHP
| //添加epel源 [root@lamp ~]# yum install -y epel-release [root@lamp ~]# curl -o /etc/yum.repos.d/epel.repo http://mirrors.aliyun.com/repo/epel-7.repo yum install -y \ https://repo.ius.io/ius-release-el7.rpm \ https://dl.fedoraproject.org/pub/epel/epel-release-latest-7.noarch.rpm //添加Webtatic源 rpm -Uvh https://mirror.webtatic.com/yum/el7/webtatic-release.rpm |
2.安装PHP
| yum -y install php70w-devel php70w.x86_64 php70w-cli.x86_64 php70w-common.x86_64 php70w-gd.x86_64 php70w-ldap.x86_64 php70w-mbstring.x86_64 php70w-mcrypt.x86_64 php70w-pdo.x86_64 php70w-mysqlnd php70w-fpm php70w-opcache php70w-pecl-redis php70w-pecl-mongodb |
3.查看PHP版本
| php -v PHP 7.0.33 (cli) (built: Dec 6 2018 22:30:44) ( NTS ) Copyright (c) 1997-2017 The PHP Group Zend Engine v3.0.0, Copyright (c) 1998-2017 Zend Technologies with Zend OPcache v7.0.33, Copyright (c) 1999-2017, by Zend Technologies |
4.在Apache网站根目录创建测试文件
| echo "<?php phpinfo(); ?>" > /var/www/html/phpinfo.php |
5.重启Apache服务
| systemctl restart httpd |
在浏览器地址栏输入http://ip地址/phpinfo.php,出现如下页面即表示安装成功
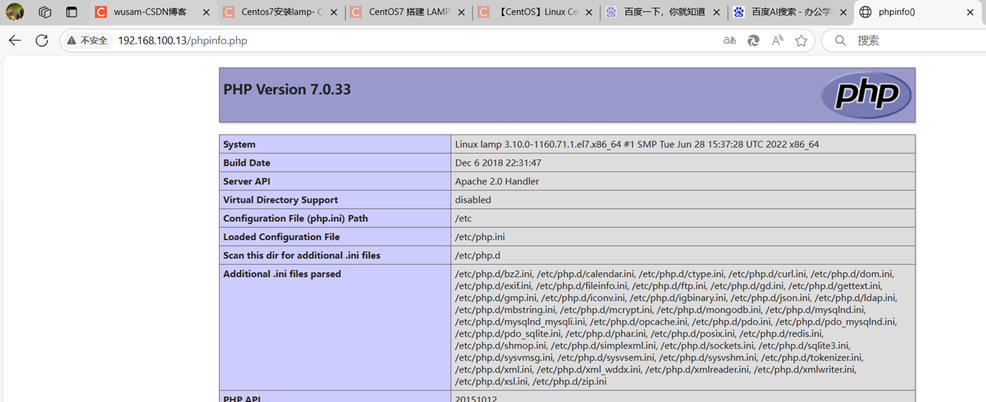
图4- 5
(7)安装phpMyAdmin
| mkdir -p /var/www/html/phpmyadmin |
| [root@lamp ~]# cd /tool [root@lamp tool]# wget https://files.phpmyadmin.net/phpMyAdmin/4.0.10.20/phpMyAdmin-4.0.10.20-all-languages.zip …… 2025-04-21 18:09:44 (2.30 MB/s) - 已保存 “phpMyAdmin-4.0.10.20-all-languages.zip” [7457007/7457007]) yum install -y unzip unzip phpMyAdmin-4.0.10.20-all-languages.zip |
3.复制phpMyAdmin文件到准备好的数据存放目录
| mv phpMyAdmin-4.0.10.20-all-languages/* /var/www/html/phpmyadmin |
4.检查是否安装成功
在浏览器地址栏输入http://ip地址/phpmyadmin,运行,出现如下页面即表示安装成功
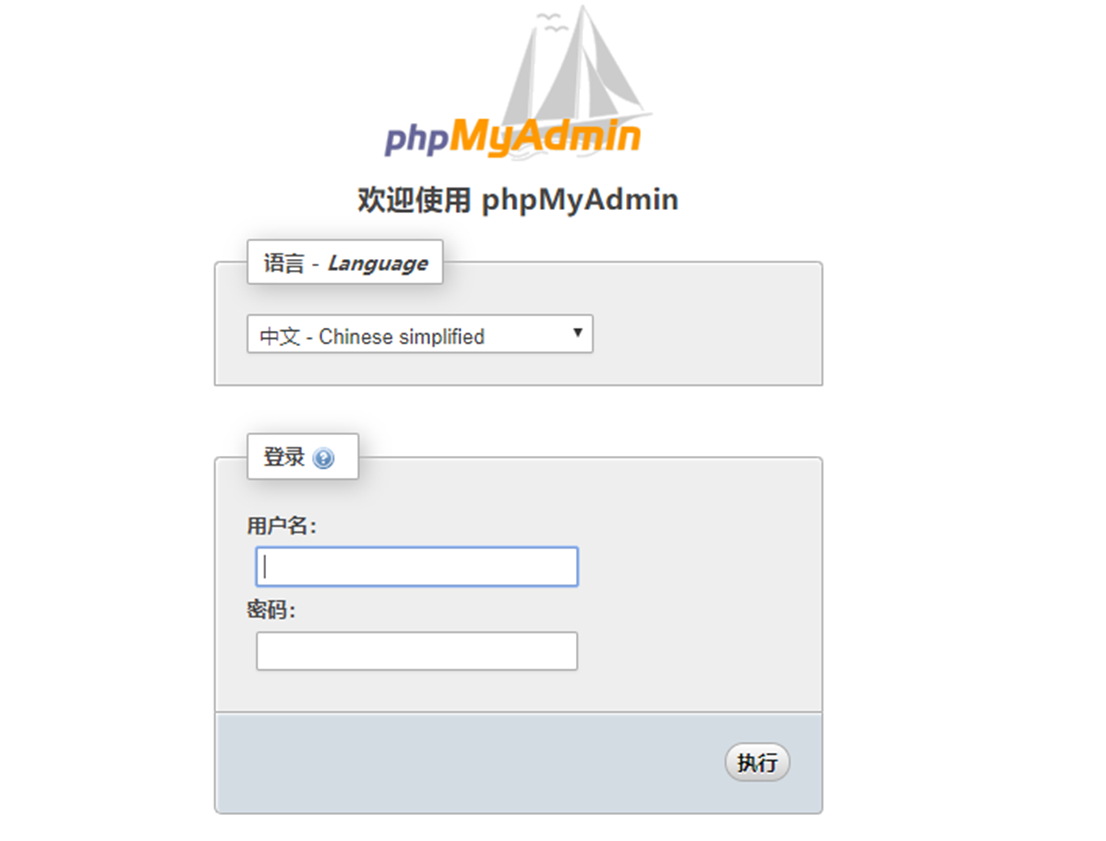
图4- 6
输入root/Admin@123456
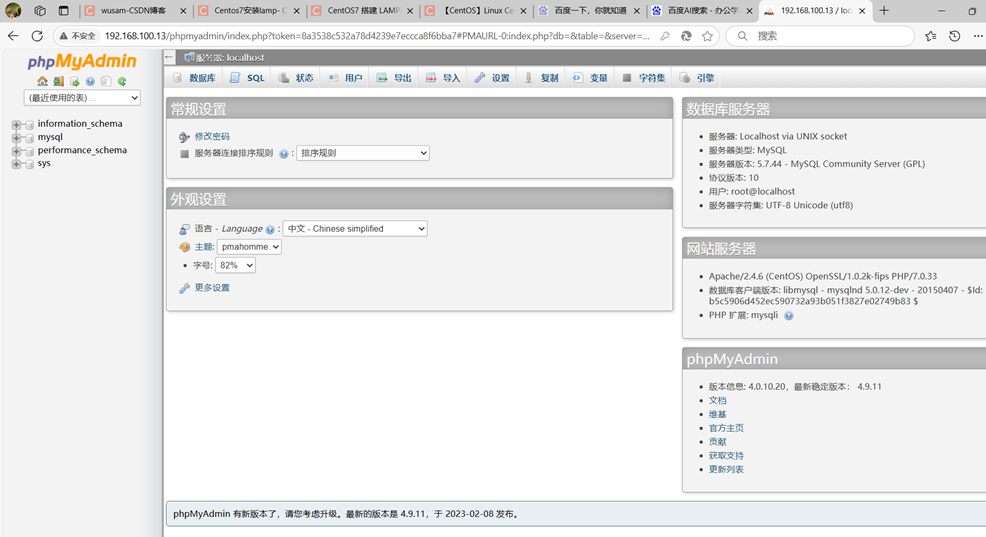
图4- 7
LAMP环境配置完成!
5.启动httpd(如果没安装,参照前面的实验,自行安装设置)
| systemctl start httpd systemctl enable httpd |
Apache目录文件
服务目录: /etc//httpd
主配置文件: /etc/httpd/conf/httpd.conf
默认网站主页存放目录: /var/www/html/
日志文件存放目录: /var/log/httpd/
从配置文件(个人主页): /etc/httpd/conf.d/
自定义主页文件,修改主配置文件,将默认主页存放目录改为/home/www/,并添加首页文件为myweb.html
(8)自己的个人主页
服务目录:/etc/httpd
主配置文件:/etc/httpd/conf/httpd.conf
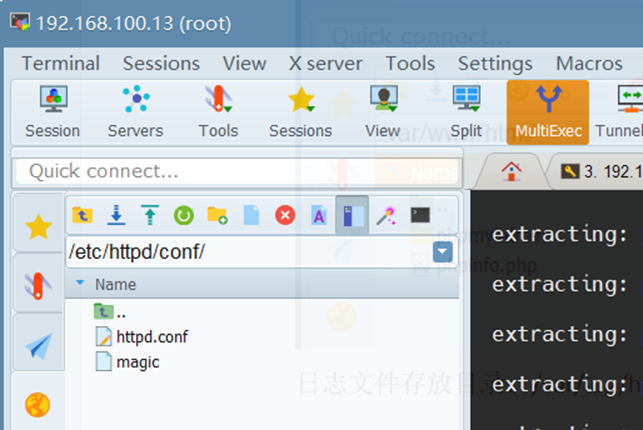
图4- 8
默认网站主页存放目录:/var/www/html/
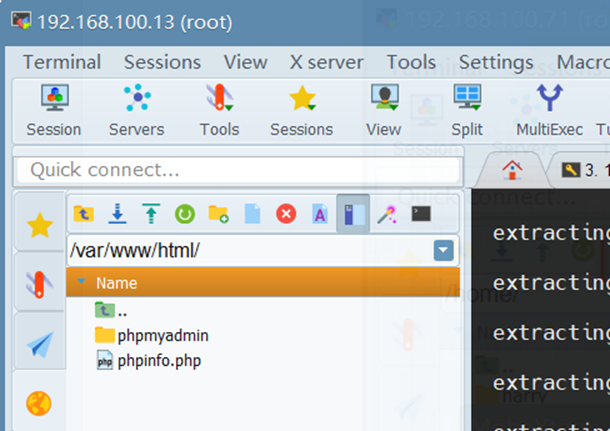
图4- 9
日志文件存放目录:/var/log/httpd/
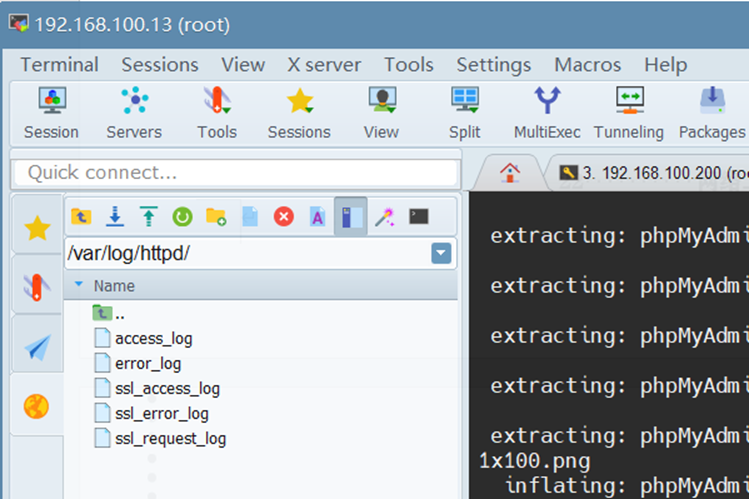
图4- 10
从配置文件(个人主页):/etc/httpd/conf.d/
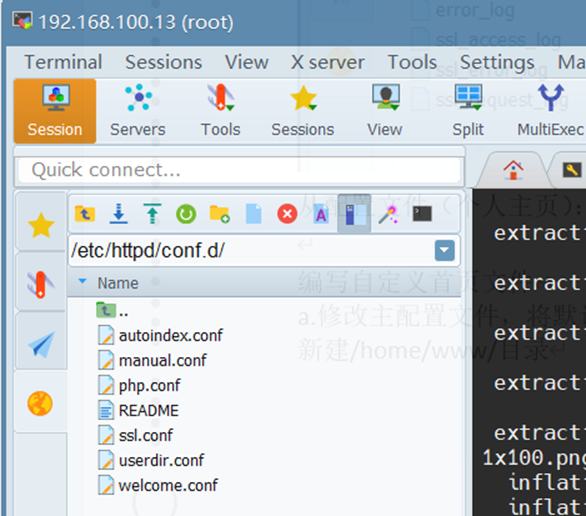
图4- 11
编写自定义首页文件
a)修改主配置文件,将默认主页存放目录改为/home/www/,并添加首页文件为wzzweb.html
新建/home/www/目录
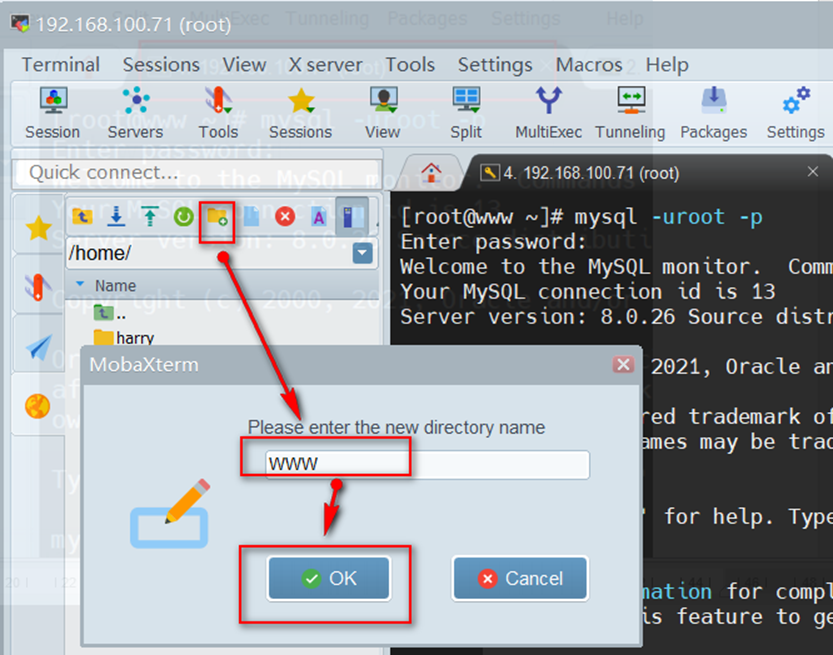
图4- 12
b)修改主页文件wzzweb.html
| <!doctype html> <html dir="ltr" lang="zh"> <head> <meta charset="utf-8"> <title>服务器管理与应用测试</title> </head> <body> <p>王大爷的课程</p> <p>1001001</p> <p>张三</p> <p>反向渗透测试</p> </body> </html> |
c)修改httpd.conf配置文件(红色部分就是根据自己的规划,进行修改的部分,其他的不要动)
| [root@www ~]# vi /etc/httpd/conf/httpd.conf # …… # DocumentRoot "/home/www" # # Relax access to content within /var/www. # <Directory "/home/www"> AllowOverride None # Allow open access: Require all granted </Directory> …… <IfModule dir_module> DirectoryIndex index.html wzzweb.html </IfModule> …… |
c.windows客户端查看
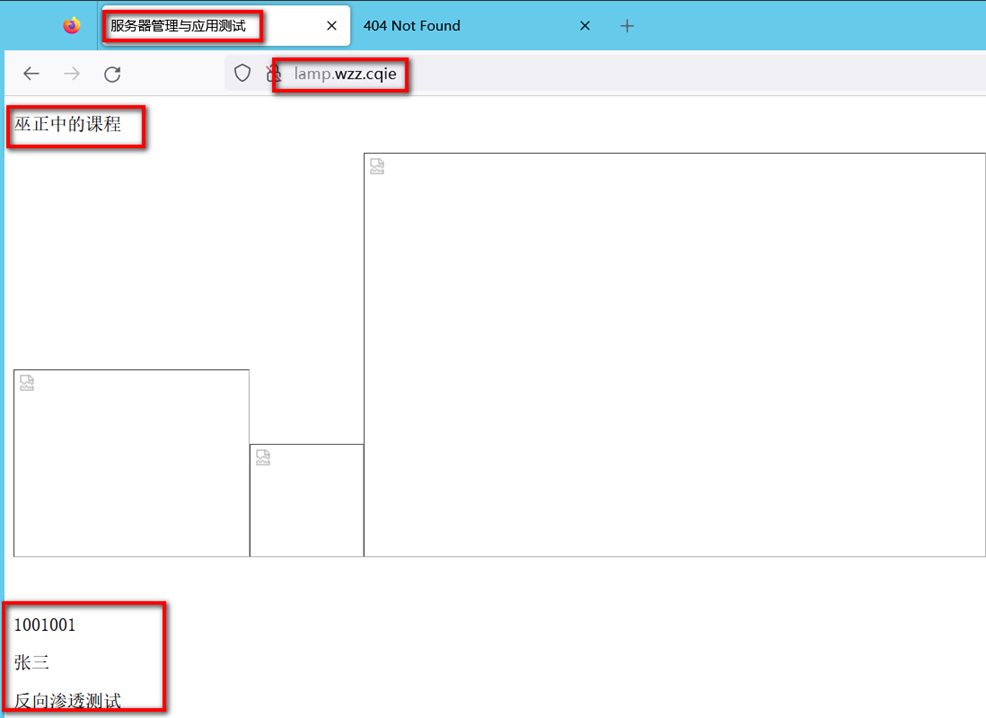
图4- 13
重启httpd服务。
(6)安装PHP框架
a.安装PHP框架
| [root@www ~]# dnf -y install php 上次元数据过期检查:1:38:37 前,执行于 2024年11月23日 星期六 20时03分51秒。 依赖关系解决。 …… 完毕! |
b.查看版本
| [root@www ~]# php --version PHP 7.2.24 (cli) (built: Oct 22 2019 08:28:36) ( NTS ) Copyright (c) 1997-2018 The PHP Group Zend Engine v3.2.0, Copyright (c) 1998-2018 Zend Technologies |
c.yum关联php和MySQL服务
| [root@www ~]# php --version PHP 7.2.24 (cli) (built: Oct 22 2019 08:28:36) ( NTS ) Copyright (c) 1997-2018 The PHP Group Zend Engine v3.2.0, Copyright (c) 1998-2018 Zend Technologies [root@www ~]# dnf search php-mysql 上次元数据过期检查:1:42:12 前,执行于 2024年11月23日 星期六 20时03分51秒。 =========名称 匹配:php-mysql =========== php-mysqlnd.x86_64 : A module for PHP applications that use MySQL databases [root@www ~]# dnf install php-mysqlnd.x86_64 -y 上次元数据过期检查:1:42:52 前,执行于 2024年11月23日 星期六 20时03分51秒。 …… 已安装: php-mysqlnd-7.2.24-1.module_el8.2.0+313+b04d0a66.x86_64 php-pdo-7.2.24-1.module_el8.2.0+313+b04d0a66.x86_64 完毕! |
d.安装常用PHP模块
| [root@www ~]# yum install -y php-gd php-ldap php-odbc php-pear php-xml php-xmlrpc php-mbstring php-snmp php-soap curl curl-devel php-bcmath 上次元数据过期检查:1:45:17 前,执行于 2024年11月23日 星期六 20时03分51秒。 软件包 curl-7.61.1-22.el8.x86_64 已安装。 …… 安装 23 软件包 总下载:5.9 M 安装大小:17 M 下载软件包: (1/23): lm_sensors-libs-3.4.0-23.20180522git70f7e08.el8.x86_64.rpm 92 kB/s | 59 kB 00:00 …… (23/23): unixODBC-2.3.7-1.el8.x86_64.rpm 1.7 MB/s | 458 kB 00:00 ------------------------------------------------------------------------------------------------------------------------------------------------------- 总计 1.6 MB/s | 5.9 MB 00:03 运行事务检查 事务检查成功。 运行事务测试 事务测试成功。 运行事务 …… 已安装: gd-2.2.5-7.el8.x86_64 jbigkit-libs-2.1-14.el8.x86_64 …… 完毕! |
e.重启httpd服务
| [root@www ~]# systemctl restart httpd |
f.将PHP信息从WEB端输出
进入主页数据目录
| [root@www ~]# cd /home/www [root@www www]# vi info.php <?php phpinfo(); ?> |
保存退出。
(7)测试php页面
做了域名解析的:通过http://域名/info.php 能访问。(注意DNS服务器能正常解析)
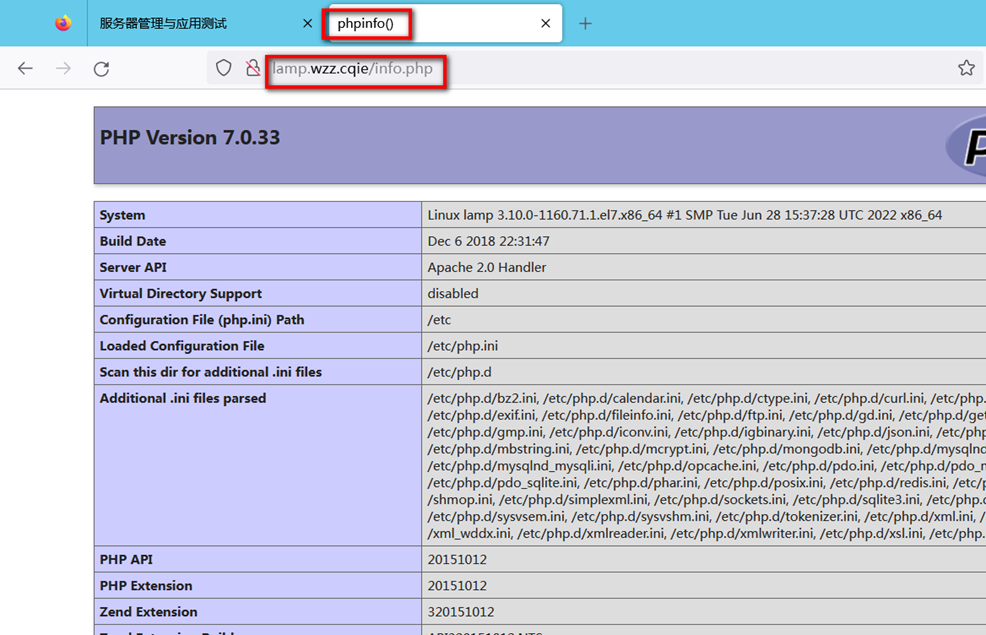
图4- 14
未做域名解析,通过ip访问:http://IP地址/info.php
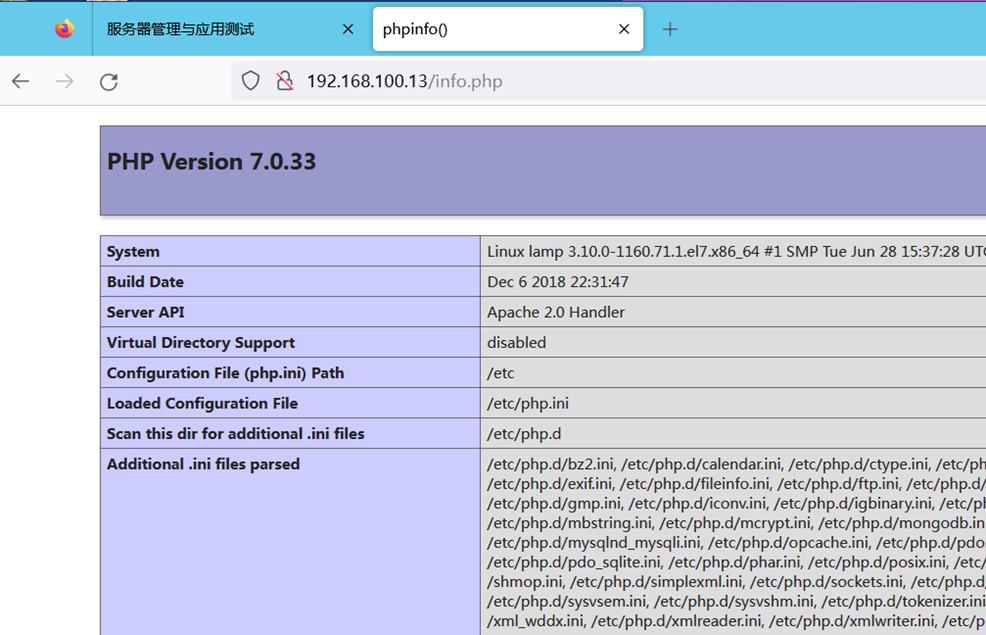
图4- 15
综合实验要求:
1. 重命名(Apache、MySQL、PHP在同一台服务器)的主机名,与学生姓名全拼一致;(10分)
2.MySQL数据库启动成功及查看数据库当前运行状态图;(10分)
3.初次登录数据库重置root账户密码成功图;(10分)
4.Apache服务的主配置文件中,将域名修改成学生自己的域名、默认主页存放目录改为/home/www/,并添加首页文件为myweb.html 的参数更改截图;(10分)
5.在浏览器中分别通过IP、域名访问首页文件成功图(首页文件包括学生专业、姓名、学号、本课程名称);(10分)
6. 在浏览器中分别通过域名访问个人主页成功图;(10分);
7. 在浏览器中分别通过域名访问虚拟目录成功图(10分);
8.安装PHP成功图及PHP相关模块成功图;(10分)
9. PHP与Mysql数据库关联成功图;(10分)