Vue实战2
Vue实战2
通过create-vue创建Vue脚手架(npm为NodeJs的软件包管理器)
Vue的创建
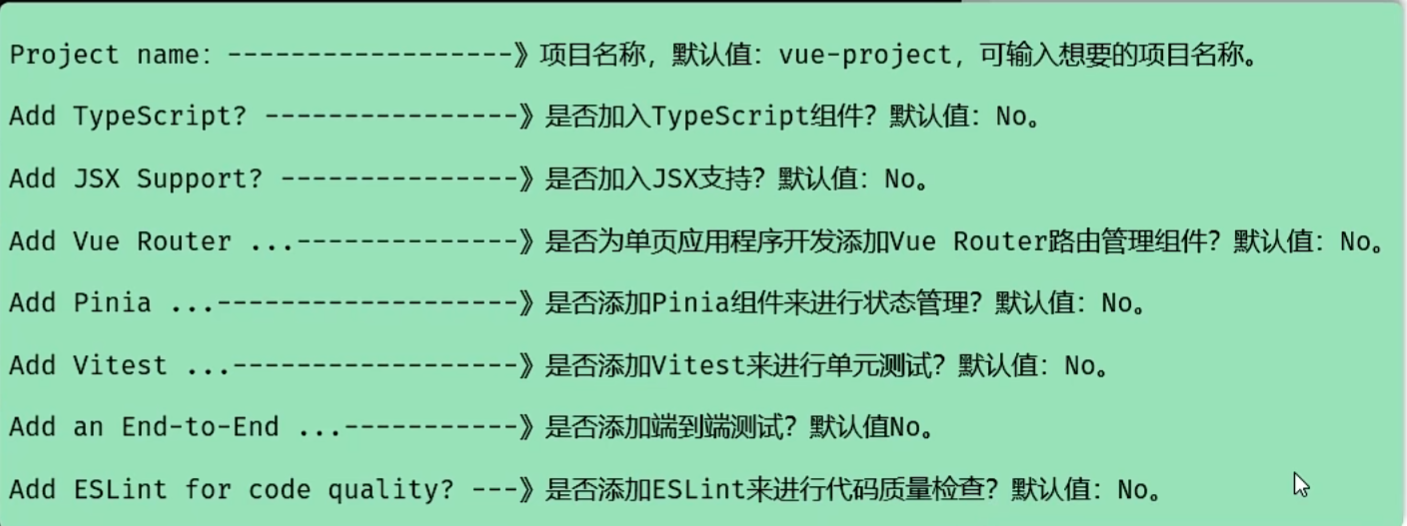
npm init vue@latest创建项目基本的选项
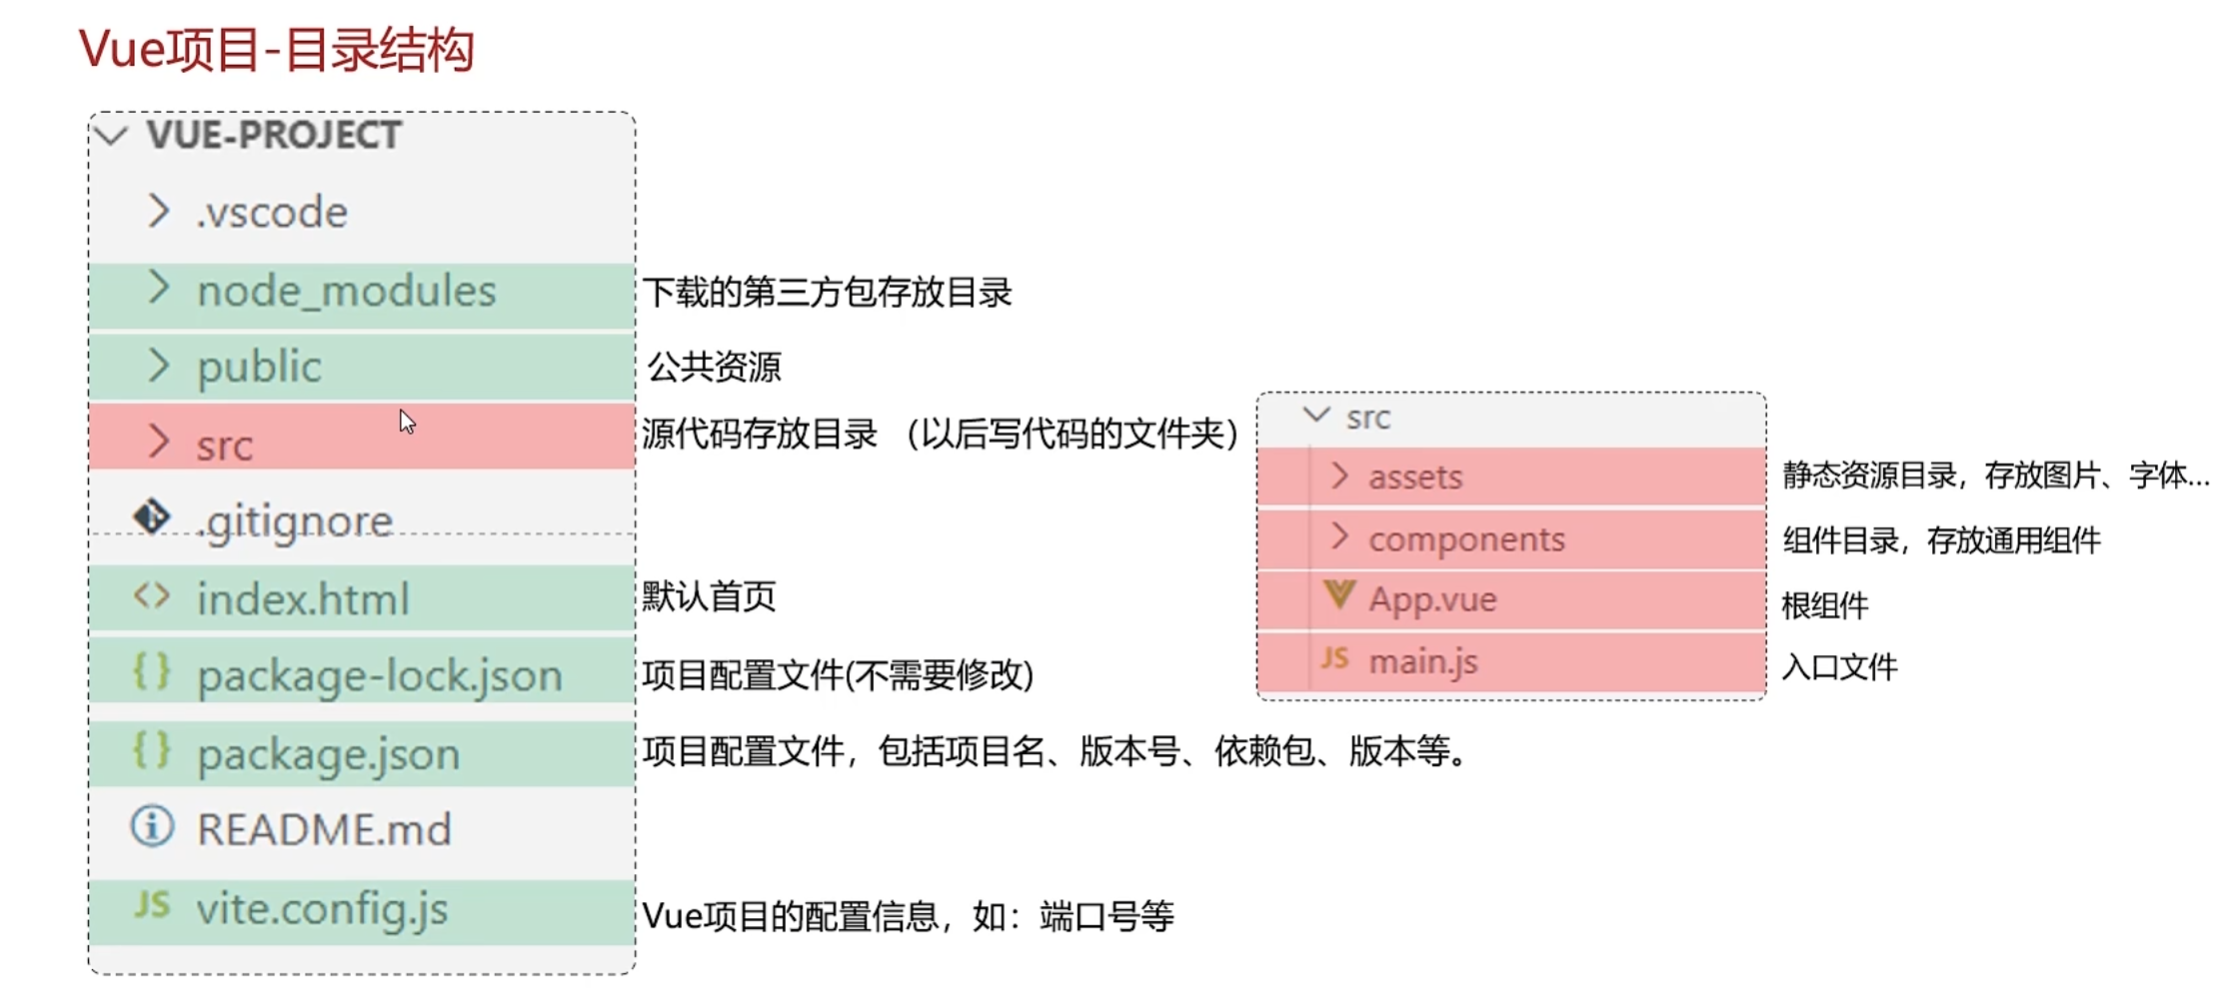
Vue项目的目录结构
启动Vue项目:npm run dev
或者通过npm脚本中的dev启动(vscode中的npm脚本打开方式通过点击package.json文件就会出现)
Vue项目的入口文件是main.js
执行流程:
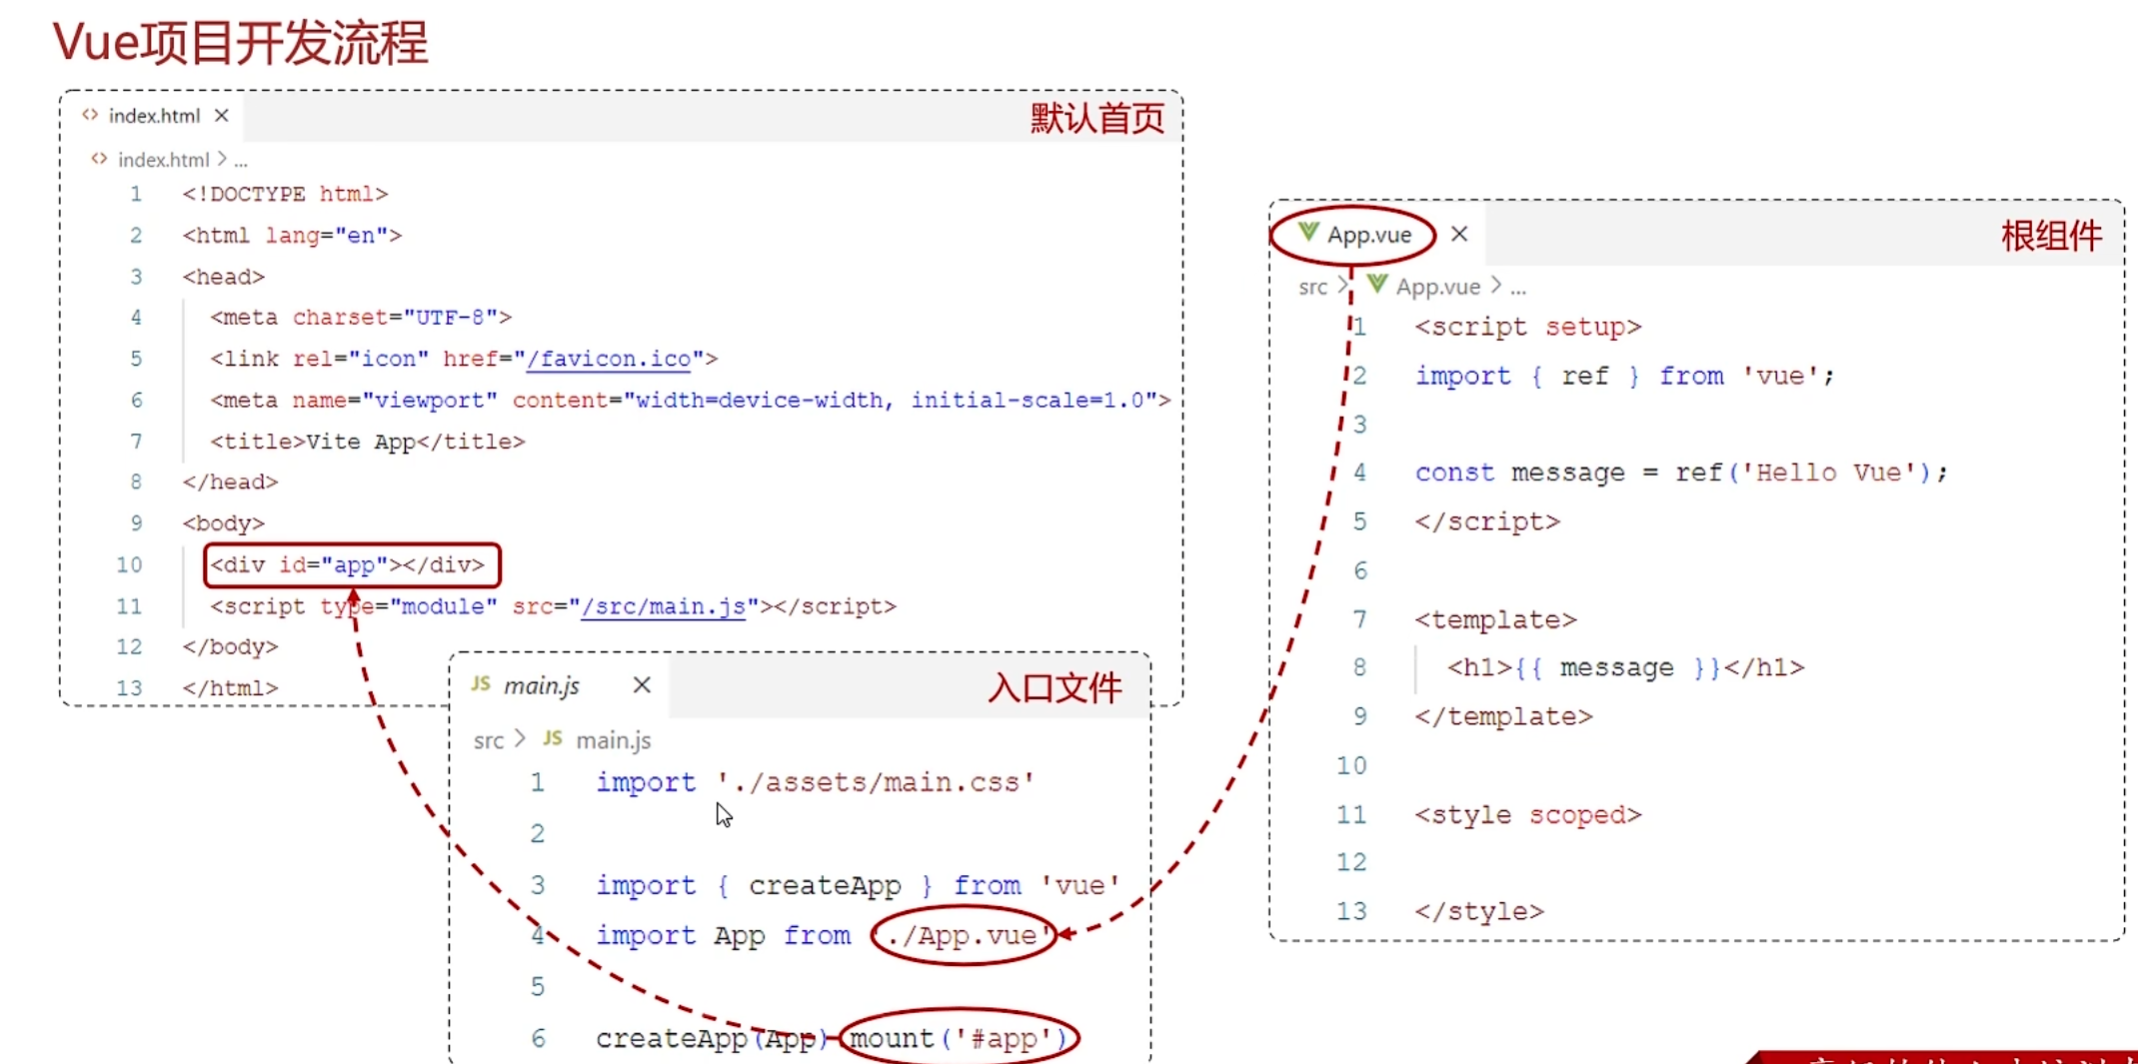
通过main.js的createApp方法将对应的App.vue导入
createApp(App).mount('#app')
在通过mount将此Vue实例关联到index.html中
<!DOCTYPE html>
<html lang=""><head><meta charset="UTF-8"><link rel="icon" href="/favicon.ico"><meta name="viewport" content="width=device-width, initial-scale=1.0"><title>Vite App</title></head><body><div id="app"></div><script type="module" src="/src/main.js"></script></body>
</html>
App.vue分为三个部分
template:编写HTML代码
style:编写CSS代码
script:编写JS代码
<!-- <script>
// 写数据
// 默认导出---》用于填充在main.js中的createApp()方法中
export default {data() {return {msg: "上海"};}
};
</script> -->
<script setup>import { ref } from "vue";const msg = ref("西安");//ref 创建响应式数据
</script>
<template><!-- HTML代码 --><!-- <h1>北京</h1> --><h1>{{ msg }}</h1>
</template><style scoped>
/* CSS代码 */
h1 {color: red;
}
</style>
Vue的API风格(组合式API和选项式API)

组合式API必须通过.value才能获取或者修改数据
Api.vue:
<script setup>import { ref,onMounted } from 'vue'// 声明响应式数据 ref,响应式的对象内部有一个属性 value// 在组合式API中一般需要将数据定义为响应式数据const count = ref(0);// 声明函数const increment = () => {count.value++;}// 声明钩子函数onMounted(() => {console.log('组件挂载完毕');})
</script><template><!-- 写HTML元素 --><button @click="increment">count:{{ count }}</button>
</template>
导入Api.vue到App.vue中:通过默认导入取的别名进行调用对应的子组件的内容
<ApiVue></ApiVue>或者<ApiVue/>
import ApiVue from "./Api.vue";
<script setup>import { ref } from "vue";const msg = ref("西安");//ref 创建响应式数据// 导入Api.vue组件import ApiVue from "./Api.vue";
</script>
<template><!-- HTML代码 --><!-- <h1>北京</h1> --><h1>{{ msg }}</h1><ApiVue></ApiVue>
</template><style scoped>
/* CSS代码 */
h1 {color: red;
}
</style>
综合案列:axios.get('http://localhost:8080/article/search',{params:{...searchCondition.value}})表示通过axios进行异步请求同时通过params进行参数的传递(...searchCondition.value表示解析这个响应式对象中的数据)
工程化的使用axios的时候通过npm install axios先导入库文件
import axios from 'axios'
<script setup>
// 通过钩子函数获取所有的文章数据
import { onMounted, ref } from 'vue'
// 引入axios  npm install axios
// axios 为默认导出的 因此需要直接进行默认导入
import axios from 'axios'// 声明响应式数据
const articleList = ref([])// 发送异步请求获取文章数据
axios.get('http://127.0.0.1:8080/article/getAll')
.then(result => {// 把服务器响应的数据保存起来articleList.value = result.data
}).catch(err => {console.log(err)
});// 指定响应式数据通过v-model进行双向绑定
const searchCondition=ref({category:'',state:''
})// 为搜索按钮绑定点击事件
// function search(){
//     axios.get('http://127.0.0.1:8080/article/search?category='+searchCondition.value.category+'&state='+searchCondition.value.state)
//     .then(result => {
//         // 把服务器响应的数据保存起来
//         articleList.value = result.data
//     }).catch(err => {
//         console.log(err)
//     });
// }
const search = () => {axios.get('http://127.0.0.1:8080/article/search?category='+searchCondition.value.category+'&state='+searchCondition.value.state)// axios.get('http://localhost:8080/article/search',{params:{...searchCondition.value}}).then(result => {// 把服务器响应的数据保存起来articleList.value = result.data}).catch(err => {console.log(err)});
}
</script><template><div>文章分类: <input type="text" v-model="searchCondition.category">发布状态: <input type="text" v-model="searchCondition.state"><button @click="search">搜索</button><br /><br /><table border="1 solid" colspa="0" cellspacing="0"><tr><th>文章标题</th><th>分类</th><th>发表时间</th><th>状态</th><th>操作</th></tr><tr v-for="article in articleList"><td>{{article.title}}</td><td>{{article.category}}</td><td>{{article.time}}</td><td>{{article.state}}</td><td><button>编辑</button><button>删除</button></td></tr></table></div></template>
将对应的文章服务方法放在另外一个js文件中通过导出的形式在这个Vue中进行调用
// 导入axios
import axios from 'axios'// 定义一个变量,用于记录公共的前缀,BaseUrl
const BaseUrl = 'http://127.0.0.1:8080'
const instance = axios.create({baseURL: BaseUrl
})// 获取所有文章数据的函数
// 由于是axios的异步操作,所以不能同步获取到对应的响应的结果
// 需要同步等待服务器响应的结果并进行返回等待的结果---》
// async设定为异步  await:等待同步返回的结果(只能用在 async 异步函数中)
export async function articleGetAllService(){return await instance.get('/article/getAll').then(result => {// 把服务器响应的数据直接进行返回return result.data}).catch(err => {console.log(err)});
}// 根据文章的分类和发布状态搜索的函数
export async function articleSearchService(conditions){return await instance.get('/article/search',{params:conditions}).then(result => {// 把服务器响应的数据直接进行返回return result.data}).catch(err => {console.log(err)});
}
引入文章相关的服务函数@/表示的是src目录
<script setup>
// 通过钩子函数获取所有的文章数据
import { onMounted, ref } from 'vue'
// 引入axios  npm install axios
// axios 为默认导出的 因此需要直接进行默认导入
import axios from 'axios'
// 引入文章相关的服务函数@/表示的是src目录
import { articleGetAllService,articleSearchService } from '@/api/article'// 声明响应式数据
const articleList = ref([])// 发送异步请求获取文章数据
// 同步获取articleGetAllService函数的返回值
const getAllArticle =async function() {let data=await articleGetAllService()articleList.value=data
}
getAllArticle();// 指定响应式数据通过v-model进行双向绑定
const searchCondition=ref({category:'',state:''
})
// 为搜索按钮绑定点击事件
const search =async function() {let data=await articleSearchService({...searchCondition.value})articleList.value=data
}</script>
async设定为异步,await等待异步操作返回结果
通过如下代码可以设定指定的请求路径的前缀
// 导入axios
import axios from 'axios'// 定义一个变量,用于记录公共的前缀,BaseUrl
const BaseUrl = 'http://127.0.0.1:8080'
const instance = axios.create({baseURL: BaseUrl
})
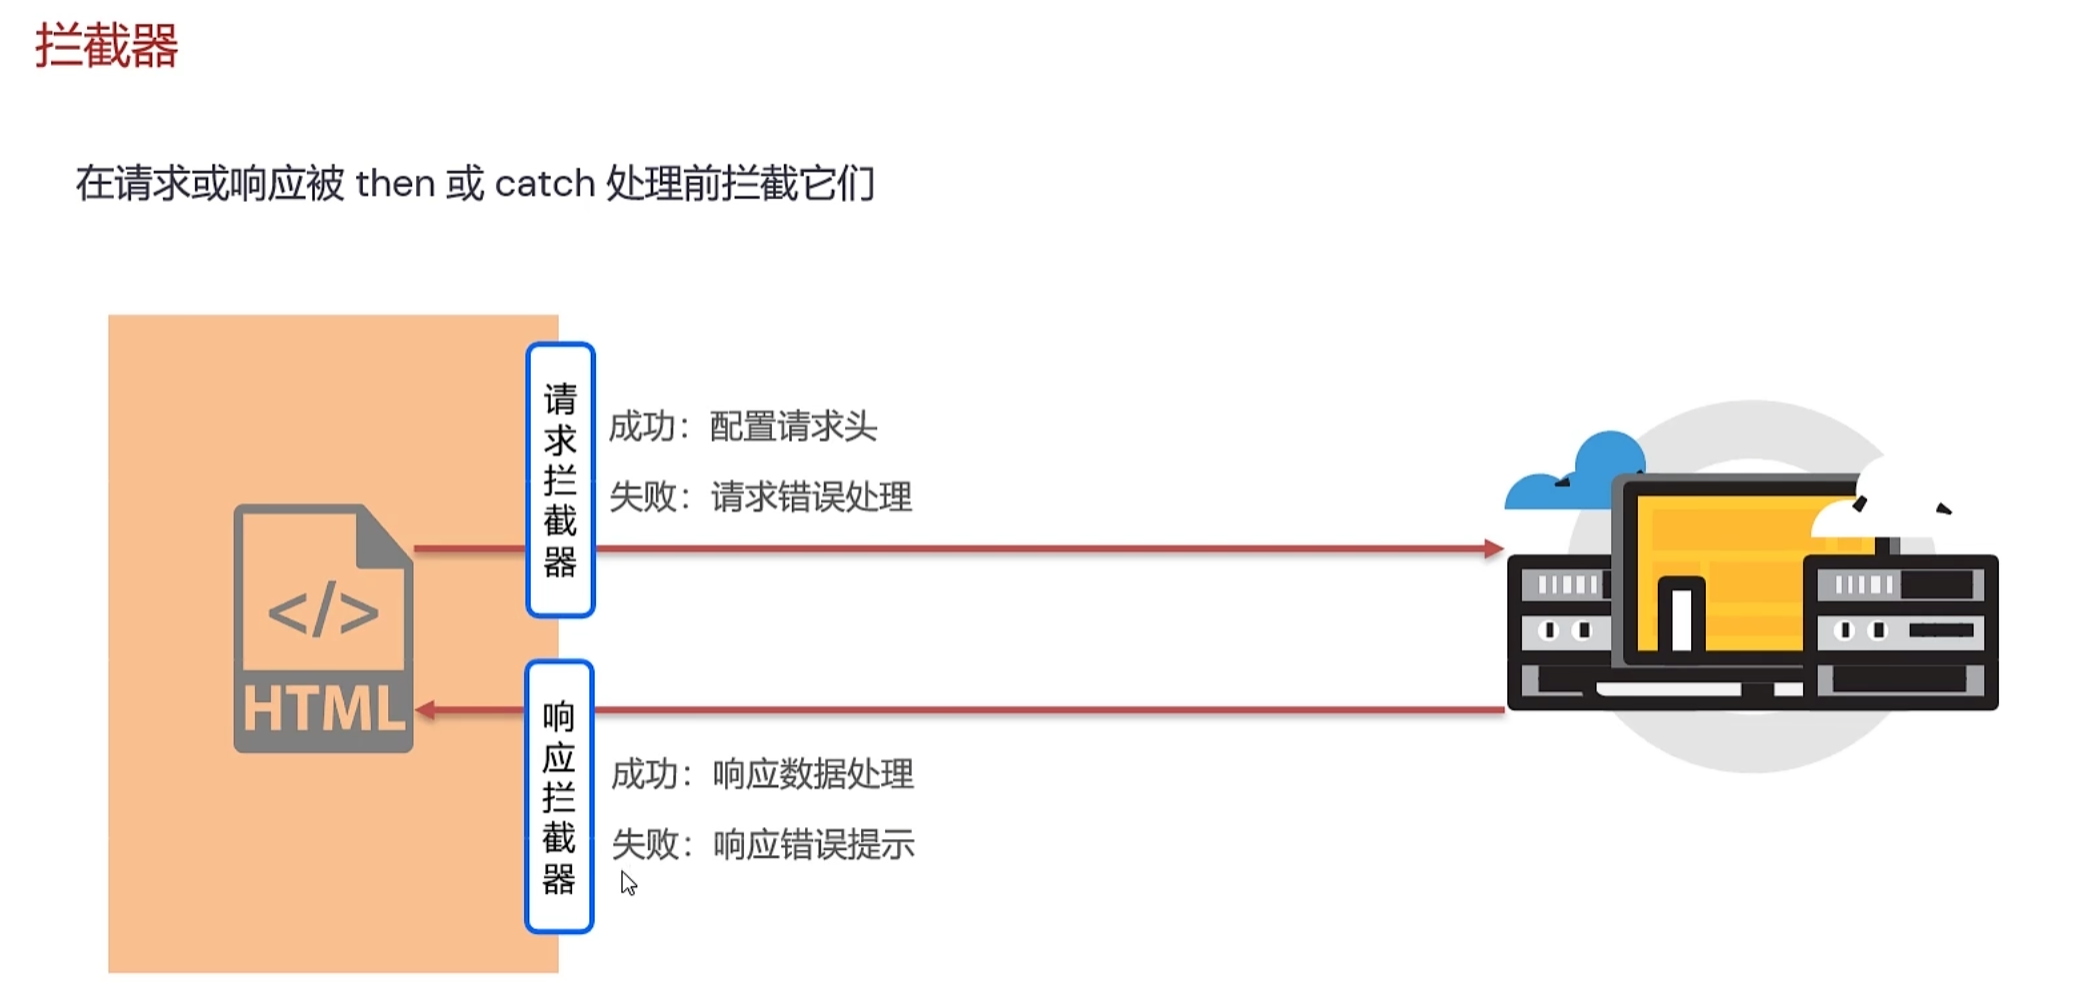
通过一个对于异步请求axios设定一个响应的拦截器,再将axios的实例进行导出,在另一个js文件中导入就不需要处理对应的then,catch操作了
// 定制请求的实例
// 导入axios
import axios from 'axios'// 定义一个变量,用于记录公共的前缀,BaseUrl
const BaseUrl = 'http://127.0.0.1:8080'
const instance = axios.create({baseURL: BaseUrl
})// 添加响应的拦截器
instance.interceptors.response.use(// function (response) {//     // 对响应数据做点什么//     return response.data// },result=>{return result.data},// function (error) {//     // 对响应错误做点什么//     alert('服务器出错了')//     return Promise.reject(error)//将异步的状态转化为失败的状态// }err=>{alert('服务器出错了')return Promise.reject(err)}
)export default instance
import request from '@/util/request.js'
export function articleGetAllService(){return request.get('/article/getAll')
}// 根据文章的分类和发布状态搜索的函数
export function articleSearchService(conditions){return request.get('/article/search',{params:conditions})
}