人工智能-深度学习之多层感知器
深度学习
- 任务
- 任务1
- 任务2
- 任务3
- 机器学习的弊端
- 多层感知器 (MLP/人工神经网络)
- MLP实现非线性分类
- Keras介绍与实战准备
- Keras or Tensorflow
- Keras建立MLP模型
- 实战(1): 建立MLP实现非线性二分类
- 实战(2): MLP实现图像多分类
- mnist数据集介绍
- 完整实战
- 完整实战(1): 建立MLP实现非线性二分类
- 完整实战(2): MLP实现图像多分类
任务
任务1
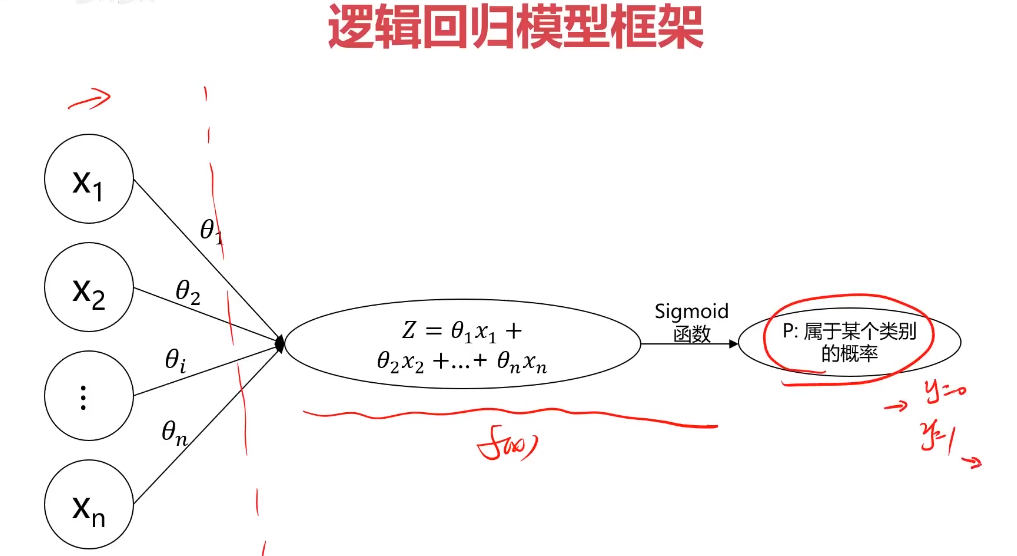
任务:根据检测数据x1、x2及其标签,判断x1=0.7、x2=0.6时所属类别
逻辑回归:需要生成多项式属性,如果初始数据属性有100项,再生成多项式数据,数据量将非常庞大!
任务2
任务:根据各个国家100项指标,判断其未来5年的发展潜力
分析:100项初始指标,其二次多项式有超过5000项!
任务3
任务:自动识别图片里面的动物是猫还是狗
机器学习的弊端
比如说:
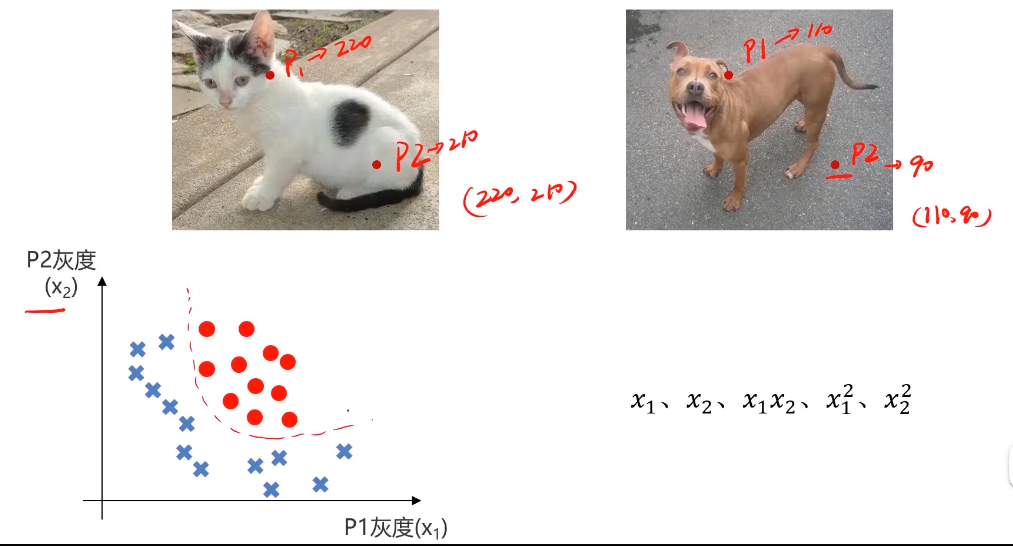
选取两个点P1,P2,基于其灰度进行分类预测时,根据其灰度组成坐标(220,210)和(110,90),绘制成图像可以观察得出该模型是一个多项式(如二次多项式)。
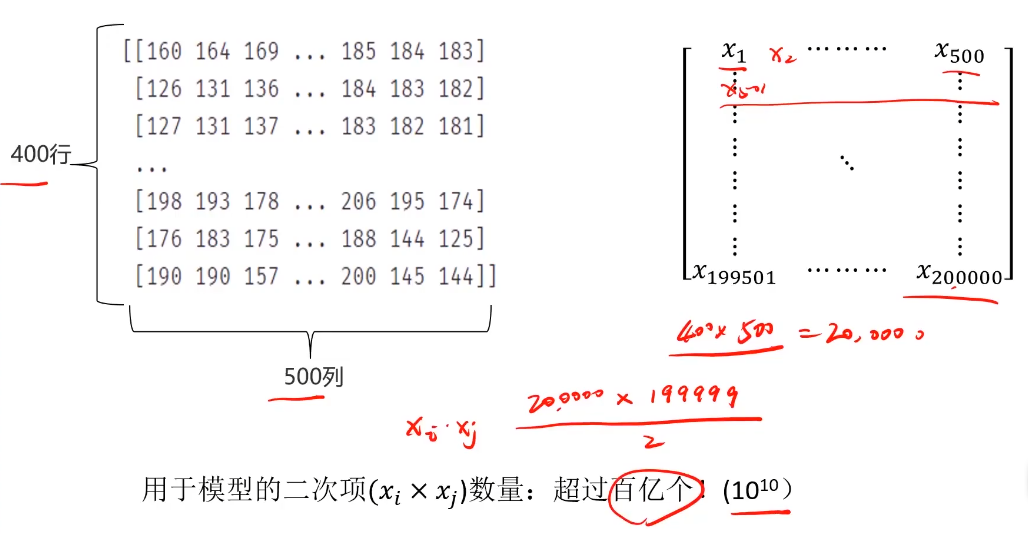
当一个图片为400x500时,模型的二次型数量超过百亿个,很难训练,且训练结果不一定好。
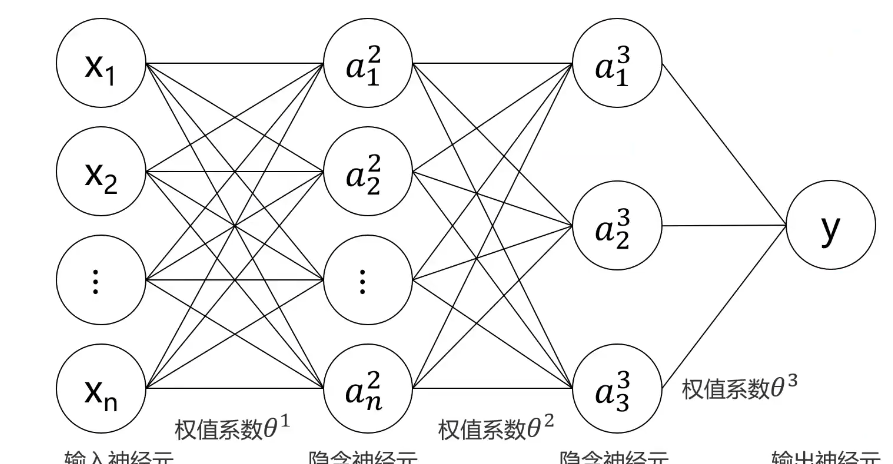
多层感知器 (MLP/人工神经网络)
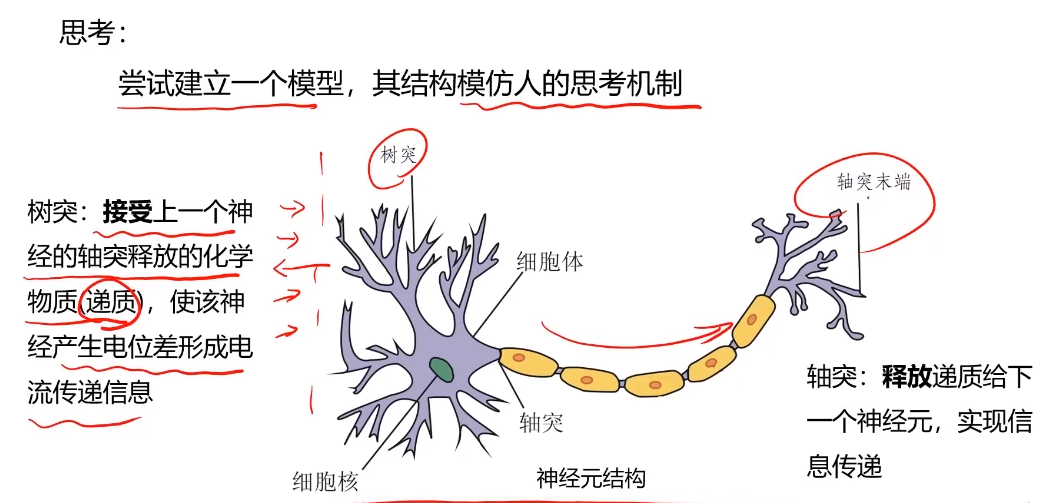
人的神经反应由无数神经元组成的网状结构形成。
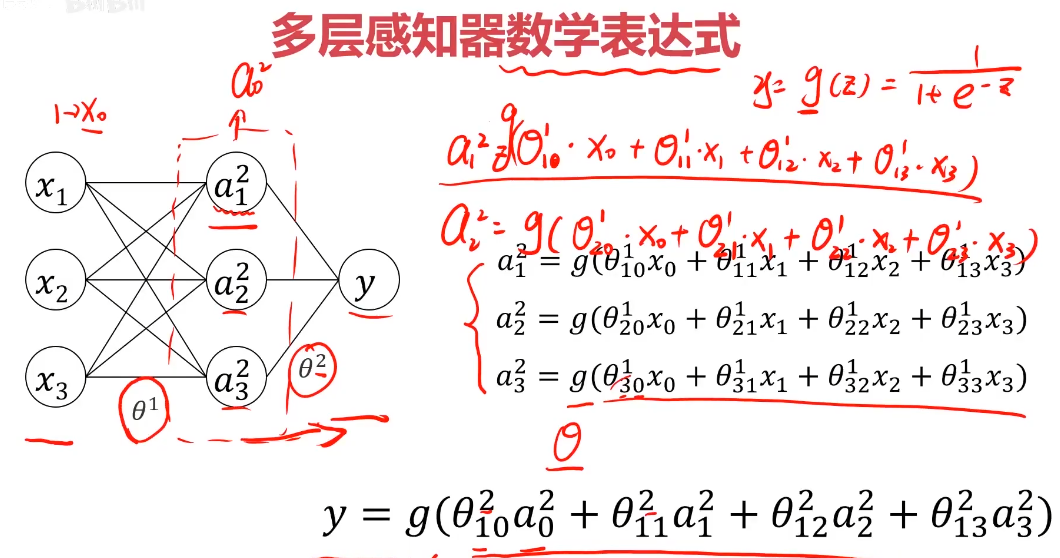
多层感知器模型框架:
MLP实现非线性分类
Keras介绍与实战准备
Keras是一个用Python编写的用于神经网络开发的应用接口,调用开接口可以实现神经网络、卷积神经网络、循环神经网络等常用深度学习算法的开发
特点:
1、集成了深度学习中各类成熟的算法,容易安装和使用,样例丰富,教程和文档也非常详细
2、能够以TesnsorFlow,或者Theano作为后端运行

Keras or Tensorflow
Tensorflow是一个采用数据流图,用于数值计算的开源软件库,可自动计算模型相关的微分导数:非常适合用于神经网络的模型的求解。
Keras可看作tensorflow封装后的一个接口(Keras作为前端,TensorFlow作为后端)。
Keras为用户提供了一个易于交互的外壳,方便进行深度学习的快速开发。
Keras建立MLP模型
#建立一个Sequential顺序模型
from keras.models import Sequential
model = Sequential()#通过.add()叠加各层网络
from keras.layers import Dense
model.add(Dense(units=3,activation='sigmoid',input_dim=3))
model.add(Dense(units=1,activation='sigmoid'))#通过.compile()配置模型求解过程参数
model.compile(loss='categorical_crossentropy',optimizer='sgd')#训练模型
model.fit(x_train, y_train, epochs=5)

实战(1): 建立MLP实现非线性二分类
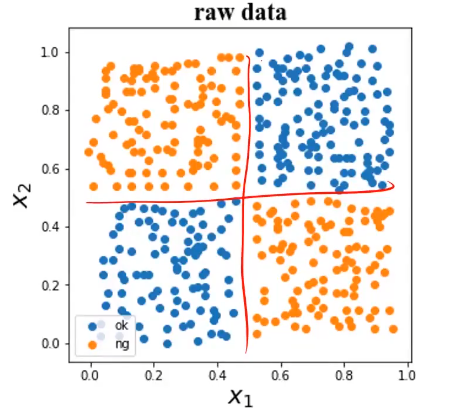
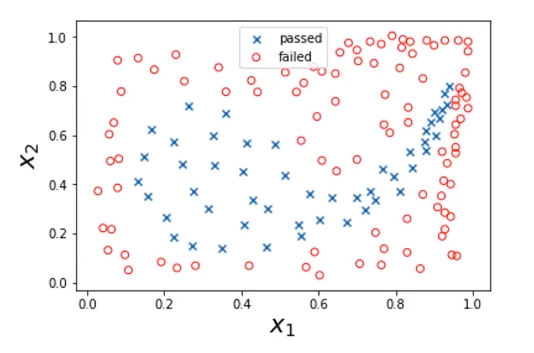
任务:基于data.csv数据,建立MLP模型,计算其在测试数据上的准确率,可视化模型预测结果:
进行数据分离:
test_size=0.33,random_state=10
模型结构:一层隐藏层,有20个神经元
#建立MLP模型,查看模型结构:
from keras.models import Sequential:
from keras.layers import Dense,Activation:
mlp = Sequential()
mlp.add(Dense(20,input_dim=2,activation='sigmoid'))
mlp.add(Dense(1,activation='sigmoid'))
mlp.summary()
#配置模型参数
mlp.compile(optimizer='adam',loss='binary_crossentropy')
#模型训练
mlp.fit(X_train, y_train, epochs=3000)
#结果预测
y_test_predict=mlp.predict_classes(X_test)
#把预测结果转换为可用于索引的Series类型
y_range_predict = pd.Series([i[0] for i in y_range_predict])
实战(2): MLP实现图像多分类
任务:基于mnist数据集,建立mlp模型,实现0-9数字的十分类:
1、实现mnist数据载入,可视化图形数字
2、完成数据预处理:图像数据维度转换与归一化、输出结果格式转换
3、计算模型在预测数据集的准确率
4、模型结构:两层隐藏层,每层有392个神经元
# 加载mnist数据集
from keras.datasets import mnist
(X_train, y_train),(X_test,y_test)=mnist.load_data()
# 可视化图片
img1 = X_train[0]
fig1 = plt.figure(figsize=(3,3))
plt.imshow(img1)
#转换输出结果格式
from keras.utils import to_categorical
y_train_format = to_categorical(y_train)
#转换输入数据维度
feature_size = (img1.shape[0])*(img1.shape[1])
X_train_format = X.train.reshape(X_train.shape[0].feature.size)
#模型建立:
mlp=Sequential()
mlp.add(Dense(units=392,activation='sigmoid',input_dim=feature_size))
mlp.add(Dense(units=392,activation='sigmoid'))
mlp.add(Dense(units=10,activation='softmax'))
#查看模型结构
mlp.summary()
#配置训练参数
mlp.compile(loss='categorical_crossentropy',optimizer='adam')
#模型训练
mlp.fit(X_train_normal,y_train_format,epochs=10)
mnist数据集介绍
机器学习领域中非常经典的一个数据集,由60000个训练样本和10000个测试样本组成,每个样本都是一张28*28像素的灰度手写数字图片。

完整实战
完整实战(1): 建立MLP实现非线性二分类
#load the data
import pandas as pd
import numpy as np
data = pd.read_csv('data.csv')
data.head()
#define the X and y
X = data.drop(['y'], axis=1)
y = data.loc[:,'y']
X.head()
#visualize the data
%matplotlib inline
from matplotlib import pyplot as plt
fig1 = figure(figsize=(5,5))
passed = plt.scatter(X.loc[:,'x1'][y==1],X.loc[:,'x2'][y==1])
failed = plt.scatter(X.loc[:,'x1'][y==0],X.loc[:,'x2'][y==0])
plt.legend((passed,failed),('passed','failed'))
plt.xlabel('x1')
plt.ylabel('x2')
plt.title('raw data')
plt.show()
#split the data
from sklearn.model_selection import train_test_splist
X_train,X_test,y_train,y_test = train_test_split(X,y,test_size=0.33,radom_state=10)
print(X_train.shape,X_test.shape,X.shape)
#set up the model
from keras.models import Sequential
from keras.layers import Dense,Activation
mlp = Sequential()
mlp.add(Dense(units=29,input_dim=2,activation='sigmoid'))
mlp.add(Dense(units=1,activation='sigmoid'))
mlp.summary()
#compile the model
mlp.compile(optimizer='adam',loss='binary_crossentropy')
#train the model
mlp.fit(X_train,y_trian,epochs=3000)
#make prediction and calculate the accuracy
y_train_predict = mlp.predict_classes(X_train)
from sklearn.metrics import accuracy_score
accuracy_train = accuracy_score(y_train, y_train_predict)
print(accuracy_train)
#make prediction and calculate the accuracy
y_test_predict = mlp.predict_classes(X_test)
accuracy_test = accuracy_score(y_test, y_test_predict)
print(accuracy_test)
y_train_predict_form = pd.Series(i[0] for i in y_train_predict)
print(y_train_predict_form)
#generate new data for plot
xx, yy = np.meshgrid(np.arange(0, 1, 0.01),np.arange(0, 1, 0.01))
x_range = np.c_[xx.ravel(), yy.ravel()]
y_range_predict = mlp.predict_classes(x_range)
print(type(y_range_predict))
#format the output
y_range_predict_form = pd.Series(i[0] for i in y_range_predict)
print(y_range_predict_form)fig1 = figure(figsize=(5,5))
passed_predict = plt.scatter(x_range[:,0][y_range_predict_form==1],x_range[:,1][y_range_predict_form==1])
failed_predict = plt.scatter(x_range[:,0][y_range_predict_form==0],x_range[:,1][y_range_predict_form==0])passed = plt.scatter(X.loc[:,'x1'][y==1],X.loc[:,'x2'][y==1])
failed = plt.scatter(X.loc[:,'x1'][y==0],X.loc[:,'x2'][y==0])
plt.legend((passed,failed,passed_predict,failed_predict),('passed','failed','passed_predict','failed_predict'))
plt.xlabel('x1')
plt.ylabel('x2')
plt.title('prediction result')
plt.show()
完整实战(2): MLP实现图像多分类
# 加载mnist数据集
from keras.datasets import mnist
(X_train, y_train),(X_test,y_test)=mnist.load_data()
# 可视化图片
img1 = X_train[0]
fig1 = plt.figure(figsize=(3,3))
plt.imshow(img1)
#转换输出结果格式
from keras.utils import to_categorical
y_train_format = to_categorical(y_train)
#转换输入数据维度
feature_size = (img1.shape[0])*(img1.shape[1])
X_train_format = X.train.reshape(X_train.shape[0].feature.size)
#模型建立:
mlp=Sequential()
mlp.add(Dense(units=392,activation='sigmoid',input_dim=feature_size))
mlp.add(Dense(units=392,activation='sigmoid'))
mlp.add(Dense(units=10,activation='softmax'))
#查看模型结构
mlp.summary()
#配置训练参数
mlp.compile(loss='categorical_crossentropy',optimizer='adam')
#模型训练
mlp.fit(X_train_normal,y_train_format,epochs=10)
#make prediction and calculate the accuracy
y_train_predict = mlp.predict_classes(X_train)
from sklearn.metrics import accuracy_score
accuracy_train = accuracy_score(y_train, y_train_predict)
print(accuracy_train)