3台CentOS虚拟机部署 StarRocks 1 FE+ 3 BE集群
背景:公司最近业务数据量上去了,需要做一个漏斗分析功能,实时性要求较高,mysql已经已经不在适用,做了个大数据技术栈选型调研后,决定使用StarRocks
StarRocks官网:StarRocks | A High-Performance Analytical Database
前置准备:
1、3台CentOS虚拟机(2c4g),确保机器间互相可以通信(192.168.0.94、192.168.0.95、192.168.0.245)
2、下载源码 StarRocks-3.4.2-centos-amd64.tar.gz(我使用的版本 3.4.2),上传到虚拟机里
下载地址:Download StarRocks Free | StarRocks
3、3台CentOS虚拟机安装了 Java 11
sudo yum install java-11-openjdk
java -version
tips:可以先在一台虚拟机上做好准备,然后复制虚拟机改下ip配置
4、下载一个mysql客户端,我用的是HeidiSQL,按自己喜欢的来就可以
官方文档的前期准备可以看一遍:前期准备 | StarRocks
安装部署:
这里操作的是 94机器(1FE+1BE)
1、在根目录下创建data文件夹,将StarRocks-3.4.2-centos-amd64.tar.gz文件放在里data下(可选)
2、解压StarRocks-3.4.2-centos-amd64.tar.gz
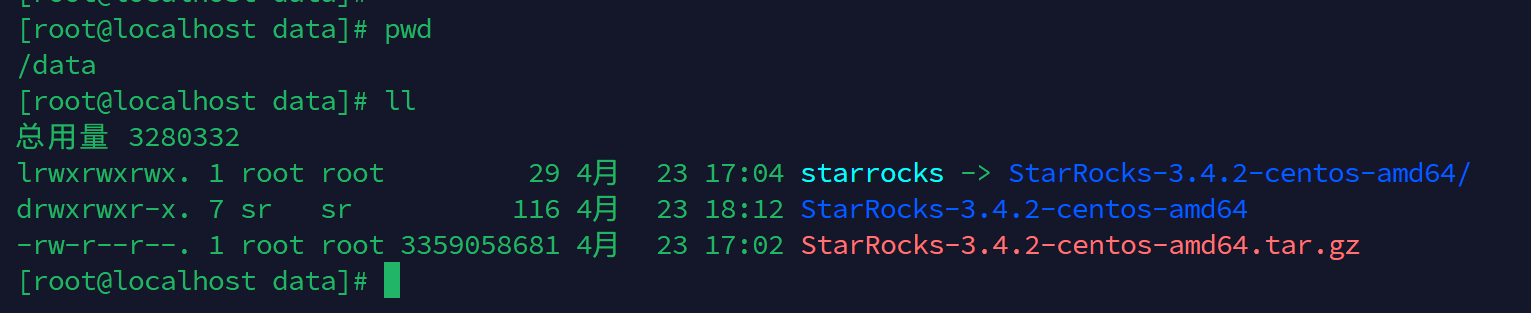
3、设置软连接(可选)
ln -s StarRocks-3.4.2-centos-amd64 starrocks4、配置FE节点信息
vi /data/starrocks/fe/conf/fe.conf动了四个配置:
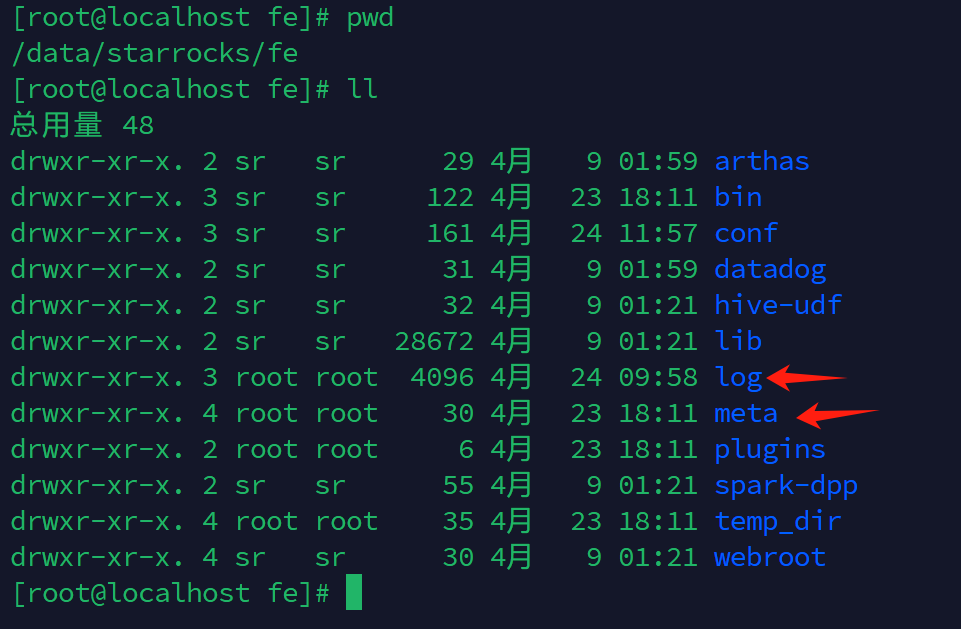
放开了LOG_DIR、meta_dir的注释,修改jvm内存为1024(默认是8096)
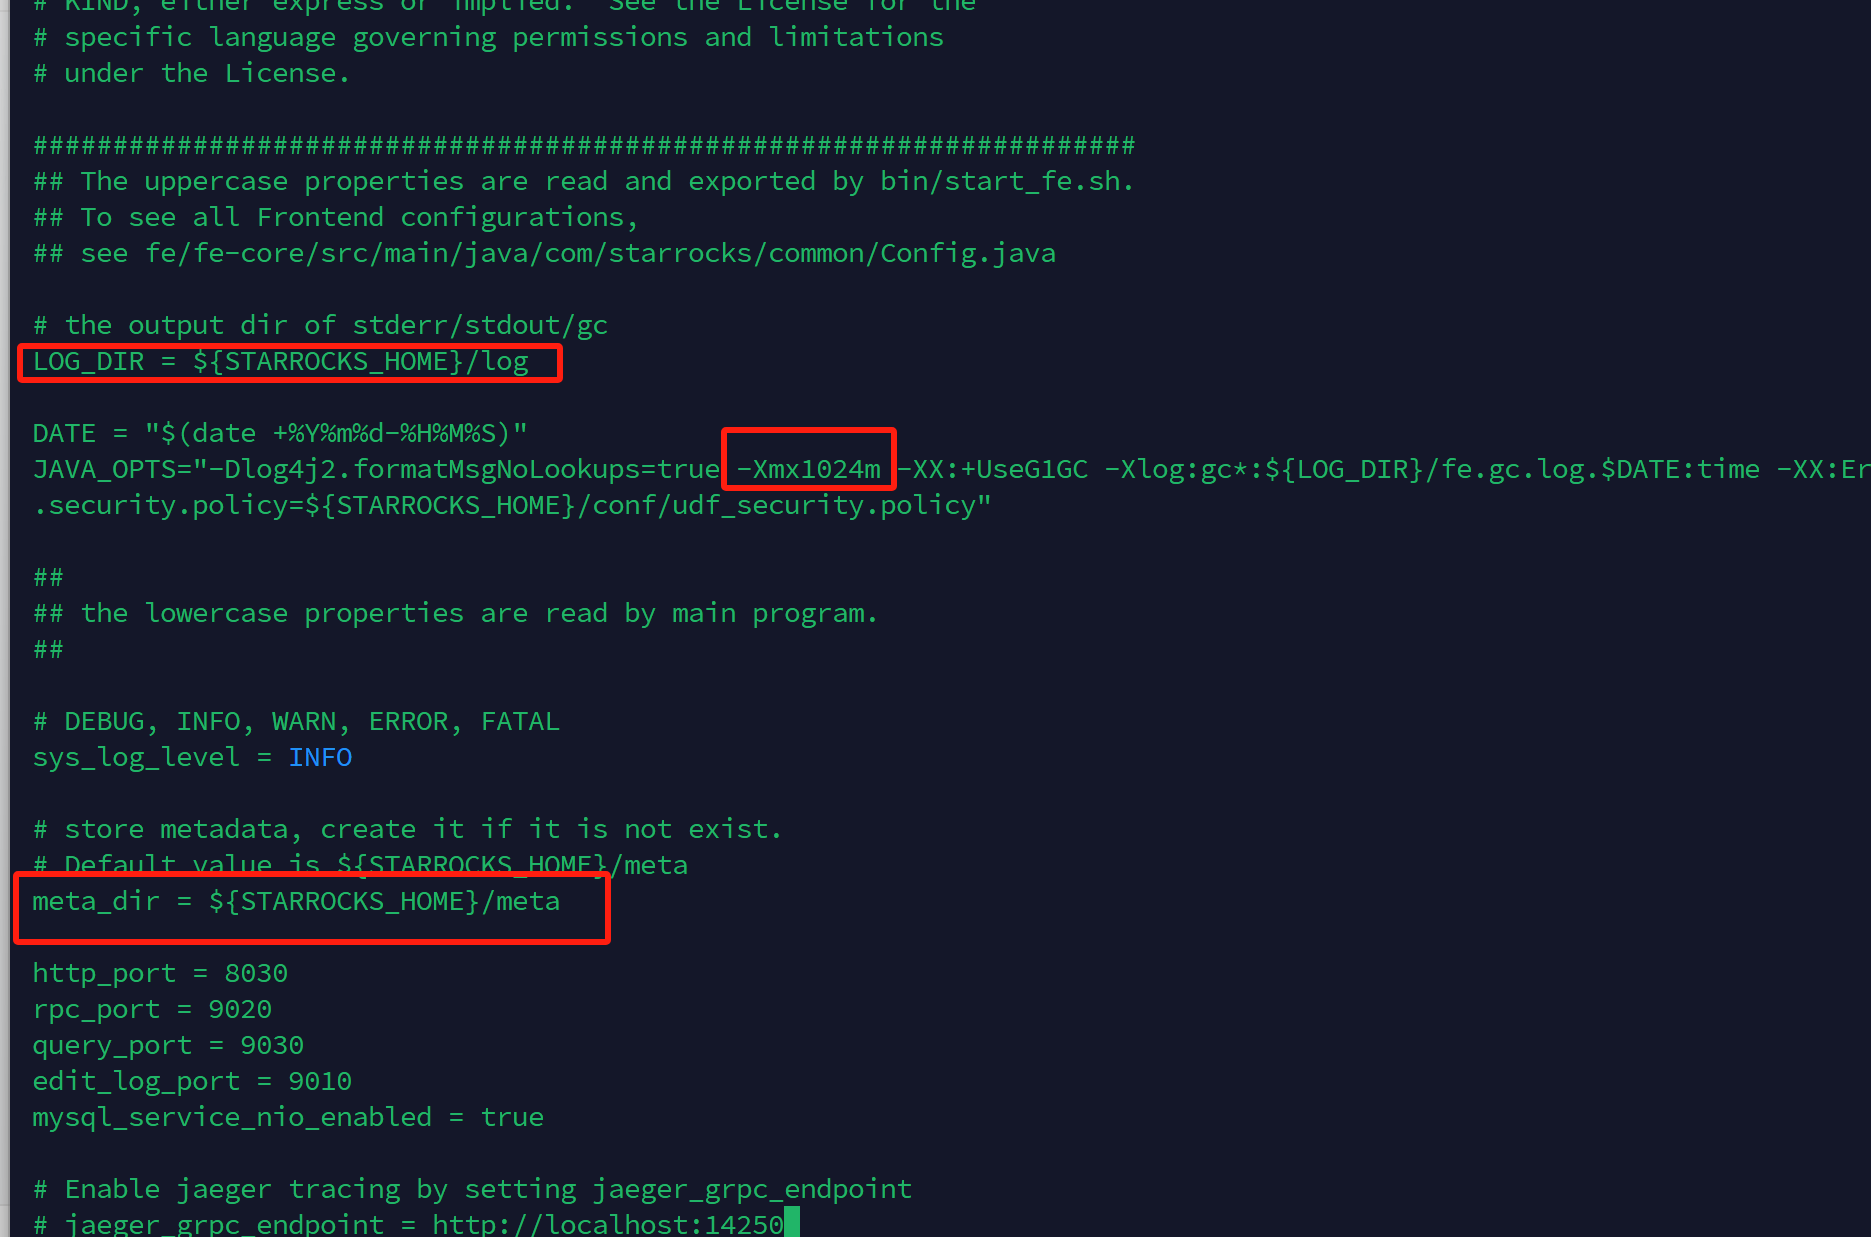
确保此路径存在并且拥有写入权限
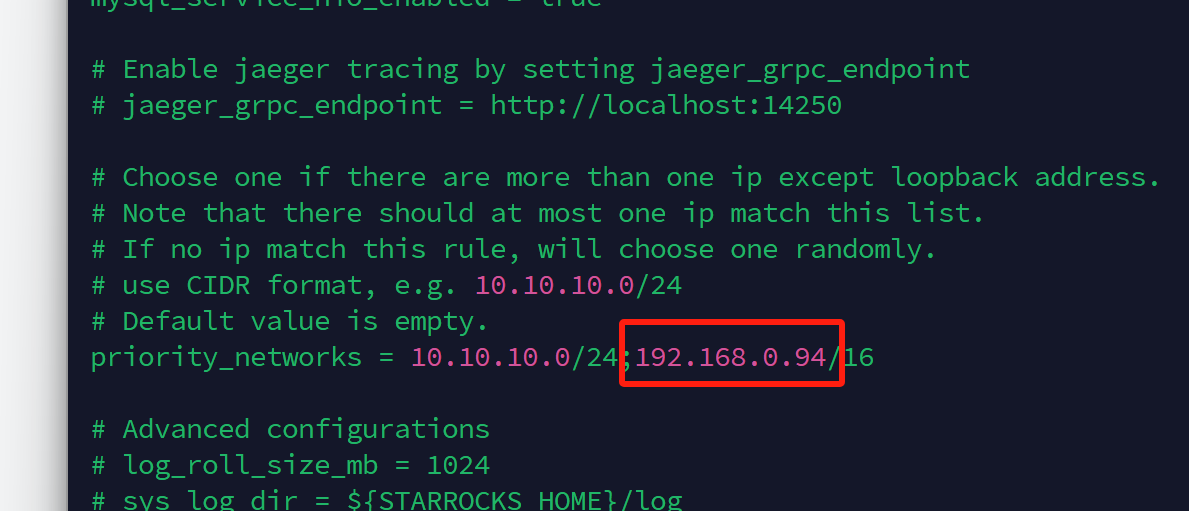
priority_networks修改为本机ip
完整配置:
# Licensed to the Apache Software Foundation (ASF) under one
# or more contributor license agreements.  See the NOTICE file
# distributed with this work for additional information
# regarding copyright ownership.  The ASF licenses this file
# to you under the Apache License, Version 2.0 (the
# "License"); you may not use this file except in compliance
# with the License.  You may obtain a copy of the License at
#
#   http://www.apache.org/licenses/LICENSE-2.0
#
# Unless required by applicable law or agreed to in writing,
# software distributed under the License is distributed on an
# "AS IS" BASIS, WITHOUT WARRANTIES OR CONDITIONS OF ANY
# KIND, either express or implied.  See the License for the
# specific language governing permissions and limitations
# under the License.#####################################################################
## The uppercase properties are read and exported by bin/start_fe.sh.
## To see all Frontend configurations,
## see fe/fe-core/src/main/java/com/starrocks/common/Config.java# the output dir of stderr/stdout/gc
# 这里改了
LOG_DIR = ${STARROCKS_HOME}/logDATE = "$(date +%Y%m%d-%H%M%S)"
JAVA_OPTS="-Dlog4j2.formatMsgNoLookups=true -Xmx1024m -XX:+UseG1GC -Xlog:gc*:${LOG_DIR}/fe.gc.log.$DATE:time -XX:ErrorFile=${LOG_DIR}/hs_err_pid%p.log -Djava.security.policy=${STARROCKS_HOME}/conf/udf_security.policy"##
## the lowercase properties are read by main program.
### DEBUG, INFO, WARN, ERROR, FATAL
sys_log_level = INFO
# store metadata, create it if it is not exist.
# Default value is ${STARROCKS_HOME}/meta
# 这里改了
meta_dir = ${STARROCKS_HOME}/metahttp_port = 8030
rpc_port = 9020
query_port = 9030
edit_log_port = 9010
mysql_service_nio_enabled = true# Enable jaeger tracing by setting jaeger_grpc_endpoint
# jaeger_grpc_endpoint = http://localhost:14250# Choose one if there are more than one ip except loopback address.
# Note that there should at most one ip match this list.
# If no ip match this rule, will choose one randomly.
# use CIDR format, e.g. 10.10.10.0/24
# Default value is empty.
# 这里改了
priority_networks = 10.10.10.0/24;192.168.0.94/16# Advanced configurations
# log_roll_size_mb = 1024
# sys_log_dir = ${STARROCKS_HOME}/log
# sys_log_roll_num = 10
# sys_log_verbose_modules =
# audit_log_dir = ${STARROCKS_HOME}/log
# audit_log_modules = slow_query, query
# audit_log_roll_num = 10
# meta_delay_toleration_second = 10
# qe_max_connection = 1024
# max_conn_per_user = 100
# qe_query_timeout_second = 300
# qe_slow_log_ms = 5000
5、配置BE节点信息
vi /data/starrocks/be/conf/be.conf动了三个配置:
放开了storage_root_path 的注释,priority_networks修改为本机ip ,增加了限制jvm的内存 JAVA_OPTS="-Xmx1024"
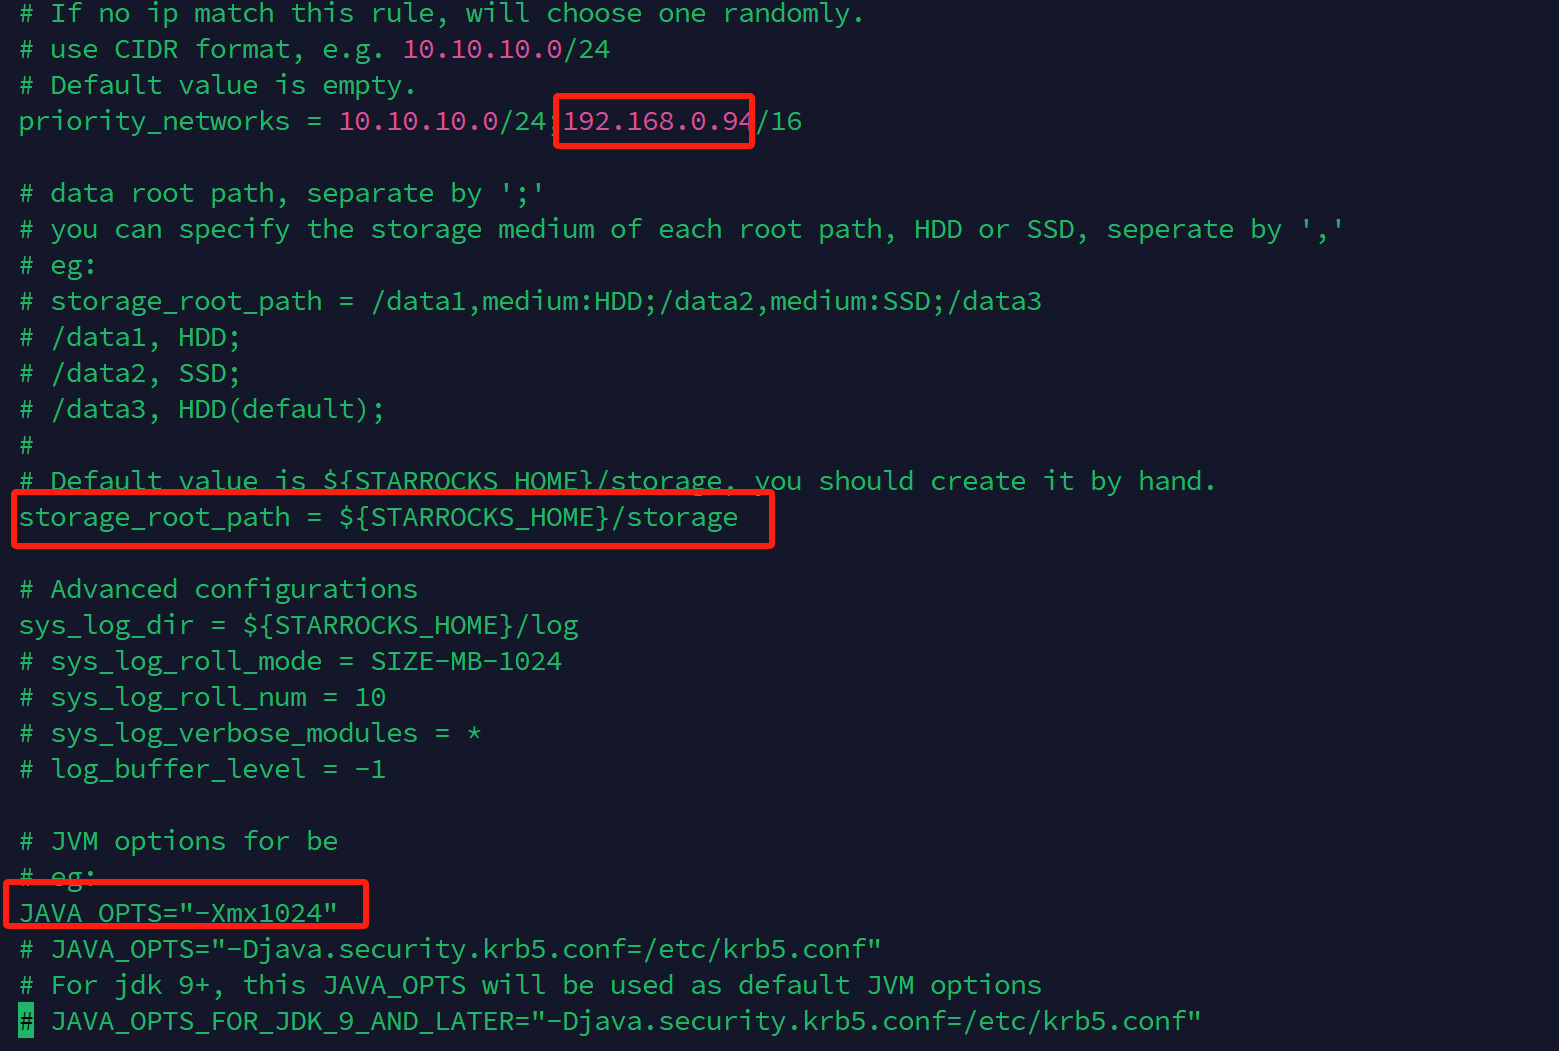
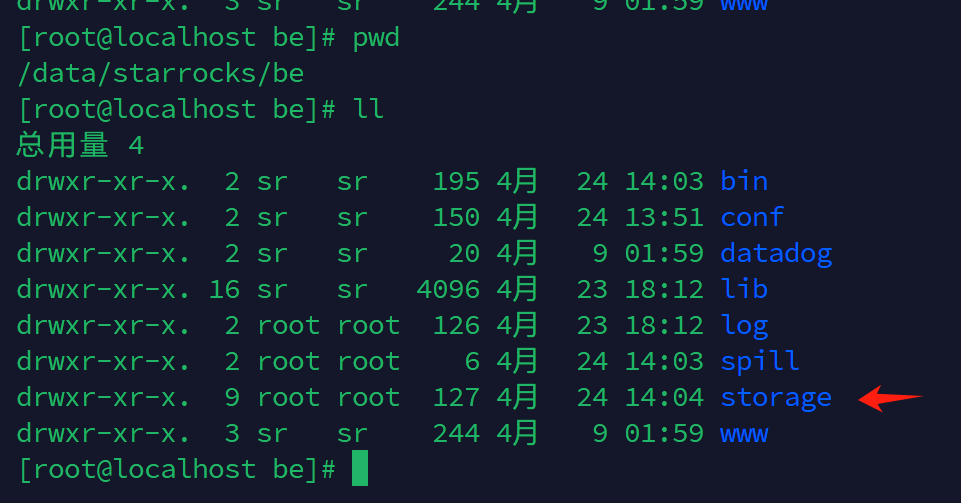
确保此路径存在并且拥有写入权限
完整配置:
# Licensed to the Apache Software Foundation (ASF) under one
# or more contributor license agreements.  See the NOTICE file
# distributed with this work for additional information
# regarding copyright ownership.  The ASF licenses this file
# to you under the Apache License, Version 2.0 (the
# "License"); you may not use this file except in compliance
# with the License.  You may obtain a copy of the License at
#
#   http://www.apache.org/licenses/LICENSE-2.0
#
# Unless required by applicable law or agreed to in writing,
# software distributed under the License is distributed on an
# "AS IS" BASIS, WITHOUT WARRANTIES OR CONDITIONS OF ANY
# KIND, either express or implied.  See the License for the
# specific language governing permissions and limitations
# under the License.# INFO, WARNING, ERROR, FATAL
sys_log_level = INFO# ports for admin, web, heartbeat service
be_port = 9060
be_http_port = 8040
heartbeat_service_port = 9050
brpc_port = 8060
starlet_port = 9070# Enable jaeger tracing by setting jaeger_endpoint
# jaeger_endpoint = localhost:6831# Choose one if there are more than one ip except loopback address.
# Note that there should at most one ip match this list.
# If no ip match this rule, will choose one randomly.
# use CIDR format, e.g. 10.10.10.0/24
# Default value is empty.
# 这里改了
priority_networks = 10.10.10.0/24;192.168.0.94/16# data root path, separate by ';'
# you can specify the storage medium of each root path, HDD or SSD, seperate by ','
# eg:
# storage_root_path = /data1,medium:HDD;/data2,medium:SSD;/data3
# /data1, HDD;
# /data2, SSD;
# /data3, HDD(default);
#
# Default value is ${STARROCKS_HOME}/storage, you should create it by hand.
# 这里改了
storage_root_path = ${STARROCKS_HOME}/storage# Advanced configurations
sys_log_dir = ${STARROCKS_HOME}/log
# sys_log_roll_mode = SIZE-MB-1024
# sys_log_roll_num = 10
# sys_log_verbose_modules = *
# log_buffer_level = -1# JVM options for be
# eg:
# 这里改了
JAVA_OPTS="-Xmx1024"
# JAVA_OPTS="-Djava.security.krb5.conf=/etc/krb5.conf"
# For jdk 9+, this JAVA_OPTS will be used as default JVM options
# JAVA_OPTS_FOR_JDK_9_AND_LATER="-Djava.security.krb5.conf=/etc/krb5.conf"
6、配置94的防火墙(非必须)
因为是fe+be所以端口多点(直接关闭防火墙也是可以的)
sudo firewall-cmd --zone=public --add-port=9030/tcp --permanent
sudo firewall-cmd --zone=public --add-port=9020/tcp --permanent
sudo firewall-cmd --zone=public --add-port=9010/tcp --permanent
sudo firewall-cmd --zone=public --add-port=8030/tcp --permanent
sudo firewall-cmd --zone=public --add-port=8040/tcp --permanent
sudo firewall-cmd --zone=public --add-port=8050/tcp --permanent
sudo firewall-cmd --zone=public --add-port=8060/tcp --permanentsudo firewall-cmd --reloadsudo systemctl restart firewalld
7、95和245机器配置的be.config
与94节点的be一样配置,就是jvm内存变成了2048
vi /data/starrocks/be/conf/be.conf动了三个配置:放开了storage_root_path 的注释,priority_networks修改为本机ip(注意2台机器的ip不同) ,增加了限制jvm的内存 JAVA_OPTS="-Xmx2048"
完整配置:
# Licensed to the Apache Software Foundation (ASF) under one
# or more contributor license agreements.  See the NOTICE file
# distributed with this work for additional information
# regarding copyright ownership.  The ASF licenses this file
# to you under the Apache License, Version 2.0 (the
# "License"); you may not use this file except in compliance
# with the License.  You may obtain a copy of the License at
#
#   http://www.apache.org/licenses/LICENSE-2.0
#
# Unless required by applicable law or agreed to in writing,
# software distributed under the License is distributed on an
# "AS IS" BASIS, WITHOUT WARRANTIES OR CONDITIONS OF ANY
# KIND, either express or implied.  See the License for the
# specific language governing permissions and limitations
# under the License.# INFO, WARNING, ERROR, FATAL
sys_log_level = INFO# ports for admin, web, heartbeat service
be_port = 9060
be_http_port = 8040
heartbeat_service_port = 9050
brpc_port = 8060
starlet_port = 9070# Enable jaeger tracing by setting jaeger_endpoint
# jaeger_endpoint = localhost:6831# Choose one if there are more than one ip except loopback address.
# Note that there should at most one ip match this list.
# If no ip match this rule, will choose one randomly.
# use CIDR format, e.g. 10.10.10.0/24
# Default value is empty.
# 这里改了
priority_networks = 10.10.10.0/24;192.168.0.95/16# data root path, separate by ';'
# you can specify the storage medium of each root path, HDD or SSD, seperate by ','
# eg:
# storage_root_path = /data1,medium:HDD;/data2,medium:SSD;/data3
# /data1, HDD;
# /data2, SSD;
# /data3, HDD(default);
#
# Default value is ${STARROCKS_HOME}/storage, you should create it by hand.
# 这里改了
storage_root_path = ${STARROCKS_HOME}/storage# Advanced configurations
sys_log_dir = ${STARROCKS_HOME}/log
# sys_log_roll_mode = SIZE-MB-1024
# sys_log_roll_num = 10
# sys_log_verbose_modules = *
# log_buffer_level = -1# JVM options for be
# eg:
# 这里改了
JAVA_OPTS="-Xmx2048"
# JAVA_OPTS="-Djava.security.krb5.conf=/etc/krb5.conf"
# For jdk 9+, this JAVA_OPTS will be used as default JVM options
# JAVA_OPTS_FOR_JDK_9_AND_LATER="-Djava.security.krb5.conf=/etc/krb5.conf"
8、配置95和245的防火墙(非必须)
直接关闭防火墙也是可以的
sudo firewall-cmd --zone=public --add-port=9050/tcp --permanent
sudo firewall-cmd --zone=public --add-port=9060/tcp --permanent
sudo firewall-cmd --zone=public --add-port=8040/tcp --permanent
sudo firewall-cmd --zone=public --add-port=8060/tcp --permanentsudo firewall-cmd --reloadsudo systemctl restart firewalld
9、启动94机器fe节点和be节点
./data/starrocks/fe/bin/start_fe.sh --daemon
./data/starrocks/be/bin/start_be.sh --daemon
查看fe节点是否启动成功
cat /data/starrocks/fe/log/fe.log | grep thrift如果日志打印以下内容,则说明该 FE 节点启动成功:
"2022-08-10 16:12:29,911 INFO (UNKNOWN x.x.x.x_9010_1660119137253(-1)|1) [FeServer.start():52] thrift server started with port 9020."查看be节点是否启动成功
cat /data/starrocks/be/log/be.INFO | grep heartbeat如果日志打印以下内容,则说明该 BE 节点启动成功:
"I0614 17:41:39.782819 3717531 thrift_server.cpp:388] heartbeat has started listening port on 9050"10、启动95和245的be节点
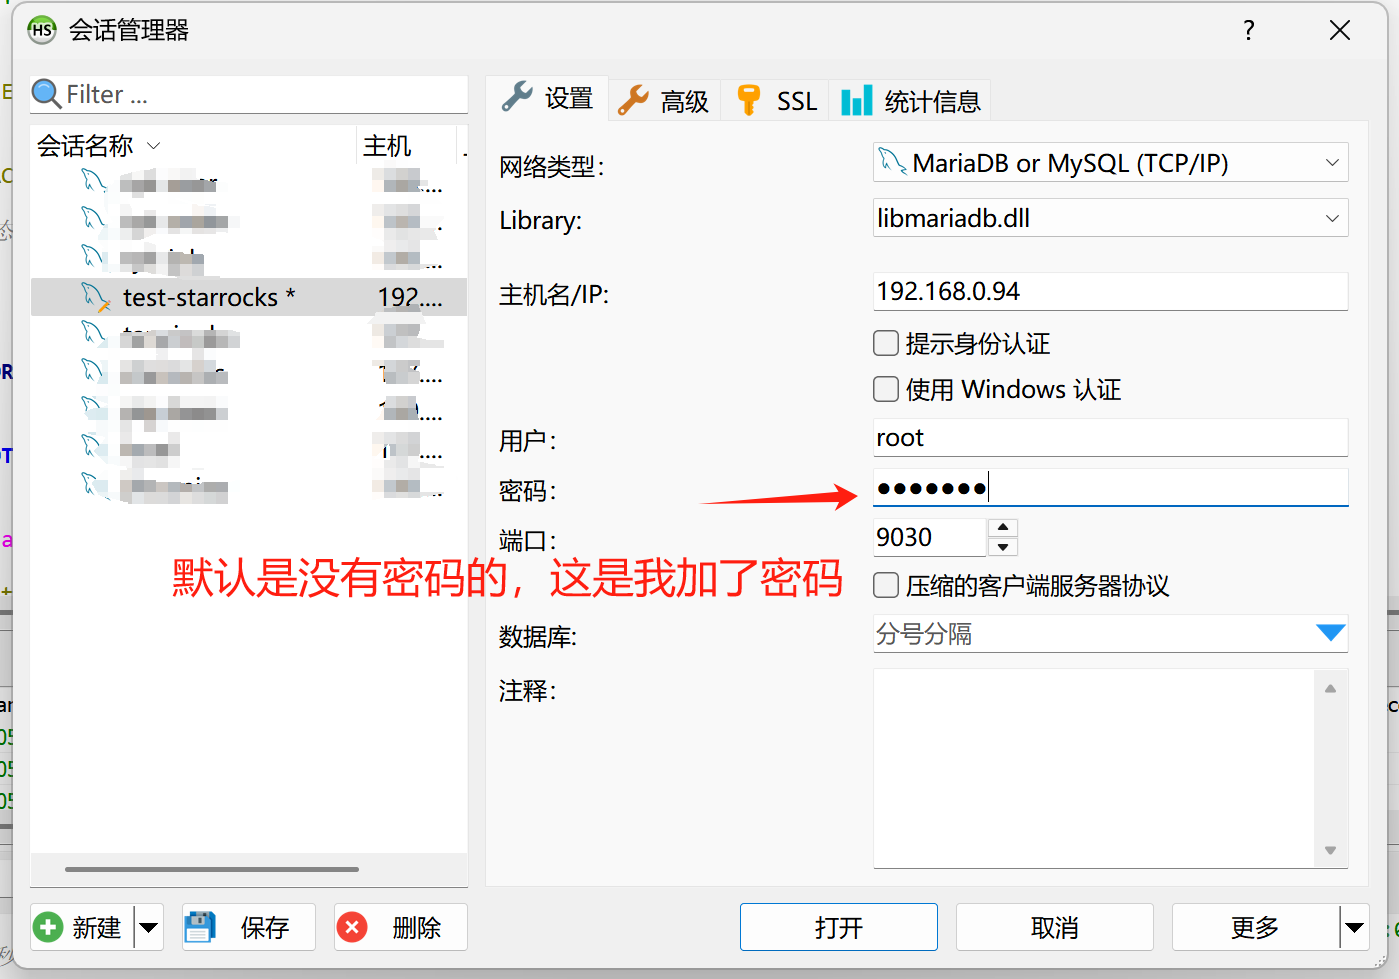
./data/starrocks/be/bin/start_be.sh --daemon11、使用客户端连接94节点的fe,端口9030
一开始默认用户是root,密码为空,这里是我进去后加上了密码
连接后
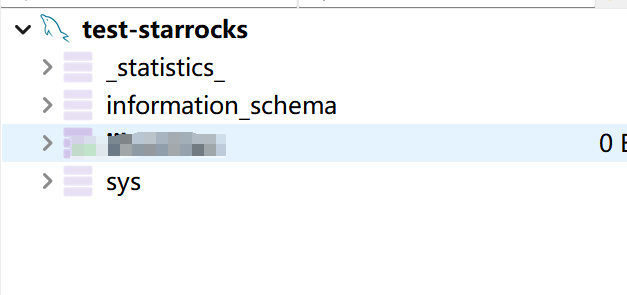
12、查看fe节点状态
在sql窗口运行即可
-- 查看 Leader FE 节点状态
SHOW PROC '/frontends'
Alive=true证明是好的

13、将be节点加入集群
-- 将BE节点加入集群
ALTER SYSTEM ADD BACKEND "192.168.0.94:9050", "192.168.0.95:9050", "192.168.0.245:9050";
加错了可以删除
-- 将be节点删除
ALTER SYSTEM DROP BACKEND "192.168.0.97:9050";
14、查看be状态
2个语句一样的效果
-- 查看 BE/CN 节点状态,alive=true
SHOW PROC '/backends'
-- 查看 BE/CN 节点状态,alive=true
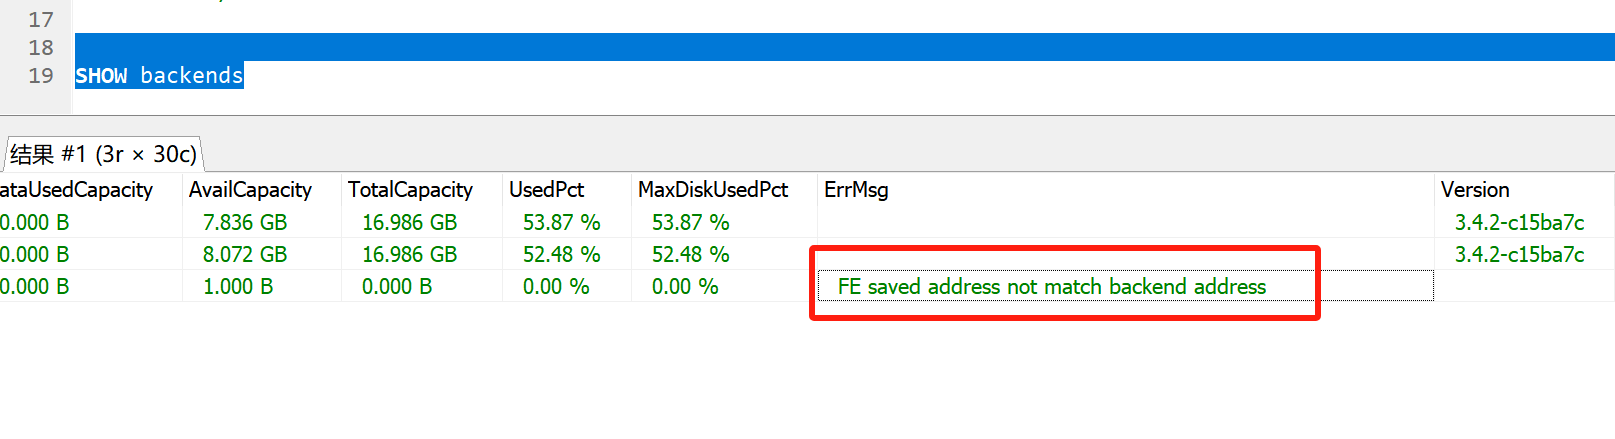
SHOW backendsAlive=true证明是好的

失败了可以看看原因,这里是因为我的ip搞错了
15、建表及查询
-- 设置root密码
SET PASSWORD = PASSWORD('root123')-- 创建数据库
CREATE DATABASE IF NOT EXISTS david;-- 删除表
DROP TABLE david.ad_events-- 创建表
CREATE TABLE `ad_events` (
-- 数据类型,https://docs.mirrorship.cn/zh/docs/sql-reference/data-types/`event_time` DATETIME NOT NULL COMMENT '时间',`event_time_hour` DATETIME NOT NULL COMMENT '时间(分、秒为0)',`event_type` TINYINT NOT NULL COMMENT '事件类型(1:请求,2:展示,3:点击)',`user_id` INT NOT NULL COMMENT '用户ID(映射为整数)',`jhn_more` TINYINT NOT NULL COMMENT '是否聚合',`ad_site_id` VARCHAR(128) NOT NULL COMMENT '代码jihuoniaojihuoniaojihuoniao位id',`client_type` TINYINT NOT NULL COMMENT '客户端类型',`my_app_id` VARCHAR(64) NOT NULL COMMENT '应用id',`ad_type` VARCHAR(32) NOT NULL COMMENT '广告类型',`platform` TINYINT NOT NULL COMMENT '广告源',`device_id` VARCHAR(64) NOT NULL COMMENT '设备号'
)
-- 表类型(明细表),https://docs.mirrorship.cn/zh/docs/table_design/table_types/duplicate_key_table/
ENGINE=OLAP
-- 按月分区, https://docs.mirrorship.cn/zh/docs/table_design/data_distribution/expression_partitioning/
PARTITION BY date_trunc('month', event_time)
-- 数据分桶,https://docs.mirrorship.cn/zh/docs/table_design/data_distribution/#%E8%AE%BE%E7%BD%AE%E5%88%86%E6%A1%B6%E6%95%B0%E9%87%8F
DISTRIBUTED BY HASH(user_id) BUCKETS 100
PROPERTIES (-- 分区保留12个月"partition_live_number" = "12",-- 3个副本,根据be节点数据来,生产推荐3个"replication_num" = "3"
);-- 插入表数据
INSERT INTO ad_events (event_time, event_time_hour, event_type, user_id, more, ad_site_id, client_type, my_app_id, ad_type, platform, device_id)
VALUES
('2025-04-24 11:38:01', '2025-04-24 11:00:00', 3, 10018, 0, 'jhn_ad_site_id', 1, 'jhn_my_app_id', 'banner', 0, '214685fd-63d3-7f4b-f43d-beb48b5f59be'),
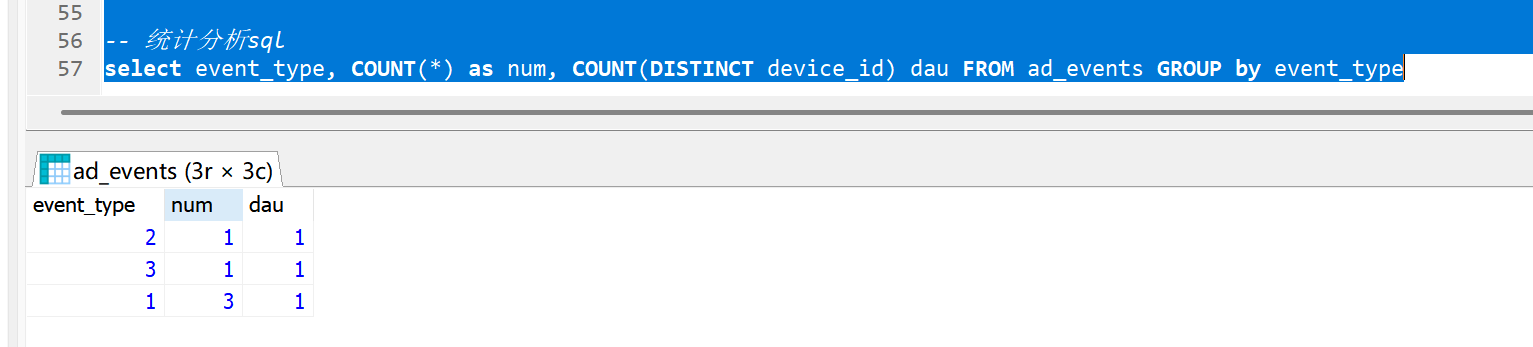
('2025-04-24 11:27:01', '2025-04-24 11:00:00', 2, 10018, 0, 'jhn_ad_site_id', 1, 'jhn_my_app_id', 'banner', 0, '214685fd-63d3-7f4b-f43d-beb48b5f59be')-- 统计分析sql
select event_type, COUNT(*) as num, COUNT(DISTINCT device_id) dau FROM ad_events GROUP by event_type-- 查看表当前的分区情况
SHOW PARTITIONS FROM ad_events;查询结果
总结:按照官网的文档自己琢磨一下就可以部署成功了,官网文档的部署前提一定要看一遍,线上部署最好是3fe+3be保证高可用。
部署前提条件 | StarRocks
参考文档:
表类型:明细表 | StarRocks
数据类型:Data type overview | StarRocks
数据分区:表达式分区(推荐) | StarRocks
数据分桶:数据分布 | StarRocks
sql参考:SQL 参考 | StarRocks