opencv练习
1.创建一个 PyQt 应用程序,该应用程序能够:
(1)使用 OpenCV 加载一张图像。
(2)在 PyQt 的窗口中显示这张图像。
(3)提供四个按钮(QPushButton):
一个用于将图像转换为灰度图
一个用于将图像恢复为原始彩色图
一个用于将图像进行翻转
一个用于将图像进行旋转
(4)当用户点击按钮时,相应地更新窗口中显示的图像。
import cv2
import sys
from PyQt6 import uic
from PyQt6.QtCore import Qt
from PyQt6.QtWidgets import QApplication, QMainWindow, QPushButton, QLabel
from PyQt6.QtGui import QImage, QPixmapclass MainWindow(QMainWindow):def __init__(self):super().__init__()ui = uic.loadUi("./1.ui", self)self.pushButton: QPushButton = ui.pushButtonself.pushButton2: QPushButton = ui.pushButton2self.pushButton3: QPushButton = ui.pushButton3self.pushButton4: QPushButton = ui.pushButton4self.label: QLabel = ui.labelself.original_image = cv2.imread("../images/lena.png")self.current_image = self.original_imageself.load_image()self.pushButton.clicked.connect(self.convert_to_gray)self.pushButton2.clicked.connect(self.restore_original)self.pushButton3.clicked.connect(self.flip_image)self.pushButton4.clicked.connect(self.rotate_image)def load_image(self):# 获取图像的宽度、高度和通道数image_rgb = cv2.cvtColor(self.current_image, cv2.COLOR_BGR2RGB)height, width, channels = image_rgb.shapebytes_per_line = channels * width# 创建 QImage 对象qimage = QImage(image_rgb.data, width, height, bytes_per_line, QImage.Format.Format_RGB888)# 创建 QPixmap 对象,并缩放适应 QLabelpixmap = QPixmap.fromImage(qimage)scaled_pixmap = pixmap.scaled(self.label.width(), self.label.height(),aspectRatioMode=Qt.AspectRatioMode.KeepAspectRatio)# 将缩放后的 QPixmap 显示到 QLabel 上self.label.setPixmap(scaled_pixmap)def convert_to_gray(self):"""按钮1: 将图像转换为灰度图并显示"""gray_image = cv2.cvtColor(self.original_image, cv2.COLOR_BGR2GRAY)# 将灰度图转换为伪RGB格式(3通道)self.current_image = cv2.cvtColor(gray_image, cv2.COLOR_GRAY2RGB)self.load_image()def restore_original(self):"""按钮2: 恢复为原始彩色图像并显示"""self.current_image = self.original_image  # 恢复为原始彩色图像self.load_image()  # 重新加载并显示def flip_image(self):"""按钮3: 翻转图像并显示"""flipped_image = cv2.flip(self.current_image, 1)  # 水平翻转self.current_image = flipped_imageself.load_image()  # 重新加载并显示def rotate_image(self):"""按钮4: 顺时针旋转图像90度并显示"""# 获取图像的中心center = (self.current_image.shape[1] // 2, self.current_image.shape[0] // 2)# 创建旋转矩阵,旋转角度 -90(顺时针旋转90度)rotation_matrix = cv2.getRotationMatrix2D(center, -90, 1.0)# 旋转图像,输出图像大小为当前图像的宽高rotated_image = cv2.warpAffine(self.current_image, rotation_matrix,(self.current_image.shape[1], self.current_image.shape[0]))# 更新当前图像self.current_image = rotated_image# 重新加载并显示图像self.load_image()if __name__ == "__main__":app = QApplication(sys.argv)window = MainWindow()window.show()sys.exit(app.exec())
2. 创建一个 PyQt 应用程序,该应用程序能够:
(1)使用 OpenCV 加载一张彩色图像,并在 PyQt 的窗口中显示它。
(2)提供一个滑动条(QSlider),允许用户调整图像的亮度。
(3)当用户调整滑动条时,实时更新窗口中显示的图像亮度。
(4)添加另一个滑动条(QSlider),允许用户调整图像的对比度。
(5)当用户调整滚动条时,实时更新窗口中显示的图像对比度。
(6)提供一个按钮(QPushButton),允许用户将图像保存为新的文件。
(7)当用户点击保存按钮时,将调整后的图像保存到指定的路径,OpenCV中使用cv2.imwrite()来保存图片。
import cv2
import sys
from PyQt6 import uic
from PyQt6.QtCore import Qt
from PyQt6.QtWidgets import QApplication, QMainWindow, QPushButton, QLabel, QSlider, QFileDialog
from PyQt6.QtGui import QImage, QPixmapclass MainWindow(QMainWindow):def __init__(self):super().__init__()ui = uic.loadUi("./2.ui", self)self.button: QPushButton = ui.pushButtonself.label: QLabel = ui.labelself.horizontalSlider: QSlider = ui.horizontalSliderself.horizontalSlider2: QSlider = ui.horizontalSlider2self.original_image = cv2.imread("../images/lena.png")self.current_image = self.original_imageself.horizontalSlider.valueChanged.connect(self.update_image)self.horizontalSlider2.valueChanged.connect(self.update_image)self.button.clicked.connect(self.save_image)self.load_image()def load_image(self):# 获取图像的宽度、高度和通道数image_rgb = cv2.cvtColor(self.current_image, cv2.COLOR_BGR2RGB)height, width, channels = image_rgb.shapebytes_per_line = channels * width# 创建 QImage 对象qimage = QImage(image_rgb.data, width, height, bytes_per_line, QImage.Format.Format_RGB888)# 创建 QPixmap 对象,并缩放适应 QLabelpixmap = QPixmap.fromImage(qimage)scaled_pixmap = pixmap.scaled(self.label.width(), self.label.height(),aspectRatioMode=Qt.AspectRatioMode.KeepAspectRatio)# 将缩放后的 QPixmap 显示到 QLabel 上self.label.setPixmap(scaled_pixmap)def update_image(self):"""根据当前亮度和对比度调整图像并显示"""brightness = self.horizontalSlider.value()  # 获取亮度值contrast = self.horizontalSlider2.value()  # 获取对比度值# 调整亮度和对比度self.current_image = cv2.convertScaleAbs(self.original_image, alpha=contrast / 100.0, beta=brightness)# 转换为 RGB 格式用于显示image_rgb = cv2.cvtColor(self.current_image, cv2.COLOR_BGR2RGB)height, width, channels = image_rgb.shapebytes_per_line = channels * width# 创建 QImage 对象qimage = QImage(image_rgb.data, width, height, bytes_per_line, QImage.Format.Format_RGB888)# 创建 QPixmap 对象,并缩放适应 QLabelpixmap = QPixmap.fromImage(qimage)scaled_pixmap = pixmap.scaled(self.label.width(), self.label.height(),aspectRatioMode=Qt.AspectRatioMode.KeepAspectRatio)# 将图像显示到 QLabel 上self.label.setPixmap(scaled_pixmap)def save_image(self):"""保存当前调整后的图像"""# 弹出文件对话框,选择保存路径file_path, _ = QFileDialog.getSaveFileName(self, "Save Image", "", "Images (*.png *.jpg *.bmp);;All Files (*)")if file_path:# 保存调整后的图像cv2.imwrite(file_path, self.current_image)  # 保存调整后的图像print(f"Image saved to {file_path}")if __name__ == "__main__":app = QApplication(sys.argv)window = MainWindow()window.show()sys.exit(app.exec())
3.创建一个 PyQt 应用程序,该应用程序能够:
(1)使用 OpenCV 加载一张图像。
(2)在 PyQt 的窗口中显示这张图像。
(3)提供一个下拉列表(QComboBox),对图像做(模糊、锐化、边缘检测)处理:
模糊——使用cv2.GaussianBlur()实现
锐化——使用cv2.Laplacian()、cv2.Sobel()实现
边缘检测——使用cv2.Canny()实现
(4)当用户点击下拉列表选项时,相应地更新窗口中显示的图像。
(5)提供一个按钮,当用户点击按钮时,能保存调整后的图像。
import cv2
import sys
from PyQt6 import uic
from PyQt6.QtCore import Qt
from PyQt6.QtWidgets import QApplication, QMainWindow, QPushButton, QLabel, QFileDialog, QComboBox
from PyQt6.QtGui import QImage, QPixmapclass MainWindow(QMainWindow):def __init__(self):super().__init__()ui = uic.loadUi("./3.ui", self)# 获取控件对象self.button: QPushButton = ui.pushButtonself.label: QLabel = ui.labelself.comboBox: QComboBox = ui.comboBox# 加载图像self.original_image = cv2.imread("../images/lena.png")self.current_image = self.original_image.copy()# 设置下拉列表的选项self.comboBox.addItem("选择处理方式")self.comboBox.addItem("模糊")self.comboBox.addItem("锐化 (Laplacian)")self.comboBox.addItem("锐化 (Sobel)")self.comboBox.addItem("边缘检测")# 连接下拉列表的选择变化信号self.comboBox.activated.connect(self.process_image)# 连接保存按钮点击事件self.button.clicked.connect(self.save_image)# 初始化图像显示self.load_image()def load_image(self):"""将图像加载到 QLabel 中显示"""# 将图像从 BGR 转换为 RGB 格式image_rgb = cv2.cvtColor(self.current_image, cv2.COLOR_BGR2RGB)height, width, channels = image_rgb.shapebytes_per_line = channels * width# 创建 QImage 对象qimage = QImage(image_rgb.data, width, height, bytes_per_line, QImage.Format.Format_RGB888)# 创建 QPixmap 对象,并缩放适应 QLabelpixmap = QPixmap.fromImage(qimage)scaled_pixmap = pixmap.scaled(self.label.width(), self.label.height(),aspectRatioMode=Qt.AspectRatioMode.KeepAspectRatio)# 将缩放后的 QPixmap 显示到 QLabel 上self.label.setPixmap(scaled_pixmap)def process_image(self):"""根据下拉列表选择的项处理图像"""selected_option = self.comboBox.currentText()if selected_option == "模糊":# 使用高斯模糊self.current_image = cv2.GaussianBlur(self.original_image, (15, 15), 0)elif selected_option == "锐化 (Laplacian)":# 使用拉普拉斯算子进行锐化laplacian = cv2.Laplacian(self.original_image, cv2.CV_64F)# 将拉普拉斯算子结果转换为 uint8 类型laplacian = cv2.convertScaleAbs(laplacian)# 加权合成原图和拉普拉斯算子的结果,进行锐化self.current_image = cv2.addWeighted(self.original_image, 1.5, laplacian, -0.5, 0)elif selected_option == "锐化 (Sobel)":# 使用 Sobel 算子进行锐化sobel_x = cv2.Sobel(self.original_image, cv2.CV_64F, 1, 0, ksize=3)sobel_y = cv2.Sobel(self.original_image, cv2.CV_64F, 0, 1, ksize=3)sobel_edge = cv2.magnitude(sobel_x, sobel_y)  # 计算梯度的幅值self.current_image = cv2.addWeighted(self.original_image, 1.5, sobel_edge.astype('uint8'), 0.5, 0)elif selected_option == "边缘检测":# 使用 Canny 边缘检测self.current_image = cv2.Canny(self.original_image, 100, 200)# 每次选择后更新图像显示self.load_image()def save_image(self):"""保存当前调整后的图像"""# 弹出文件对话框,选择保存路径file_path, _ = QFileDialog.getSaveFileName(self, "Save Image", "", "Images (*.png *.jpg *.bmp);;All Files (*)")if file_path:# 保存调整后的图像cv2.imwrite(file_path, self.current_image)print(f"Image saved to {file_path}")if __name__ == "__main__":app = QApplication(sys.argv)window = MainWindow()window.show()sys.exit(app.exec())
4.请编写一段Python代码,实现以下功能:
(1)读取一张二维码图片
(2)进行二值化处理和形态学操作,获取二维码轮廓
(3)通过轮廓外接特征检测或者多边形逼近等获取 二维码的四个点
(4)进行透视变换,矫正二维码图像
import cv2
import numpy as np# 1. 读取二维码图像
image = cv2.imread('./er2.png')  # 请根据需要修改图像路径
# 2. 将图像转换为灰度图
gray = cv2.cvtColor(image, cv2.COLOR_BGR2GRAY)
# 3. 二值化处理
_, binary = cv2.threshold(gray, 100, 255, cv2.THRESH_BINARY_INV)
# 4. 形态学操作 - 腐蚀和膨胀,增强轮廓
kernel1 = np.ones((3, 3), np.uint8)
kernel2 = np.ones((13, 13), np.uint8)
eroded = cv2.erode(binary, kernel1, iterations=1)
dilated = cv2.dilate(eroded, kernel2, iterations=2)
eroded2 = cv2.erode(dilated, kernel2, iterations=1)
# 5. 查找轮廓
contours, _ = cv2.findContours(eroded2, cv2.RETR_EXTERNAL, cv2.CHAIN_APPROX_SIMPLE)# 6. 遍历轮廓,寻找最大的四边形轮廓
for contour in contours:# 计算轮廓的多边形逼近epsilon = 0.02 * cv2.arcLength(contour, True)approx = cv2.approxPolyDP(contour, epsilon, True)# 如果多边形有4个点,说明是二维码if len(approx) == 4:# 获取四个顶点points = approx.reshape(4, 2)  # 修改:将points调整为(4, 2)的形状print(f"QR code corners detected: {points}")# 画出轮廓和四个角点cv2.drawContours(image, [approx], -1, (0, 255, 0), 2)for point in points:cv2.circle(image, tuple(point), 10, (0, 0, 255), -1)cv2.imshow("QR Code", image)# 进行透视变换# 对四个点进行排序:左上、右上、右下、左下rect = np.zeros((4, 2), dtype="float32")# 按照总的顺序排布s = points.sum(axis=1)rect[0] = points[np.argmin(s)]  # 左上rect[2] = points[np.argmax(s)]  # 右下diff = np.diff(points, axis=1)rect[1] = points[np.argmin(diff)]  # 右上rect[3] = points[np.argmax(diff)]  # 左下# 获取二维码图像的宽度和高度(tl, tr, br, bl) = rectwidth = max(int(np.linalg.norm(br - bl)), int(np.linalg.norm(tr - tl)))height = max(int(np.linalg.norm(tr - br)), int(np.linalg.norm(tl - bl)))# 目标点 (按顺序排列)dst = np.array([[0, 0],[width, 0],[width, height],[0, height]], dtype="float32")# 计算透视变换矩阵M = cv2.getPerspectiveTransform(rect, dst)# 进行透视变换warped = cv2.warpPerspective(image, M, (width, height))# 显示透视变换后的二维码cv2.imshow("Warped QR Code", warped)cv2.waitKey(0)cv2.destroyAllWindows()
运行结果:


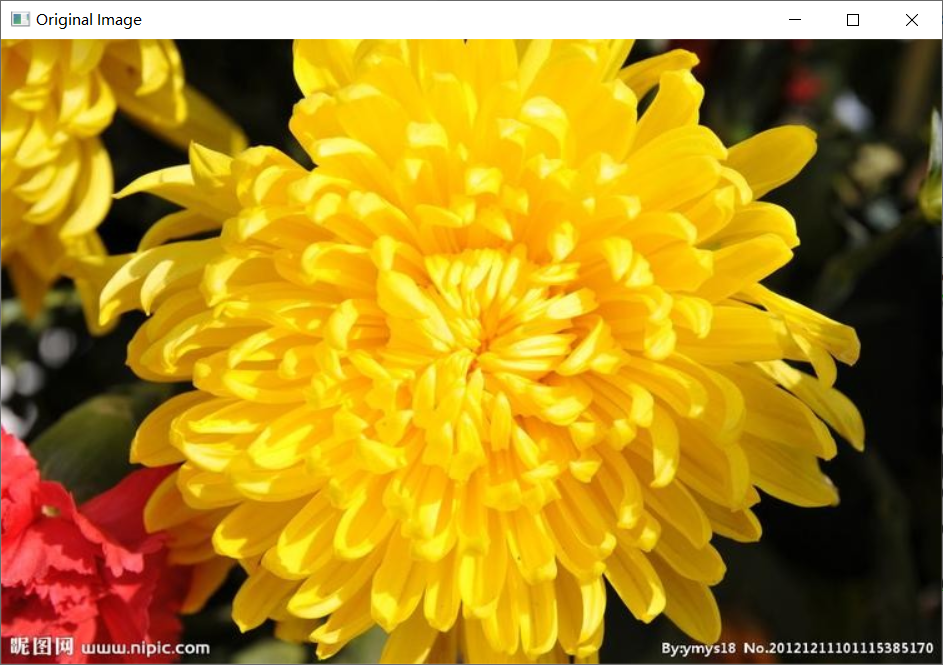
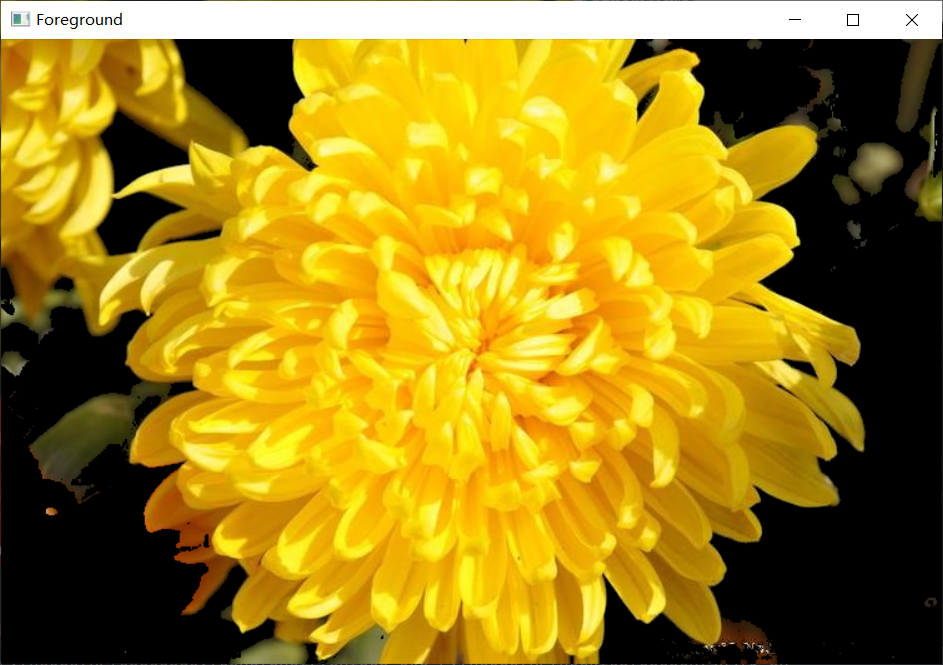
5. 请编写一段Python代码,实现以下功能:
(1)读取一张彩色图像
(2)制作要提取颜色的掩膜
(3)输出抠图后的前景图 和 背景图
import cv2
import numpy as np# 1. 读取彩色图像
image = cv2.imread('./hua2.png')  # 修改为你的图像路径
# 2. 将图像从 BGR 转换到 HSV
hsv = cv2.cvtColor(image, cv2.COLOR_BGR2HSV)
# 3. 黄色的HSV范围
lower_y = np.array([11, 43, 46])
upper_y = np.array([34, 255, 255])
# 4. 创建两个掩膜
mask = cv2.inRange(hsv, lower_y, upper_y)
# 5. 输出前景图和背景图
# 前景图:通过掩膜提取前景
foreground = cv2.bitwise_and(image, image, mask=mask)
# 背景图:反掩膜提取背景
mask_inv = cv2.bitwise_not(mask)
background = cv2.bitwise_and(image, image, mask=mask_inv)
# 6. 显示结果
cv2.imshow("Original Image", image)
cv2.imshow("Foreground", foreground)
cv2.imshow("Background", background)cv2.waitKey(0)
cv2.destroyAllWindows()
运行结果