红黑树模拟实现STL中的map和set---C++
一 红黑树迭代器
1.1 如何设计
再看本章课程前,是基于已经学过上一节红黑树的。
为什么要实现迭代器呢?主要是为了方便遍历,是数据结构的底层实现与用户透明,实现迭代器得考虑一下几种问题:
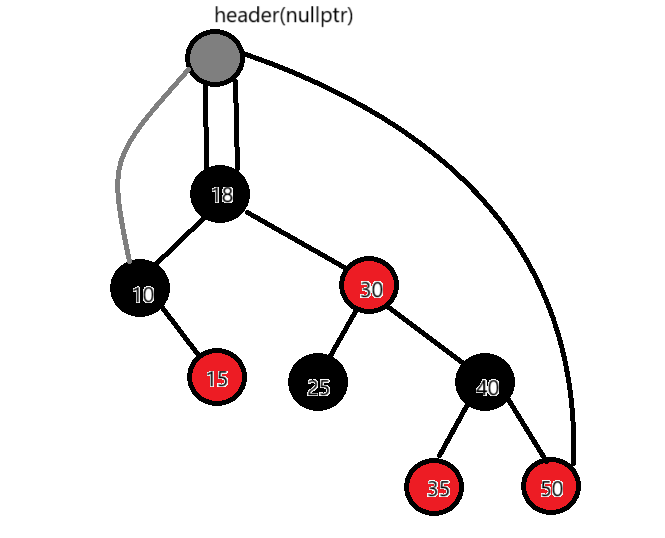
begin()和end():STL中明确规定,在迭代器中,begin()是闭区间,end()是开区间,就是一个左闭右开的区间内,不断遍历里面的数据,而红黑树是中序遍历,所以:begin()就可以直接指向红黑树最左边的节点,而end()就可以去指向nullptr,然后进行--操作的时候就可以判断一下当前的this是不是为空,是的话就直接特殊处理一下,让它--以后指向红黑树的最右边节点。
1.2迭代器的定义
template<class T,class Ref,class Ptr> struct __TreeIterator {typedef RBTreeNode<T> Node;typedef __TreeIterator<T, Ref, Ptr> Self;Node* _node;Node* _root;__TreeIterator(Node* node,Node* root):_node(node),_root(root){}这里采用类模板的方式,Ref是T的引用,Ptr是T的指针;
template<class T,class Ref,class Ptr>1.3 operator++(),operator--()
Self& operator++()
{if (_node->_right){_node = _node->_right;while (_node->_left){_node = _node->_left;}}else{Node* cur = _node;Node* parent = cur->_parent;while (parent && cur == parent->_right){cur = parent;parent = parent->_parent;}_node = parent;}return *this;
}Self& operator--()
{if (_node == nullptr){Node* rightMost = _root;while (rightMost && rightMost->_right){rightMost = rightMost->_right;}_node = rightMost;}else if (_node->_left){Node* rightMost = _node->_left;while (rightMost->_right){rightMost = rightMost->_right;}_node = rightMost;}else {Node* cur = _node;Node* parent = cur->_parent;while (parent && cur == parent->_left){cur = parent;parent = parent->_parent;}_node = parent;}return *this;
}
疏通了逻辑来看重载++和--操作就很简单了,++操作走中序遍历的思路,也就是走升序,一直遍历去找比自己当前节点大的下一个节点,先看当前节点的右子树是否为空,不为空那就去找右子树的最左节点,那个节点就是要找的那个节点了,如果为空,那就一直往上走,直到是某个节点的左节点,如果找到了空,那就是整个树都走完了。--操作就是和++操作类似的,就是首先如果是空的话那就得先走到红黑树的最右边节点,然后从看右子树是否为空改成左子树是否为空,走到走到空也是意味着这个树走完了。
1.4 -> * != ==
Ref operator*()
{return _node->_data;
}Ptr operator->()
{return &_node->_data;
}
bool operator!=(const Self& s)
{return _node != s._node;
}bool operator==(const Self& s)
{return _node == s._node;
}
->就是把引用返回去,*就是解引用把数据返回去,==和!=就是比较当前节点是否和你指定的相等。
二 红黑树的改造
2.1 类模板
既然已经完成了对迭代器的支持,那么就光一个实现的红黑树是不行的,我们得加点东西让红黑树能够对map和set进行适配。
template<class K, class T,class KeyOfT>
class RBTree
{typedef RBTreeNode <T> Node;
public:typedef __TreeIterator<T, T&, T*> Iterator;typedef __TreeIterator<T, const T&, const T*> ConstIterator;
首先是对类模板的改变,多加了一个KeyOfT,其主要是为了取map/set中的key数据,后面对迭代器和const迭代器进行typedef一下,使其不会那么繁琐的写类型。‘
2.2 begin()/end()
Iterator Begin()
{Node* minLeft = _root;while (minLeft && minLeft->_left){minLeft = minLeft->_left;}return Iterator(minLeft, _root);
}Iterator End()
{return Iterator(nullptr, _root);
}ConstIterator Begin() const
{Node* minLeft = _root;while (minLeft && minLeft->_left){minLeft = minLeft->_left;}return ConstIterator(minLeft, _root);
}ConstIterator End() const
{return ConstIterator(nullptr, _root);
}
实现begin()/end()很简单,一个普通和一个const版本的,实现begin()首先就需要找到当前树的最小节点,首先找到根,然后一直往左走,就是最小的那个节点了,end()就直接给个空就好了。
2.3 插入
pair<Iterator,bool> Insert(const T& data)
{if (_root == nullptr){_root = new Node(data);_root->_col = BLACK;return { Iterator(_root,_root),true };}Node* parent = nullptr;Node* cur = _root;KeyOfT kot;while (cur){if (kot(cur->_data) < kot(data)){parent = cur;cur = cur->_right;}else if (kot(cur->_data) > kot(data)){parent = cur;cur = cur->_left;}else{return { Iterator(cur,_root),false };}}cur = new Node(data);Node* newnode = cur;cur->_col = RED;if (kot(parent->_data) < kot(data)){parent->_right = cur;}else{parent->_left = cur;}cur->_parent = parent;while (parent && parent->_col == RED){Node* grandfather = parent->_parent;if (parent == grandfather->_left){//   g// p   uNode* uncle = grandfather->_right;// 叔叔存在且为红if (uncle && uncle->_col == RED){parent->_col = uncle->_col = BLACK;grandfather->_col = RED;// 继续往上处理cur = grandfather;parent = cur->_parent;}else{// 叔叔不存在或者存在且为黑//      g//   p     u//cif (cur == parent->_left){RotateR(grandfather);parent->_col = BLACK;grandfather->_col = RED;}else{//      g//   p     u//      cRotateL(parent);RotateR(grandfather);grandfather->_col = RED;cur->_col = BLACK;}break;}}else{   //   g// u   pNode* uncle = grandfather->_left;// 叔叔存在且为红,->变色即可if (uncle && uncle->_col == RED){parent->_col = uncle->_col = BLACK;grandfather->_col = RED;// 继续往上处理cur = grandfather;parent = cur->_parent;}else // 叔叔不存在,或者存在且为黑{// 情况二:叔叔不存在或者存在且为黑// 旋转+变色//      g//   u     p//            cif (cur == parent->_right){RotateL(grandfather);parent->_col = BLACK;grandfather->_col = RED;}else{//      g//   u     p//      cRotateR(parent);RotateL(grandfather);cur->_col = BLACK;grandfather->_col = RED;}break;}}}_root->_col = BLACK;return { Iterator(newnode,_root),true };
}
其他的不说,就说改变的吧,首先为了适配迭代器,在返回值上设置成pair,一个是iterator迭代器,另一个就是返回的是否插入成功,然后在返回的时候用{}来进行返回,编译器会自动识别,总体上和原来的是很相似的,只是做了适配的工作。
2.4 Find()
Iterator Find(const K& key)
{KeyOfT kot;Node* cur = _root;while (cur){if (kot(cur->_data) < key){cur = cur->_right;}else if (kot(cur->_data) > key){cur = cur->_left;}else{return Iterator(cur, _root);}}return End();
}
find()就更简单了,找到了就是返回的对应的迭代器位置,没有找到直接返回End()就可以了。
三 map模拟实现
map的底层结构就是红黑树,用红黑树封装一个map就可以了。
emplate<class K, class V>class map{struct MapKeyOfT{const K& operator()(const pair<K, V>& kv){return kv.first;}};public:typedef typename RBTree<K, pair<const K, V>, MapKeyOfT>::Iterator iterator;typedef typename RBTree<K, pair<const K, V>, MapKeyOfT>::ConstIterator const_iterator;iterator begin(){return _t.Begin();}iterator end(){return _t.End();}const_iterator begin() const{return _t.Begin();}const_iterator end() const{return _t.End();}pair<iterator, bool> insert(const pair<K, V>& kv){return _t.Insert(kv);}V& operator[](const K& key){pair<iterator, bool> ret = _t.Insert({ key, V() });return ret.first->second;}private:RBTree<K, pair<const K, V>, MapKeyOfT> _t;};由于map是key-value模型,所以我们的类模板设置了两个类型,分别是K,和V,在map类里面我们终于看到了KeyOfT这个结构体,这个结构体里面我们就设计了一个括号重载,这就是我们的仿函数的用法,你可以看到它返回的是我们的键值,接下来我们对红黑树的两个迭代器类型再次进行重命名,这样我们在测试主函数里面使用的时候格式就跟使用标准库的时候是一模一样的。接下来还是我们的两组begin,end,我们直接调用红黑树的两组begin和end就可以了,接下来是insert插入,我们还是调用红黑树的插入,find也是如此,最后是我们的方括号重载。
方括号重载:方括号我们一般都是把想要让程序员看到的数据给取出来,在map中我们想看到的大多数时候都不是key值,而是value值,value值就是我们的pair结构体中的second变量里;或者说这个区域的数据如果是空的,那么我们还可以把数据添加进去。因此,我们的方括号重载也是这样去设计的,先去添加(如果已经存在了它就会返回的是false,直接把原来的数据赋值给ret,不清楚的话,可以看红黑树插入的代码就会了解了),然后我们再返回second数据就可以了。
这就是我们map的简单封装,封装顾名思义就是为了把代码封装起来给别人看,目的就是为了能够让代码看起来更加规范,简洁和通俗易懂,所以不难发现,封装后的接口,返回值啥的,基本都是类似的。
四 set的实现
set内部也是红黑树,同样在内部封装一个红黑树就可以了。
template<class K>
class set
{struct SetKeyOfT{const K& operator()(const K& key){return key;}};
public:typedef typename RBTree<K, const K, SetKeyOfT>::Iterator iterator;typedef typename RBTree<K, const K, SetKeyOfT>::ConstIterator const_iterator;iterator begin(){return _t.Begin();}iterator end(){return _t.End();}const_iterator begin() const{return _t.Begin();}const_iterator end() const{return _t.End();}pair<iterator, bool> insert(const K& key){return _t.Insert(key);}private:RBTree<K, const K, SetKeyOfT> _t;
};
为了去和红黑树匹配,而set又只是存一个key值,那么我们直接可以存两个key放入到红黑树就可以了,然后后面的封装思路就和map是一样的,然后也就不需要和map一样要一个pair来存key value了。
最后,实现map/set的本质意义就是为了去了解底层,这样才能明白他为什么这么设计,以及他这么设计的巧妙之处,在后面自己使用的时候也就不会苦恼这么设计的原因,它为什么可以这样用了。