LLM量化技术全景:GPTQ、QAT、AWQ、GGUF与GGML
01
引言
本文介绍的是在 LLM 讨论中经常听到的各种量化技术。本文的目的是提供一步一步的解释和代码,让大家可以自己使用这些技术来压缩模型。
闲话少说,我们来研究一下吧!
02
Quantization
量化是指将高精度数字转换为低精度数字。低精度实体可以存储在磁盘上很小的空间内,从而减少内存需求。让我们从一个简单的量化例子开始,以澄清概念。
假设有 25 个 FP16 格式的权重值,如下图矩阵所示。

我们需要对这些值进行 int8 量化。具体步骤如下。
-
旧数值的取值范围= fp16 格式的最大权重值 - fp16 格式的最小权重值 = 0.932-0.0609 = 0.871
-
新数值的取值范围 = Int 8 包含 -128 至 127 的数字。因此,Range = 127-(-128) = 255
-
Scale: 新范围内的最大值/旧范围内的最大值=127/ 0.932 =136.2472498690413
-
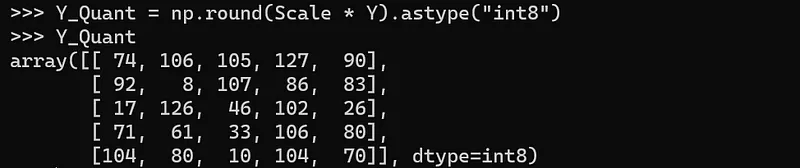
量化后的值: 计算公式为:
Quantized Value = Round(Scale * Original Value)
经过上述转换,得到量化后的结果为:
-
进而反量化操作的计算公式为:
New Value = Quantized Value / Scale

- 量化误差:
这里需要注意的一点是,当我们去量化回到 fp16 格式时,我们会发现数字似乎并不完全相同。第一个元素 0.5415 变成了 0.543。在大多数元素中都可以发现同样的问题。这就是量化-去量化过程中产生的误差。
既然我们已经了解了量化的核心思想,下面我们就来谈谈 LLM 的量化类型。
03
GPTQ原理
GPTQ是一种训练后量化方法。这意味着在获得预训练的大型语言模型(LLM)后,您只需将模型参数转换为较低精度即可。GPTQ更适用于GPU而非CPU。以下是GPTQ的几种主要变体:
- 静态范围GPTQ:可将权重和激活值转换为较低精度。
- 动态范围GPTQ:将权重转换为较低精度,并开发一个函数用于在推理过程中动态将激活值量化为较低精度。
- 权重量化: 通过降低模型权重和/或激活值的精度来节省存储空间。在推理时,输入仍保持float32格式,因此需要将权重还原至与输入相同的精度进行计算。然而,由于舍入误差,这一过程会导致一定的精度损失。
我们首先来看下静态范围量化的过程:
- 如果大家打算同时量化权重和激活,则需要一个样本校准数据集来进行 GPTQ。
- 校准数据集 - 该数据集可以是从原始数据集中抽取的样本。例如,从原始预训练数据集中抽取 1000 个数据样本,作为整个数据集的代表性样本。
- 校准数据集推理 - 接着将使用该校准数据集进行推理,以找到采样权重和相应激活的分布。该分布将作为量化的基础。 例如,特定层中激活值的范围是 0.2 至 0.9,权重的范围是 0.1 至 0.3。有了最小-最大值范围后,就可以使用本文之前解释的数学方法对该层进行量化。
- 静态范围量化算法概述 :
在GPTQ算法中,我们逐层对神经网络进行量化,具体步骤如下:
a. 权重矩阵分组
将每一层的权重矩阵按列划分为若干组。
例如,若设置group_size=128,则权重矩阵会被划分为多个128列的组。
b. 迭代式量化处理
在每组(128列)中,先量化其中一列的数据。
量化后,调整该组剩余的权重,以补偿量化引入的误差。
c. 全局误差补偿
处理完当前组的所有列后,更新整个矩阵的其他列组(其他128列组),以进一步修正误差。这一完整过程也称为"惰性批量更新”(Lazy Batch Update)。
接下来,我们通过代码示例进一步说明。
04
GPTQ代码实现
这种量化方法需要使用GPU。起初,我尝试对一个7B分片的Mistral模型进行量化,但失败了。这是因为模型在下载后首先加载到CPU上,而T4显卡的CPU内存不足以支持。最终,我选择了一个较小的模型,可以在Google Colab的免费T4实例中容纳。这个模型是来自HF仓库的bigscience/bloom-3b。
!pip install auto_gptq
import torch
from auto_gptq import AutoGPTQForCausalLM, BaseQuantizeConfig
from transformers import TextGenerationPipeline
from transformers import AutoTokenizer
pretrained_model_name = "bigscience/bloom-3b"
quantize_config = BaseQuantizeConfig(bits=4, group_size=128)
# Tensors of bloom are of float16. Hence, torch_dtype=torch.float16. Do not leave torch_dtype as "auto" as this leads to a warning of implicit dtype conversion
model = AutoGPTQForCausalLM.from_pretrained(pretrained_model_name, quantize_config, trust_remote_code=False, device_map="auto", torch_dtype=torch.float16)  # changing device map to "cuda" does not have any impact on T4 GPU mem usage.
tokenizer = AutoTokenizer.from_pretrained(pretrained_model_name)
# Calibration
examples = [tokenizer("Automated machine learning is the process of automating the tasks of applying machine learning to real-world problems. AutoML potentially includes every stage from beginning with a raw dataset to building a machine learning model ready for deployment.")
]  # giving only 1 example here for testing. In an real world scenario, you might want to give 500-1000 samples.
model.quantize(examples)
quantized_model_dir = "bloom3b_q4b_gs128"
model.save_quantized(quantized_model_dir)
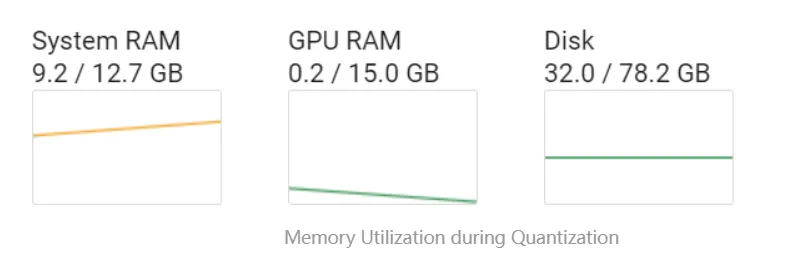
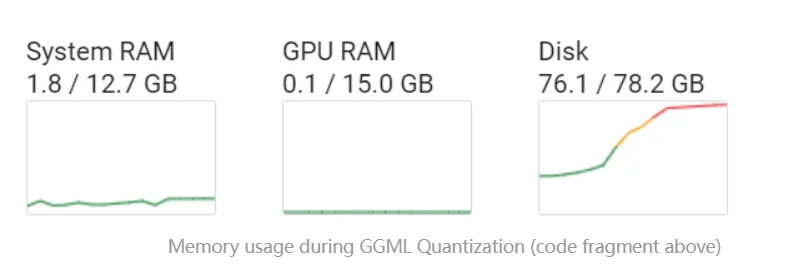
从下面的图片可以注意到一个重要的点:在量化过程中,GPU内存其实并没有被充分利用,虽然GPU是进行量化的前提条件。
我们使用以下代码测试下量化模型的输出:
# Inference with quantized model
device = "cuda:0"  # make use of GPU for inference.
model = AutoGPTQForCausalLM.from_quantized(quantized_model_dir, device=device, torch_dtype=torch.float16)
pipeline = TextGenerationPipeline(model=model, tokenizer=tokenizer, max_new_tokens=50)
print(pipeline("Automated machine learning is")[0]["generated_text"])
# Sequence length of a model (bloom has seq length of 2048) is total tokens in input & output;
# max_new_tokens is number of output tokens
# Do note that there is a warning while executing this code that model's sequence length was not in model config. However, what i could find any option to pass the seq length of bloom in configurations.
# The warnings related to fused modules & unsupported model is not valid. The links that i used to validate this are in references.
结果如下:

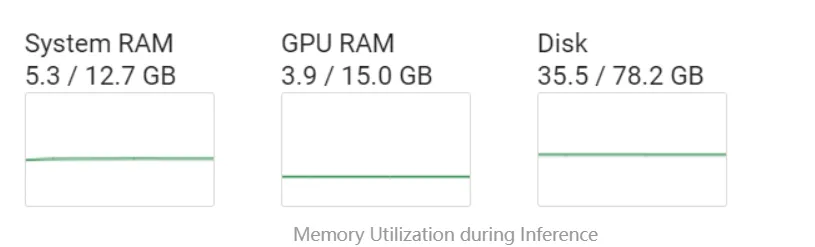
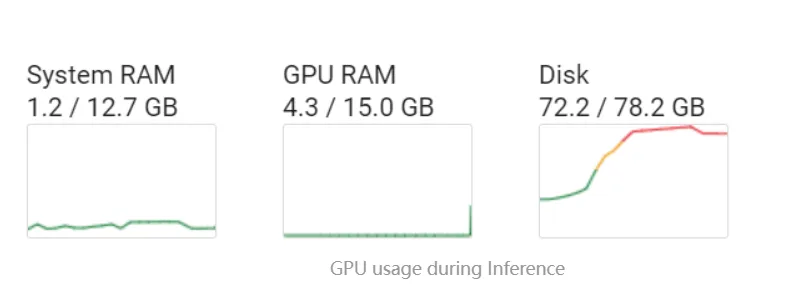
当执行推理代码(上图)时,GPU 的使用率会上升。这意味着量化模型正从 CPU 转移到 GPU,从而增加了 GPU 内存消耗。
至此,GPTQ 结束。
05
GGUF | GGML
GGUF是GGML的升级版本。GGML作为LLM库的C++实现,支持LLaMA系列、Falcon等多种大语言模型。基于该库的模型可运行于苹果自研芯片(Mac OS系统)——这种由苹果独创的处理器创新性地集成了CPU与GPU功能。
GGUF格式同时兼容Windows和Linux操作系统,这意味着普通CPU环境也能运行这些模型。当CPU性能不足时,用户还可将部分模型层卸载至GPU运算。该格式提供从2比特到8比特的多级量化选项,具体操作流程为:先获取原始LLaMA模型,将其转换为GGUF格式,最终对GGUF格式进行低精度量化处理。
# Install llama.cpp
!git clone https://github.com/ggerganov/llama.cpp
!cd llama.cpp && git pull && make clean && LLAMA_CUBLAS=1 make
!pip install -r llama.cpp/requirements.txt
# Download model
!git lfs install
!git clone https://huggingface.co/Siddharthvij10/MistralSharded2
# Convert weights to fp16
!python llama.cpp/convert.py MistralSharded2 --outtype f16 --outfile "MistralSharded2/mistralsharded2.fp16.bin"
# Quantization - Requires GPU RAM as a mandate. However, does not use much of it.
# As per info on https://huggingface.co/TheBloke/Llama-2-13B-chat-GGML, q4_k_m uses Q6_K for half of the attention.wv and feed_forward.w2 tensors, else Q4_K!./llama.cpp/quantize "MistralSharded2/mistralsharded2.fp16.bin" "MistralSharded2/mistralsharded2.Q4_K_M.gguf" q4_k_m
GGML 量化过程中的内存使用情况:
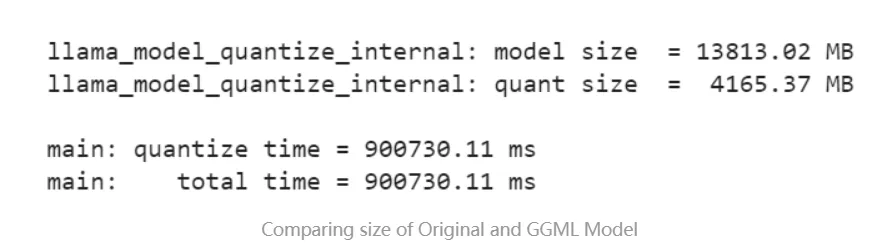
比较原始模型和 GGML 模型的大小:
推理代码如下:
import os# There are 32 layers in mistral 7B. Hence offloading all 32 layers to GPU while loading for inference below.!./llama.cpp/main -m "MistralSharded2/mistralsharded2.Q4_K_M.gguf" -n 35 --color -ngl 32 -p "Automated machine learning"
结果如下:

推理过程中 GPU 的使用情况:
06
QAT
我们开始进行量化感知训练(QAT)时,会使用一个预训练模型或后训练量化(PTQ)模型作为基础。若采用PTQ模型,QAT微调的主要目的是恢复因PTQ过程造成的精度损失。QAT会改变模型的前向传播过程,但保持反向传播不受影响。在QAT中,我们只对那些参数量化后不会导致精度显著下降的网络层实施量化操作,而对量化会负面影响精度的层则保留其原始精度。
QAT的核心思想是根据每层权重的精度要求,将输入数据量化为较低精度。同时,若下一层需要更高精度,QAT还会负责将权重与输入相乘后的输出重新转换回高精度。这种先将输入降精度、再将计算输出恢复高精度的过程被称为"伪量化节点插入"——之所以称为"伪量化",是因为它既执行量化又执行反量化,最终还原为基础运算。
QAT在前向传播中引入量化误差,这些误差会累积并通过反向传播中的优化器进行调整。通过这种方式,模型能够学习如何通过减小量化引入的误差来优化自身性能。
请注意,TensorFlow 官网上提供了几段代码示例,其中一段使用标准 TensorFlow,另一段使用 tf-nightly。我在使用标准 TensorFlow 时遇到了“模型中的某些层不支持 QAT”的错误,因此切换到了 nightly 版本。此外,我还移除了 Keras 模型中的所有复杂层(如自定义层或高级结构)。由于这只是一个演示用的简单模型,代码是在 CPU 上运行的。
! pip uninstall -y tensorflow
! pip install -q tf-nightly  # Use tf-nightly instead of tensorflow since it gets updated with fixes every day
! pip install -q tensorflow-model-optimization  # this lib is used for QAT
import numpy as np
import pandas as pd
import tensorflow as tf
import tensorflow_model_optimization as tfmot
from sklearn.model_selection import train_test_split
from sklearn.preprocessing import StandardScaler
### Sample Keras model - Code generated by ChatGPT
# Generate sample data
np.random.seed(0)
data = pd.DataFrame(np.random.rand(1000, 5), columns=['Feature1', 'Feature2', 'Feature3', 'Feature4', 'Feature5'])
target = pd.Series(np.random.randint(0, 2, size=1000), name='Target')
# Split data into train and test sets
X_train, X_test, y_train, y_test = train_test_split(data, target, test_size=0.2, random_state=42)
# Standardize features
scaler = StandardScaler()
X_train_scaled = scaler.fit_transform(X_train)
X_test_scaled = scaler.transform(X_test)
# Define the Keras model
model = tf.keras.Sequential([tf.keras.layers.Dense(64, activation='relu', input_shape=(5,)),tf.keras.layers.Dense(32, activation='relu'),tf.keras.layers.Dense(1, activation='sigmoid')
])
# Compile the model
model.compile(optimizer='adam', loss='binary_crossentropy', metrics=['accuracy'])
# Train the model
model.fit(X_train_scaled, y_train, epochs=10, batch_size=32, validation_split=0.2)
# Evaluate the model
test_loss, test_accuracy = model.evaluate(X_test_scaled, y_test)
print(f'Test Loss: {test_loss}, Test Accuracy: {test_accuracy}')
quant_aware_model = tfmot.quantization.keras.quantize_model(model)
quant_aware_model.compile(optimizer='adam', loss='binary_crossentropy', metrics=['accuracy'])
# Fine tune to create a quant aware model
quant_aware_model.fit(X_train_scaled, y_train, epochs=10, batch_size=32, validation_split=0.2)
# Evaluate the quant aware model
test_loss, test_accuracy = quant_aware_model.evaluate(X_test_scaled, y_test)
print(f'Test Loss: {test_loss}, Test Accuracy: {test_accuracy}')
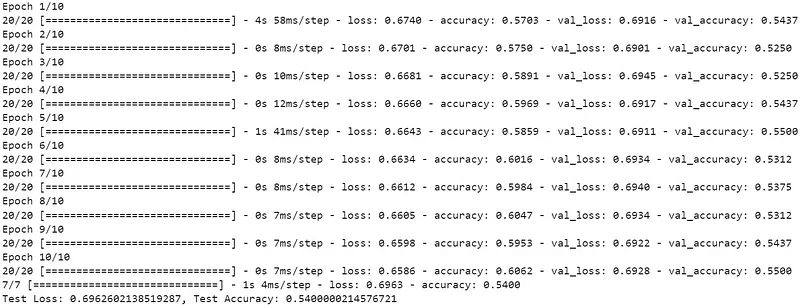
结果如下:
07
AWQ
AWQ适用于 GPU 或 CPU。其核心思想是不量化所有权重,而是选择性量化对模型性能影响较小的权重,从而保持模型的有效性。
算法流程:
a. 校准(Calibration)
向预训练的大语言模型(LLM)输入样本数据,分析权重和激活值的分布。
识别关键激活值及其对应的权重(即对模型输出影响较大的部分)。
b. 缩放(Scaling)
放大关键权重(提高其数值范围),同时对非关键权重进行低精度量化。
由于重要权重被保留(甚至增强),而次要权重被压缩,量化带来的精度损失被最小化。
c. 权重格式要求(SafeTensor)
AWQ 要求模型权重从 PyTorch 的 .bin 格式转换为 SafeTensor(.safetensors)格式。转换方法可参考官方指南:
链接:https://huggingface.co/spaces/safetensors/convert
