Threejs中顶视图截图
Threejs中顶视图截图
一般项目中的每个模型,都需要有一张对应的图片,一般是顶视图,在对应的2D场景场景中展示。以下分享一个实现方式,先将清空模型材质的纹理,把颜色设置为白色,使用正交相机截取顶视图,生成一张图片,作为模型在2D场景的图标。
这个是截图模型顶视图的代码:
import * as THREE from 'three';
import { OutlinePostProcess } from './OutlinePostProcess';export class ModelCapture {private renderer: THREE.WebGLRenderer;private scene: THREE.Scene;private camera: THREE.OrthographicCamera;private outlineProcess: OutlinePostProcess;private width: number = 240;private height: number = 260;constructor() {this.scene = new THREE.Scene();this.renderer = new THREE.WebGLRenderer({antialias: true,alpha: true,preserveDrawingBuffer: true});this.camera = new THREE.OrthographicCamera(0, 0, 0, 0, 0.1, 2000)this.camera.position.set(0, 100, 0);this.camera.lookAt(0, 0, 0);const ambientLight = new THREE.AmbientLight(0xffffff, 1);this.scene.add(ambientLight);this.outlineProcess = new OutlinePostProcess(this.renderer,this.scene,this.camera,this.width,this.height);this.outlineProcess.setDefaultEnabled(true);this.outlineProcess.setEnabled(true);this.outlineProcess.makeOutlineDirty();}public captureModel(model: THREE.Group): void {const root = model;this.scene.add(root);const boundingBox = new THREE.Box3().setFromObject(root);const size = new THREE.Vector3();boundingBox.getSize(size);this.updateSize(size.x, size.z);root.traverse((child: THREE.Object3D) => {if (child instanceof THREE.Mesh) {if (Array.isArray(child.material)) {child.material.forEach(material => {if (material.map) material.map = null;material.color = new THREE.Color(1, 1, 1);});} else if (child.material && child.material.map) {child.material.map = null;child.material.color = new THREE.Color(1, 1, 1);}}});this.outlineProcess.makeOutlineDirty();this.outlineProcess.render();const imageUrl = this.renderer.domElement.toDataURL('image/png');const img = document.createElement('img');img.id = 'model-capture';img.src = imageUrl;img.style.position = 'absolute';img.style.top = '0';img.style.right = '0';img.style.width = '20%';img.style.height = '20%';document.body.appendChild(img);}// 更新场景尺寸的函数public updateSize(width: number, height: number) {// 更新渲染器尺寸this.renderer.setSize(width, height)// 更新相机参数this.camera.left = width / -2this.camera.right = width / 2this.camera.top = height / 2this.camera.bottom = height / -2this.camera.updateProjectionMatrix()this.outlineProcess.onResize(width, height);}
}
为了方便顶视图的效果,搭建了一个同样的场景,来实时观察相机截图的内容,代码如下:
import * as THREE from 'three'
import { OrbitControls } from 'three/examples/jsm/controls/OrbitControls.js';
import { GLTFLoader } from 'three/examples/jsm/loaders/GLTFLoader'
import { OutlinePostProcess } from './OutlinePostProcess';
import { ModelCapture } from './ModelCapture';export class TopView {private static initialized = false;private static renderer: THREE.WebGLRenderer;private static scene: THREE.Scene;private static camera: THREE.OrthographicCamera;private static outlineProcess: OutlinePostProcess;private static model: THREE.Group;private static modelCapture: ModelCapture;public static main() {TopView.modelCapture = new ModelCapture();if (TopView.initialized) {return;}TopView.initialized = true;console.log("TopView")this.scene = new THREE.Scene()const container = document.getElementById('main') as HTMLDivElementif (!container) {console.error('找不到容器元素')return}this.renderer = new THREE.WebGLRenderer({antialias: true,alpha: true,preserveDrawingBuffer: true})container.appendChild(this.renderer.domElement)this.camera = new THREE.OrthographicCamera(0, 0, 0, 0, 0.1, 2000)this.outlineProcess = new OutlinePostProcess(this.renderer, this.scene, this.camera, 240, 260);this.updateSize(240, 260)window.addEventListener('resize', ()=>{this.updateSize(240, 260);})this.camera.position.set(0, 100, 0);this.camera.lookAt(0, 0, 0);(globalThis as any).testCamera = TopView.camera;// 添加环境光const ambientLight = new THREE.AmbientLight(0xffffff, 1)this.scene.add(ambientLight)// 添加坐标轴辅助器const axesHelper = new THREE.AxesHelper(500)this.scene.add(axesHelper)// 添加网格辅助器const gridHelper = new THREE.GridHelper(1000, 20)this.scene.add(gridHelper)// 加载 GLB 模型const loader = new GLTFLoader()loader.load('/bed.glb', (gltf: any) => {let root = gltf.scene;root.scale.set(0.1, 0.1, 0.1);root.rotation.set(0, 0, 0);// 获取模型的包围盒const boundingBox = new THREE.Box3().setFromObject(root);const size = new THREE.Vector3();boundingBox.getSize(size);console.log('模型尺寸:', size);TopView.scene.add(root);TopView.model = root.clone();}, undefined, (error: any) => {console.error('加载模型出错:', error)})// 添加场景控制器const controls = new OrbitControls(this.camera, this.renderer.domElement)controls.enableDamping = true // 启用阻尼效果controls.dampingFactor = 0.05 // 阻尼系数controls.screenSpacePanning = false // 禁用屏幕空间平移controls.minDistance = 100 // 最小缩放距离controls.maxDistance = 500 // 最大缩放距离controls.maxPolarAngle = Math.PI / 2 // 限制垂直旋转角度// 渲染场景function animate() {requestAnimationFrame(animate)controls.update() // 更新控制器// TopView.renderer.render(TopView.scene, TopView.camera)TopView.outlineProcess.makeOutlineDirty();TopView.outlineProcess.render();}animate()}// 更新场景尺寸的函数public static updateSize(width: number, height: number) {// 更新渲染器尺寸this.renderer.setSize(width, height)// 更新相机参数this.camera.left = width / -2this.camera.right = width / 2this.camera.top = height / 2this.camera.bottom = height / -2this.camera.updateProjectionMatrix()this.outlineProcess.onResize(width, height);}public static async captureScene() {this.outlineProcess.makeOutlineDirty();this.outlineProcess.render();let imageUrl = await this.renderer.domElement.toDataURL('image/png');const img = await document.createElement('img');img.id = 'scene-capture';img.src = imageUrl;img.style.position = 'absolute';img.style.top = '0';img.style.left = '0';img.style.width = '20%';img.style.height = '20%';document.body.appendChild(img);}// 创建一个函数来捕获渲染结果public static async captureModel() {await TopView.modelCapture.captureModel(TopView.model.clone())}
}(globalThis as any).TopView = TopView;
可以在控制台输入如下代码,调用 TopView 中的两个方法,来测试:
// 截取当前场景
TopView.captureScene()
// 使用截图工具类截图
TopView.captureModel()
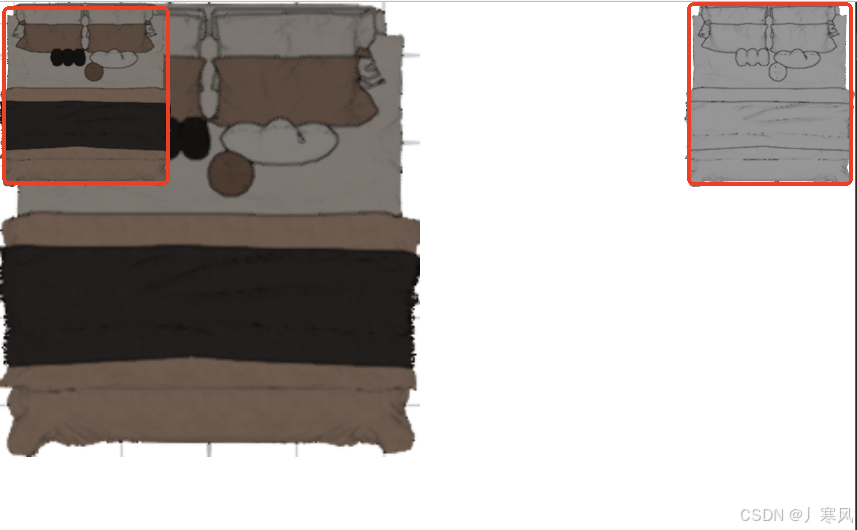
效果如下,左边是截取的场景,右边是截图工具类截的图。
其中,用到的描边方式,我在上一篇博客中有介绍,代码有一点修改,便于调式,也把源码放在下面。
import * as THREE from "three";
import { EffectComposer, FXAAShader, GammaCorrectionShader, RenderPass, ShaderPass, SMAAPass } from "three/examples/jsm/Addons.js";export class OutlinePostProcess {private _composer!: EffectComposer;private _normalIdRenderTarget!: THREE.WebGLRenderTarget;private _renderPass!: RenderPass;private _outlinePass!: ShaderPass;private _fxaaPass!: ShaderPass;private _smaaPass!: SMAAPass;// 抗锯齿模式,0: FXAA,1: SMAAprivate _aaMode: number = 0;private _defaultEnabled: boolean = true;private _enabled: boolean = true;private _isRenderingNormalId: boolean = false;private _normalIdMaterial!: THREE.ShaderMaterial;// 避免每帧都重复渲染一次描边,场景没变化时无需渲染private _outlineDirty: boolean = true;// 是否启用对角线采样private _enableDiagonalSampling: boolean = false;constructor(private renderer: THREE.WebGLRenderer,private scene: THREE.Scene,private _camera: THREE.Camera,private _width: number,private _height: number,) {this.initNormalIdMaterial();this.initRenderTarget();this.initComposer();}public set camera(camera: THREE.Camera) {this._camera = camera;this._renderPass.camera = camera;this.makeOutlineDirty();}public get width() {const pixelRatio = this.renderer.getPixelRatio();return this._width * pixelRatio;}public get height() {const pixelRatio = this.renderer.getPixelRatio();return this._height * pixelRatio;}private initNormalIdMaterial() {this._normalIdMaterial = new THREE.ShaderMaterial({uniforms: {meshID: { value: 0.0 }},vertexShader: `varying vec3 vNormal;void main() {vNormal = normalize(normalMatrix * normal);gl_Position = projectionMatrix * modelViewMatrix * vec4(position, 1.0);}`,fragmentShader: `uniform float meshID;varying vec3 vNormal;vec2 encodeNormal(vec3 n) {vec2 enc = normalize(n.xy) * (sqrt(-n.z * 0.5 + 0.5));enc = enc * 0.5 + 0.5;return enc;}vec2 encodeID(float id) {float tempID = id / 255.0;float highID = floor(tempID);return vec2(highID / 255.0, tempID - highID);}void main() {vec2 encodedNormal = encodeNormal(normalize(vNormal));vec2 encodedID = encodeID(meshID);gl_FragColor = vec4(encodedNormal, encodedID);}`});}private switchMaterial(isNormalId: boolean) {if (isNormalId === this._isRenderingNormalId) {return;}let meshID = 1;const processMesh = (object: THREE.Object3D, parentSkipOutline: boolean = false) => {// 如果父级节点禁用描边,则当前节点也禁用描边const skipOutline = parentSkipOutline || object.userData.SkipOutline;// 检查对象是否可见if (!object.visible) {return;}if (object instanceof THREE.Mesh ||object instanceof THREE.Line ||object instanceof THREE.Points ||object instanceof THREE.Sprite) {if (isNormalId) {object.userData.originalMaterial = object.material;let normalIdMaterial = object.userData.normalIdMaterial;if (!normalIdMaterial) {normalIdMaterial = this._normalIdMaterial.clone();object.userData.normalIdMaterial = normalIdMaterial;}normalIdMaterial.uniforms.meshID.value = skipOutline ? 0 : meshID++;object.material = normalIdMaterial;} else {object.material = object.userData.originalMaterial;}}// 递归处理所有子节点object.children.forEach(child => processMesh(child, skipOutline));};// 从场景根节点开始处理processMesh(this.scene);this._isRenderingNormalId = isNormalId;}private initRenderTarget() {this._normalIdRenderTarget = new THREE.WebGLRenderTarget(this.width,this.height,{format: THREE.RGBAFormat,type: THREE.FloatType,minFilter: THREE.NearestFilter,magFilter: THREE.NearestFilter,colorSpace: THREE.SRGBColorSpace,count: 1});}private initComposer() {this._composer = new EffectComposer(this.renderer);// 添加主渲染通道this._renderPass = new RenderPass(this.scene, this._camera);this._composer.addPass(this._renderPass);// 放在renderPass之后,修复渲染后颜色变暗的问题const gammaCorrectionShader = new ShaderPass(GammaCorrectionShader);this._composer.addPass(gammaCorrectionShader);// 添加轮廓后处理通道this._outlinePass = new ShaderPass({uniforms: {tDiffuse: { value: null },tNormalId: { value: null },resolution: { value: new THREE.Vector2(1 / this.width, 1 / this.height) },outlineColor: { value: new THREE.Vector4(0.0, 0.0, 0.0, 1.0) },lowIDConfig: { value: 1.0 },lowNormalConfig: { value: 0.8 },intensityConfig: { value: 0.3 },enableDiagonalSampling: { value: this._enableDiagonalSampling }},vertexShader: `varying vec2 vUv;void main() {vUv = uv;gl_Position = projectionMatrix * modelViewMatrix * vec4(position, 1.0);}`,fragmentShader: `uniform sampler2D tDiffuse;uniform sampler2D tNormalId;uniform vec2 resolution;uniform vec4 outlineColor;uniform float lowIDConfig;uniform float lowNormalConfig;uniform float intensityConfig;uniform bool enableDiagonalSampling;varying vec2 vUv;vec3 decodeNormal(vec2 enc) {vec4 nn = vec4(enc, 0.0, 0.0) * vec4(2.0,2.0,0.0,0.0) + vec4(-1.0,-1.0,1.0,-1.0);float l = dot(nn.xyz,-nn.xyw);nn.z = l;nn.xy *= sqrt(l);return nn.xyz * 2.0 + vec3(0.0,0.0,-1.0);}float decodeID(vec2 enc) {return floor((enc.x * 255.0 + enc.y) * 255.0 + 0.5);}// 采样辅助函数vec2 sampleDirection(vec2 uv, vec2 offset, vec3 currentNormal, float currentID) {vec4 texSample = texture2D(tNormalId, uv + offset);float id = decodeID(texSample.zw);if(id < 0.5) {return vec2(0.0);}vec3 normalSample = decodeNormal(texSample.xy);float normalDiff = 1.0 - abs(dot(currentNormal, normalSample));float idDiff = abs(currentID - id) < 0.0001 ? 0.0 : 1.0;return vec2(normalDiff, idDiff);}void main() {vec4 tex = texture2D(tNormalId, vUv);if(tex.x == 0.0 && tex.y == 0.0 && tex.z == 0.0) {gl_FragColor = texture2D(tDiffuse, vUv);return;}float currentID = decodeID(tex.zw);if(currentID < 0.5) {gl_FragColor = texture2D(tDiffuse, vUv);return;}vec3 currentNormal = decodeNormal(tex.xy);// 使用采样辅助函数处理四个方向vec2 rightSample = sampleDirection(vUv, vec2(resolution.x, 0.0), currentNormal, currentID);vec2 leftSample = sampleDirection(vUv, vec2(-resolution.x, 0.0), currentNormal, currentID);vec2 downSample = sampleDirection(vUv, vec2(0.0, resolution.y), currentNormal, currentID);vec2 upSample = sampleDirection(vUv, vec2(0.0, -resolution.y), currentNormal, currentID);// 处理对角线方向的采样float diagonalIdDiff = 0.0;float diagonalNormalDiff = 0.0;if(enableDiagonalSampling) {vec2 rightUpSample = sampleDirection(vUv, vec2(resolution.x, -resolution.y), currentNormal, currentID);vec2 rightDownSample = sampleDirection(vUv, vec2(resolution.x, resolution.y), currentNormal, currentID);vec2 leftUpSample = sampleDirection(vUv, vec2(-resolution.x, -resolution.y), currentNormal, currentID);vec2 leftDownSample = sampleDirection(vUv, vec2(-resolution.x, resolution.y), currentNormal, currentID);diagonalNormalDiff = rightUpSample.x + rightDownSample.x + leftUpSample.x + leftDownSample.x;diagonalIdDiff = rightUpSample.y + rightDownSample.y + leftUpSample.y + leftDownSample.y;}float totalIdDiff = rightSample.y + leftSample.y + downSample.y + upSample.y + diagonalIdDiff * 0.5;float totalNormalDiff = rightSample.x + leftSample.x + downSample.x + upSample.x + diagonalNormalDiff * 0.5;vec2 result = clamp(vec2(totalNormalDiff * lowNormalConfig, totalIdDiff * lowIDConfig) * intensityConfig,0.0,1.0);float outlineStrength = max(result.x, result.y);vec4 sceneColor = texture2D(tDiffuse, vUv);gl_FragColor = mix(sceneColor, outlineColor, outlineStrength * outlineColor.a);}`});this._composer.addPass(this._outlinePass);if (this._aaMode === 0) {// 添加FXAA抗锯齿通道this._fxaaPass = new ShaderPass(FXAAShader);this._fxaaPass.material.uniforms.resolution.value.x = 1 / (this.width);this._fxaaPass.material.uniforms.resolution.value.y = 1 / (this.height);this._composer.addPass(this._fxaaPass);}else {// 创建 SMAA Passthis._smaaPass = new SMAAPass(this.width, this.height);this._composer.addPass(this._smaaPass);}}public setEnabled(enabled: boolean) {this._enabled = enabled;if (enabled) {this._outlineDirty = true;}}public setDefaultEnabled(t: boolean) {this._defaultEnabled = t;}public get isEnabled(): boolean {return this._enabled;}public get isDefaultEnabled() {return this._defaultEnabled;}public onResize(w: number, h: number) {this._width = w;this._height = h;// 更新渲染器尺寸this.renderer.setSize(this.width, this.height, false);// 更新后处理效果尺寸this._normalIdRenderTarget.setSize(this.width, this.height);this._composer.setSize(this.width, this.height);this._outlinePass.uniforms.resolution.value.set(1 / this.width, 1 / this.height);// 更新抗锯齿通道尺寸if (this._aaMode === 0) {this._fxaaPass.material.uniforms.resolution.value.x = 1 / (this.width);this._fxaaPass.material.uniforms.resolution.value.y = 1 / (this.height);}else {this._smaaPass.setSize(this.width, this.height);}}public render() {if (!this._enabled) {// 如果禁用了描边效果,直接进行普通渲染this.renderer.render(this.scene, this._camera);return;}// 渲染法线和ID到渲染目标if (this._outlineDirty) {this.switchMaterial(true);this.renderer.setRenderTarget(this._normalIdRenderTarget);this.renderer.render(this.scene, this._camera);this._outlineDirty = true;}// 更新轮廓通道的纹理this._outlinePass.uniforms.tNormalId.value = this._normalIdRenderTarget.texture;// this.showRenderTarget(this.renderer, this._normalIdRenderTarget, this.width, this.height);// 恢复正常渲染this.switchMaterial(false);this.renderer.setRenderTarget(null);// 执行后处理渲染this._composer.render();}public makeOutlineDirty() {this._outlineDirty = true;}public setLowIDConfig(value: number) {this._outlinePass.uniforms.lowIDConfig.value = value;this.makeOutlineDirty();}public getLowIDConfig() {return this._outlinePass.uniforms.lowIDConfig.value;}public setLowNormalConfig(value: number) {this._outlinePass.uniforms.lowNormalConfig.value = value;this.makeOutlineDirty();}public getLowNormalConfig() {return this._outlinePass.uniforms.lowNormalConfig.value;}public setIntensityConfig(value: number) {this._outlinePass.uniforms.intensityConfig.value = value;this.makeOutlineDirty();}public getIntensityConfig() {return this._outlinePass.uniforms.intensityConfig.value;}// 设置是否启用对角线采样public setEnableDiagonalSampling(enable: boolean) {this._enableDiagonalSampling = enable;this._outlinePass.uniforms.enableDiagonalSampling.value = enable;this.makeOutlineDirty();}// 获取是否启用对角线采样public getEnableDiagonalSampling(): boolean {return this._enableDiagonalSampling;}public getOutlineColor(): THREE.Vector4 {return this._outlinePass.uniforms.outlineColor.value;}public setOutlineColor(x: number, y: number, z: number) {this._outlinePass.uniforms.outlineColor.value.set(x, y, z, 1);}public showRenderTarget(render: THREE.WebGLRenderer, target: THREE.WebGLRenderTarget, width: number, height: number) {// 根据渲染目标的格式选择正确的数据类型let pixels;if (target.texture.type === THREE.FloatType) {pixels = new Float32Array(width * height * 4);} else {pixels = new Uint8Array(width * height * 4);}// 将 renderTarget 的纹理数据读取到 Canvas 上render.setRenderTarget(target);render.readRenderTargetPixels(target, 0, 0, width, height, pixels);render.setRenderTarget(null);// 将 Canvas 数据展示到 img let imgElement = document.getElementById('normalIdTexture') as HTMLImageElement;if (!imgElement) {imgElement = document.createElement('img');imgElement.id = 'normalIdTexture';// 添加样式使图片可见imgElement.style.position = 'fixed';imgElement.style.top = '120px';imgElement.style.left = '10px';imgElement.style.width = '400px';imgElement.style.height = 'auto';imgElement.style.border = '1px solid #ccc';imgElement.style.zIndex = '100000';document.body.appendChild(imgElement);}const canvas = document.createElement('canvas');canvas.width = width;canvas.height = height;const ctx = canvas.getContext('2d');if (ctx) {let uint8ClampedArray;if (pixels instanceof Float32Array) {// 如果是 Float32Array,需要将数据转换为 Uint8ClampedArrayuint8ClampedArray = new Uint8ClampedArray(width * height * 4);for (let i = 0; i < pixels.length; i++) {uint8ClampedArray[i] = Math.min(255, Math.max(0, pixels[i] * 255));}} else {uint8ClampedArray = new Uint8ClampedArray(pixels);}// 确保 alpha 通道不透明// for (let i = 3; i < pixels.length; i += 4) {//     uint8ClampedArray[i] = 255;// }const imageData = new ImageData(uint8ClampedArray, width, height);// 创建临时 Canvas 来存储原始图像const tempCanvas = document.createElement('canvas');tempCanvas.width = width;tempCanvas.height = height;const tempCtx = tempCanvas.getContext('2d');if (tempCtx) {tempCtx.putImageData(imageData, 0, 0);// 使用 GPU 加速的变换来翻转图像ctx.save();ctx.scale(1, -1);ctx.translate(0, -height);ctx.drawImage(tempCanvas, 0, 0);ctx.restore();}}imgElement.src = canvas.toDataURL();}
}