【XR手柄交互】Unity 中使用 InputActions 实现手柄控制详解(基于 OpenXR + Unity新输入系统(Input Actions))
摘要:
本文主要介绍如何使用 Input Actions(Unity 新输入系统)+ OpenXR 来实现 VR手柄控制(监听ABXY按钮、摇杆、抓握等操作)。
🎮 Unity 中使用 InputActions 实现手柄控制详解(基于 OpenXR + 新输入系统)
✅ 一、环境准备
必要组件
- Unity 2021.3 或以上(推荐使用 LTS 版本)
- 已启用 XR 插件管理器,并为目标平台启用
OpenXR - 安装以下 Package:
Input SystemOpenXR Plugin
启用 OpenXR
Edit > Project Settings > XR Plug-in Management > OpenXR
然后启用 OpenXR 的 Interaction Profiles:
OpenXR Feature Group > Interaction Profiles:- ✅
Oculus Touch Controller - ✅
Valve Index Controller - ✅
Microsoft Mixed Reality Controller
- ✅
🧱 二、创建 Input Actions 文件
1. 创建 Action 文件
在 Assets 文件夹中右键点击:
Create > Input Actions
重命名为:XRControls.inputactions
双击打开,会出现如下结构编辑界面:
2. 添加 Action Map 和 Actions
示例:创建两个 Action Maps
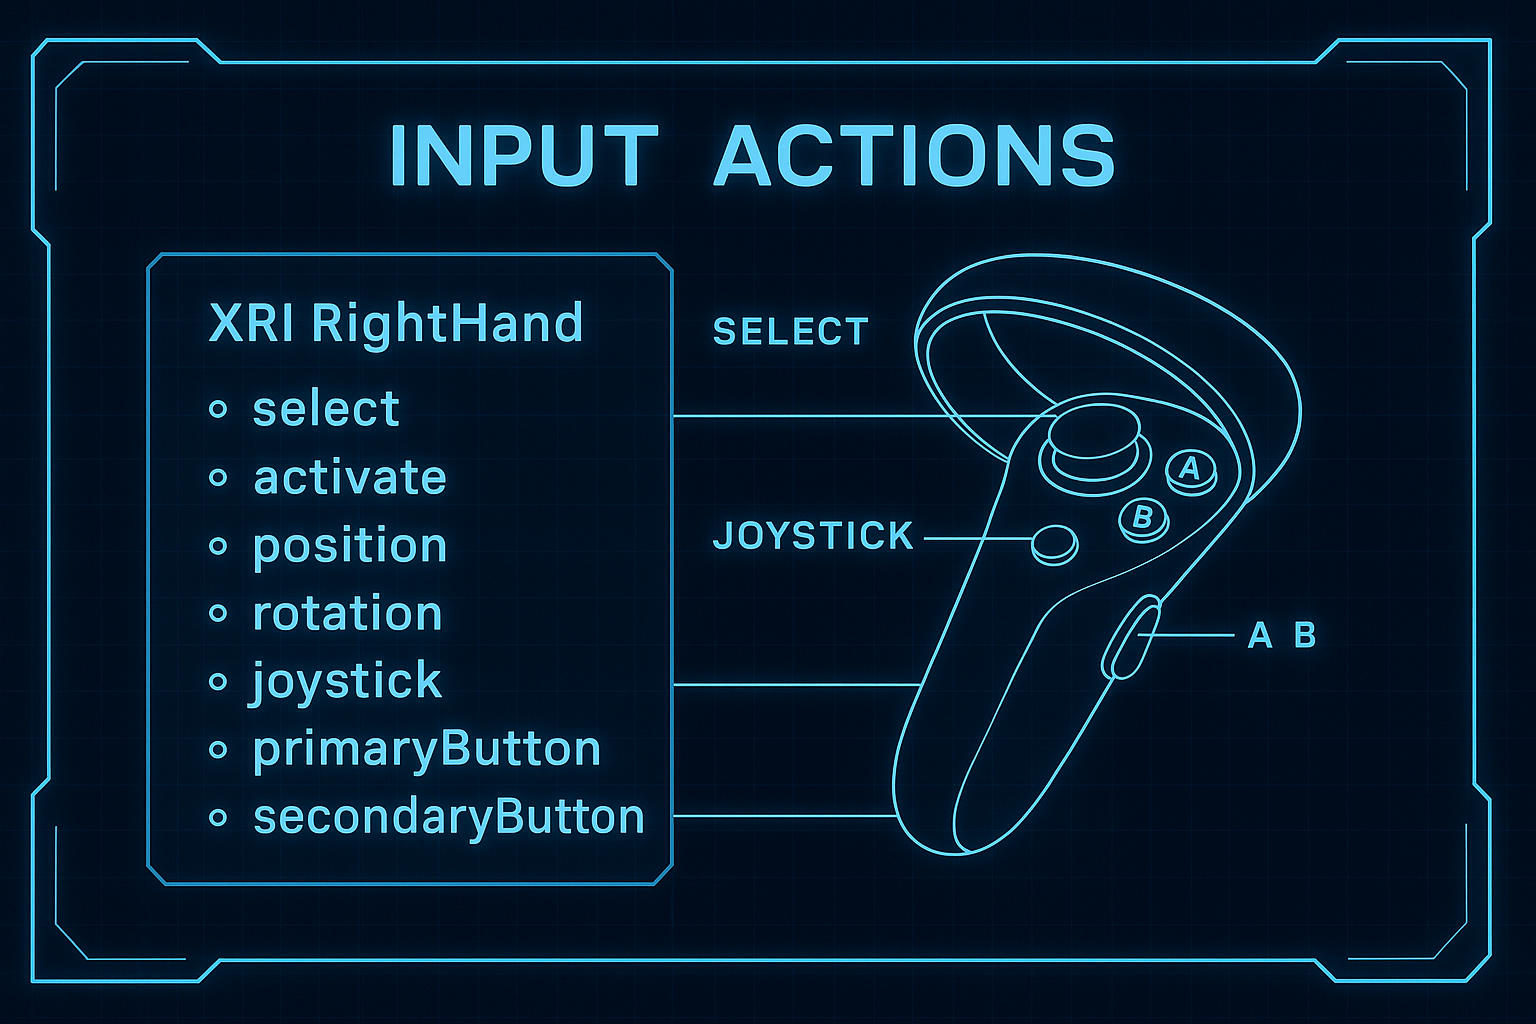
XRI LeftHandXRI RightHand
在 XRI RightHand 中添加这些动作:
| Action Name | Action Type | Control Type | Binding Path |
|---|---|---|---|
| select | Button | Button | <XRController>{RightHand}/trigger |
| activate | Button | Button | <XRController>{RightHand}/grip |
| position | Value | Vector3 | <XRController>{RightHand}/devicePosition |
| rotation | Value | Quaternion | <XRController>{RightHand}/deviceRotation |
| joystick | Value | Vector2 | <XRController>{RightHand}/thumbstick |
| primaryButton | Button | Button | <XRController>{RightHand}/primaryButton |
| secondaryButton | Button | Button | <XRController>{RightHand}/secondaryButton |
💡 注意:ABXY 按钮在默认的
XRI Default Input Actions文件中 没有绑定,需要你手动添加绑定。
对于左手 X/Y 按钮,可添加:
<XRController>{LeftHand}/primaryButton→ X 按钮<XRController>{LeftHand}/secondaryButton→ Y 按钮
配置完成后,点击 Save。
🔌 三、绑定 Action 到脚本中监听手柄输入
1. 创建脚本:XRControllerInputListener.cs
using UnityEngine;
using UnityEngine.InputSystem;public class XRControllerInputListener : MonoBehaviour
{[Header("输入绑定")]public InputActionProperty selectAction;public InputActionProperty activateAction;public InputActionProperty joystickAction;public InputActionProperty positionAction;public InputActionProperty rotationAction;[Header("主按钮(ABXY)")]public InputActionProperty rightPrimaryButton;   // A 按钮public InputActionProperty rightSecondaryButton; // B 按钮public InputActionProperty leftPrimaryButton;    // X 按钮public InputActionProperty leftSecondaryButton;  // Y 按钮void OnEnable(){selectAction.action.Enable();activateAction.action.Enable();joystickAction.action.Enable();positionAction.action.Enable();rotationAction.action.Enable();rightPrimaryButton.action.Enable();rightSecondaryButton.action.Enable();leftPrimaryButton.action.Enable();leftSecondaryButton.action.Enable();selectAction.action.performed += OnSelectPressed;activateAction.action.performed += OnGripPressed;rightPrimaryButton.action.performed += ctx => Debug.Log("A 按钮按下");rightPrimaryButton.action.canceled  += ctx => Debug.Log("A 按钮抬起");rightSecondaryButton.action.performed += ctx => Debug.Log("B 按钮按下");leftPrimaryButton.action.performed     += ctx => Debug.Log("X 按钮按下");leftSecondaryButton.action.performed   += ctx => Debug.Log("Y 按钮按下");}void OnDisable(){selectAction.action.performed -= OnSelectPressed;activateAction.action.performed -= OnGripPressed;}void OnSelectPressed(InputAction.CallbackContext ctx){Debug.Log("Trigger pressed");}void OnGripPressed(InputAction.CallbackContext ctx){Debug.Log("Grip pressed");}void Update(){// 摇杆值Vector2 joystick = joystickAction.action.ReadValue<Vector2>();if (joystick.magnitude > 0.1f){Debug.Log($"Joystick: {joystick}");}// 控制器位置Vector3 pos = positionAction.action.ReadValue<Vector3>();Quaternion rot = rotationAction.action.ReadValue<Quaternion>();transform.SetPositionAndRotation(pos, rot);}
}
2. 绑定 InputActionProperty 到 Inspector
选中绑定此脚本的 GameObject,在 Inspector 中:
- 展开每个字段(例如
rightPrimaryButton) - 选择 InputActionAsset 中的:
XRI RightHand/primaryButtonXRI RightHand/secondaryButtonXRI LeftHand/primaryButtonXRI LeftHand/secondaryButton
📌 常用输入绑定路径(OpenXR)
| 控制器部位 | Binding Path |
|---|---|
| 扳机 Trigger | <XRController>{RightHand}/trigger |
| 抓握 Grip | <XRController>{RightHand}/grip |
| 主按钮 A/B/X/Y | <XRController>{RightHand}/primaryButton 等 |
| 摇杆方向 | <XRController>{RightHand}/thumbstick |
| 摇杆点击 | <XRController>{RightHand}/thumbstickClick |
| 控制器位置 | <XRController>{RightHand}/devicePosition |
| 控制器旋转 | <XRController>{RightHand}/deviceRotation |
✅ 如果仍想使用默认 XRIActions 文件怎么办?
可以这样做:
- 复制一份
XRI Default Input Actions.inputactions - 重命名为你自己的(比如
XRControls.inputactions) - 添加上述的 ABXY Action
- 在
Project Settings > XR Interaction Toolkit中替换为你的版本
✅ 总结
通过 Unity 的 Input System + OpenXR,可以优雅地实现对手柄各种输入(按钮、摇杆、位置等)的监听和处理。其优势是:
- 自动适配各种头显(Oculus、Index、Pico)
- 支持多平台一致性
- 易于拓展和可视化调试
同时补充支持 ABXY 按钮,只需扩展绑定路径与监听逻辑即可,无需重新实现控制器系统。