使用 LangGraph 和 Elasticsearch 构建强大的 RAG 工作流
作者:来自 Elastic Neha Saini

在这篇博客中,我们将向你展示如何配置和自定义 LangGraph Retrieval Agent 模板与 Elasticsearch,以构建一个强大的 RAG 工作流,实现高效的数据检索和由 AI 驱动的响应。
Elasticsearch 原生集成了行业领先的生成式 AI 工具和提供商。查看我们关于超越 RAG 基础知识或构建可投入生产的应用程序 Elastic Vector Database 的网络研讨会。
要为你的用例构建最佳搜索解决方案,现在就开始免费云试用,或在本地机器上尝试 Elastic。
LangGraph Retrieval Agent Template 是由 LangChain 开发的入门项目,旨在通过 LangGraph Studio 使用 LangGraph 构建基于检索的问题解答系统。该模板预先配置,可与 Elasticsearch 无缝集成,使开发者能够快速构建能够高效索引和检索文档的智能体。
本博客重点介绍如何使用 LangGraph Studio 和 LangGraph CLI 运行并自定义 LangChain Retrieval Agent Template。该模板为构建检索增强生成(RAG)应用提供了框架,并支持多种检索后端,如 Elasticsearch。
我们将带你逐步完成设置、配置环境,以及如何高效结合 Elastic 执行该模板,并自定义智能体流程。
先决条件
在继续之前,请确保你已安装以下内容:
-
Elasticsearch Cloud 部署或本地 Elasticsearch 部署(也可以在 Elastic Cloud 上创建一个 14 天免费试用)——版本需为 8.0.0 或更高
-
Python 3.9 及以上版本
-
一个 LLM 提供商的访问权限,如 Cohere(本指南使用)、 OpenAI 或 Anthropic / Claude
创建 LangGraph 应用
1. 安装 LangGraph CLI
pip install --upgrade "langgraph-cli[inmem]"2. 从 retrieval-agent-template 创建 LangGraph 应用
mkdir lg-agent-demo
cd lg-agent-demo
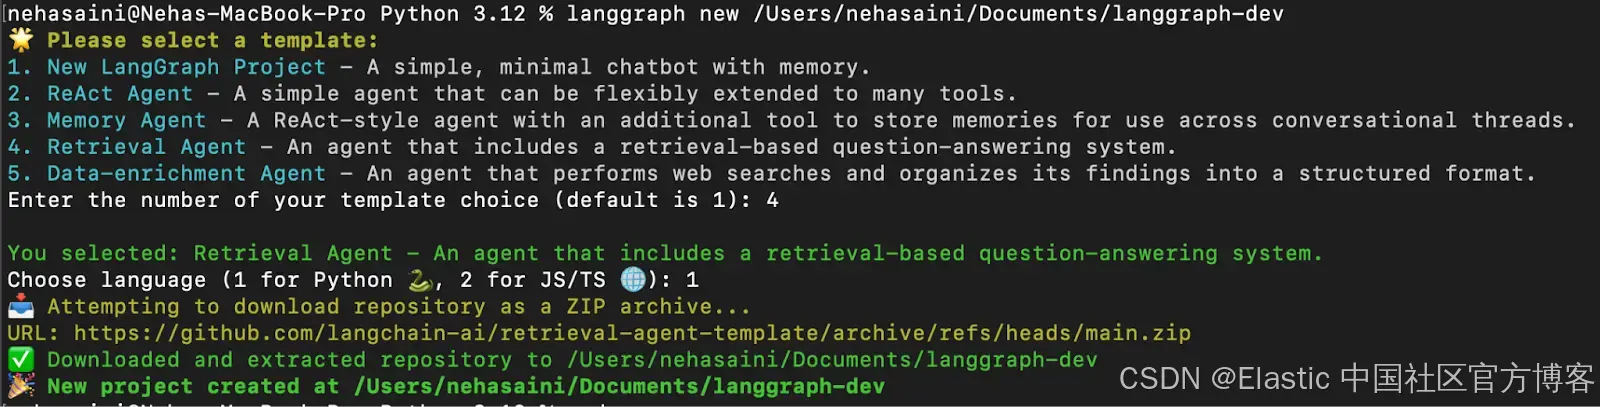
langgraph new lg-agent-demo 你会看到一个交互式菜单,可以从中选择可用的模板列表。选择 4 表示 Retrieval Agent,选择 1 表示 Python,如下所示:
故障排除:如果遇到错误 “urllib.error.URLError: <urlopen error [SSL: CERTIFICATE_VERIFY_FAILED] certificate verify failed: unable to get local issuer certificate (_ssl.c:1000)>”
请运行 Python 的安装证书命令来解决此问题,如下所示。

3. 安装依赖项
在新建的 LangGraph 应用根目录下,创建一个虚拟环境并以 edit 模式安装依赖项,这样你的本地更改将被服务器使用:
#For Mac
python3 -m venv lg-demo
source lg-demo/bin/activate
pip install -e .#For Windows
python3 -m venv lg-demo
lg-demo\Scripts\activate
pip install -e .
设置环境
1. 创建一个 .env 文件
.env 文件保存 API 密钥和配置,以便应用可以连接到你选择的 LLM 和检索提供者。通过复制示例配置生成一个新的 .env 文件:
cp .env.example .env2. 配置 .env 文件
.env 文件自带一组默认配置。你可以根据你的设置添加必要的 API 密钥和值来更新它。对于与你的使用场景无关的键,可以保持不变或者删除。
# To separate your traces from other applications
LANGSMITH_PROJECT=retrieval-agent# LLM choice (set the API key for your selected provider):
ANTHROPIC_API_KEY=your_anthropic_api_key
FIREWORKS_API_KEY=your_fireworks_api_key
OPENAI_API_KEY=your_openai_api_key# Retrieval provider (configure based on your chosen service):## Elastic Cloud:
ELASTICSEARCH_URL=https://your_elastic_cloud_url
ELASTICSEARCH_API_KEY=your_elastic_api_key## Elastic Local:
ELASTICSEARCH_URL=http://host.docker.internal:9200
ELASTICSEARCH_USER=elastic
ELASTICSEARCH_PASSWORD=changeme## Pinecone:
PINECONE_API_KEY=your_pinecone_api_key
PINECONE_INDEX_NAME=your_pinecone_index_name## MongoDB Atlas:
MONGODB_URI=your_mongodb_connection_string# Cohere API key:
COHERE_API_KEY=your_cohere_api_key
Elastic Cloud 和 Cohere 示例 .env 文件
下面是一个示例 .env 配置,使用 Elastic Cloud 作为检索提供者,Cohere 作为 LLM,正如本博客中演示的:
# To separate your traces from other applications
LANGSMITH_PROJECT=retrieval-agent
#Retrieval Provider
# Elasticsearch configuration
ELASTICSEARCH_URL=elastic-url:443
ELASTICSEARCH_API_KEY=elastic_api_key
# Cohere API key
COHERE_API_KEY=cohere_api_key注意:虽然本指南使用 Cohere 进行响应生成和向量生成,但你也可以根据自己的用例选择其他 LLM 提供商,比如 OpenAI、Claude,或者本地的 LLM 模型。请确保你要使用的每个 key 都已经在 .env 文件中正确设置。
3. 更新配置文件 - configuration.py
在 .env 文件中设置好相应的 API key 后,下一步是更新应用程序的默认模型配置。更新配置可以确保系统使用你在 .env 文件中指定的服务和模型。
导航到配置文件:
cd src/retrieval_graphconfiguration.py 文件包含检索代理执行以下三项主要任务时使用的默认模型设置:
-
嵌入模型(Embedding model)—— 将文档转换为向量表示
-
查询模型(Query model)—— 将用户查询处理为向量
-
响应模型(Response model)—— 生成最终回答
默认情况下,代码使用的是 OpenAI(如 openai/text-embedding-3-small)和 Anthropic(如 anthropic/claude-3-5-sonnet-20240620 和 anthropic/claude-3-haiku-20240307)提供的模型。
在本博客中,我们切换为使用 Cohere 模型。如果你已经在使用 OpenAI 或 Anthropic,则无需更改。
使用 Cohere 的示例更改:
打开 configuration.py 并按如下方式修改默认模型设置:
…embedding_model: Annotated[str,{"__template_metadata__": {"kind": "embeddings"}},] = field(default="cohere/embed-english-v3.0",
…
response_model: Annotated[str, {"__template_metadata__": {"kind": "llm"}}] = field(default="cohere/command-r-08-2024",
…
query_model: Annotated[str, {"__template_metadata__": {"kind": "llm"}}] = field(default="cohere/command-r-08-2024",metadata={
使用 LangGraph CLI 运行检索代理
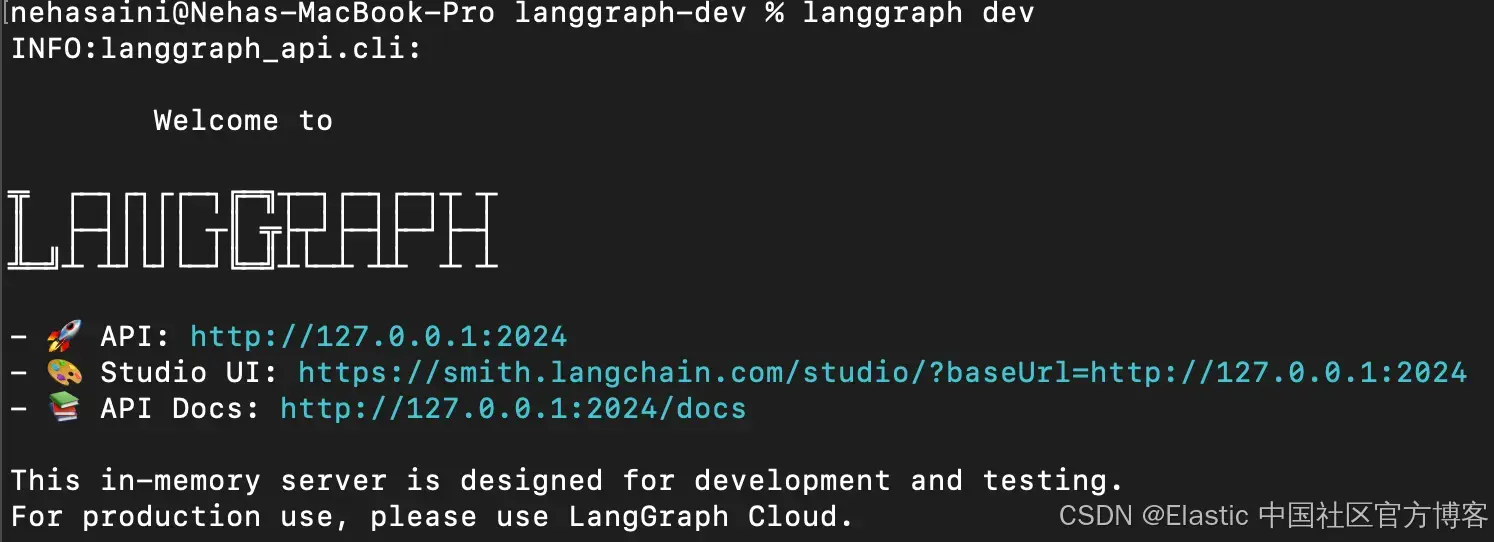
1. 启动 LangGraph 服务器
cd lg-agent-demo
langgraph dev
这将在本地启动 LangGraph API 服务器。如果运行成功,你应该会看到类似下面的内容:
打开 Studio UI 链接。
这里有两个可用的图表:
-
Retrieval Graph:从 Elasticsearch 检索数据并使用 LLM 响应查询。
-
Indexer Graph:将文档索引到 Elasticsearch 并使用 LLM 生成向量。

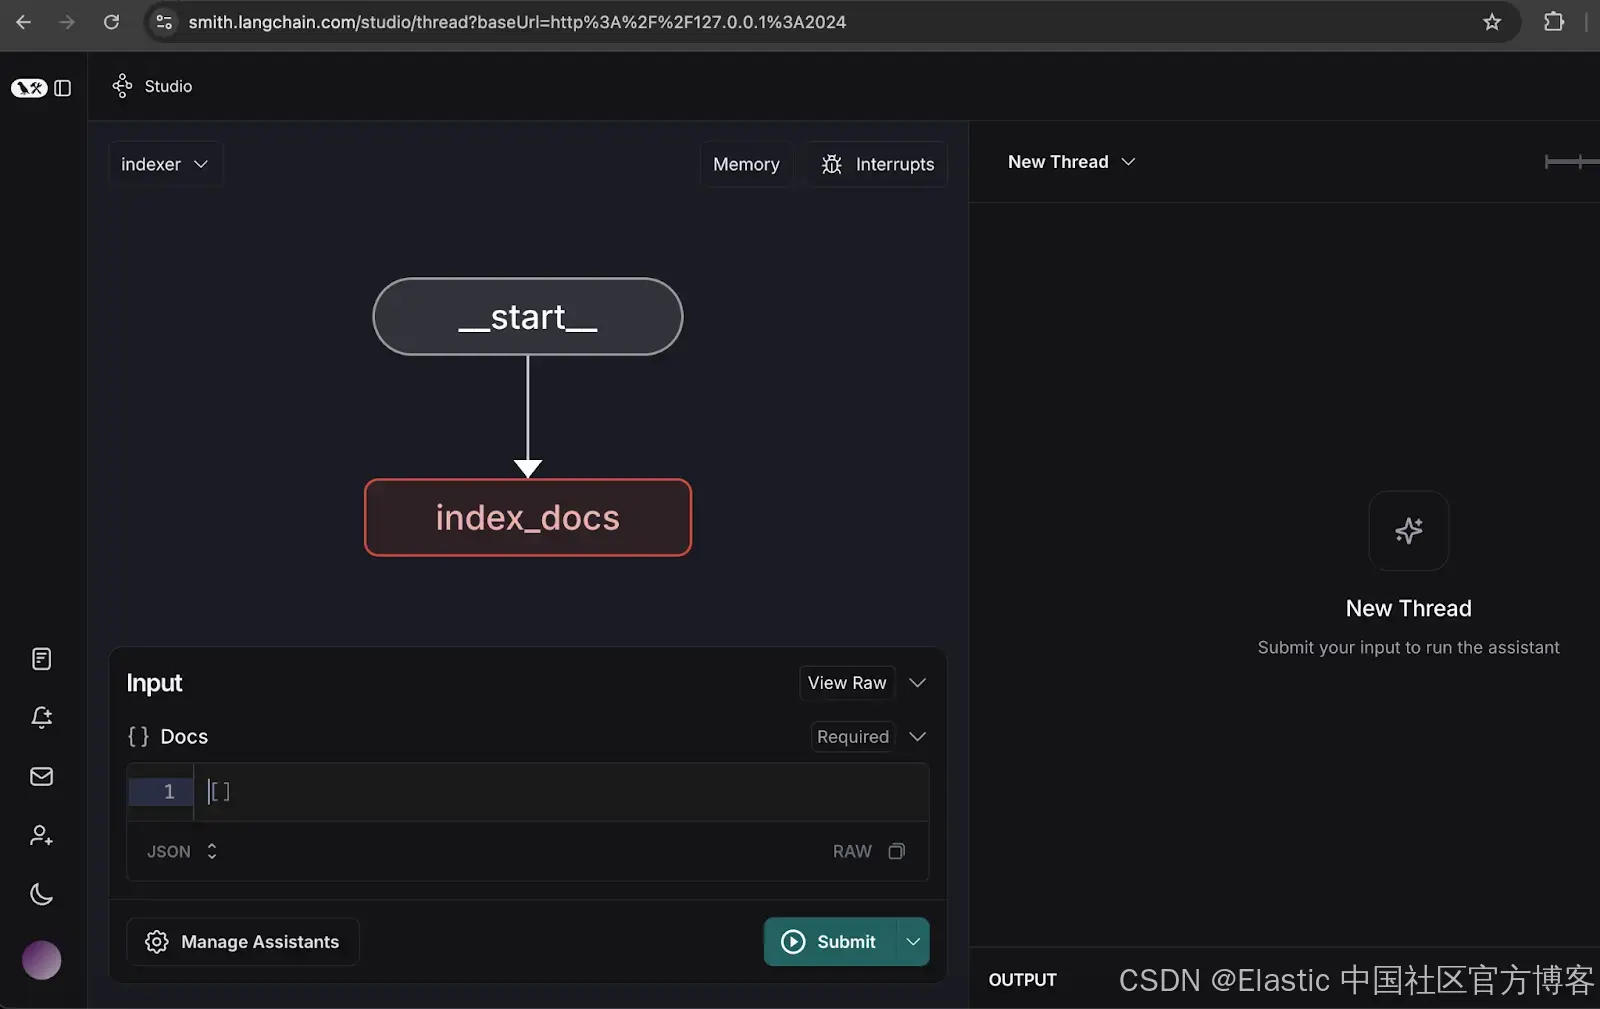
2. 配置 Indexer graph
- 打开 Indexer graph。
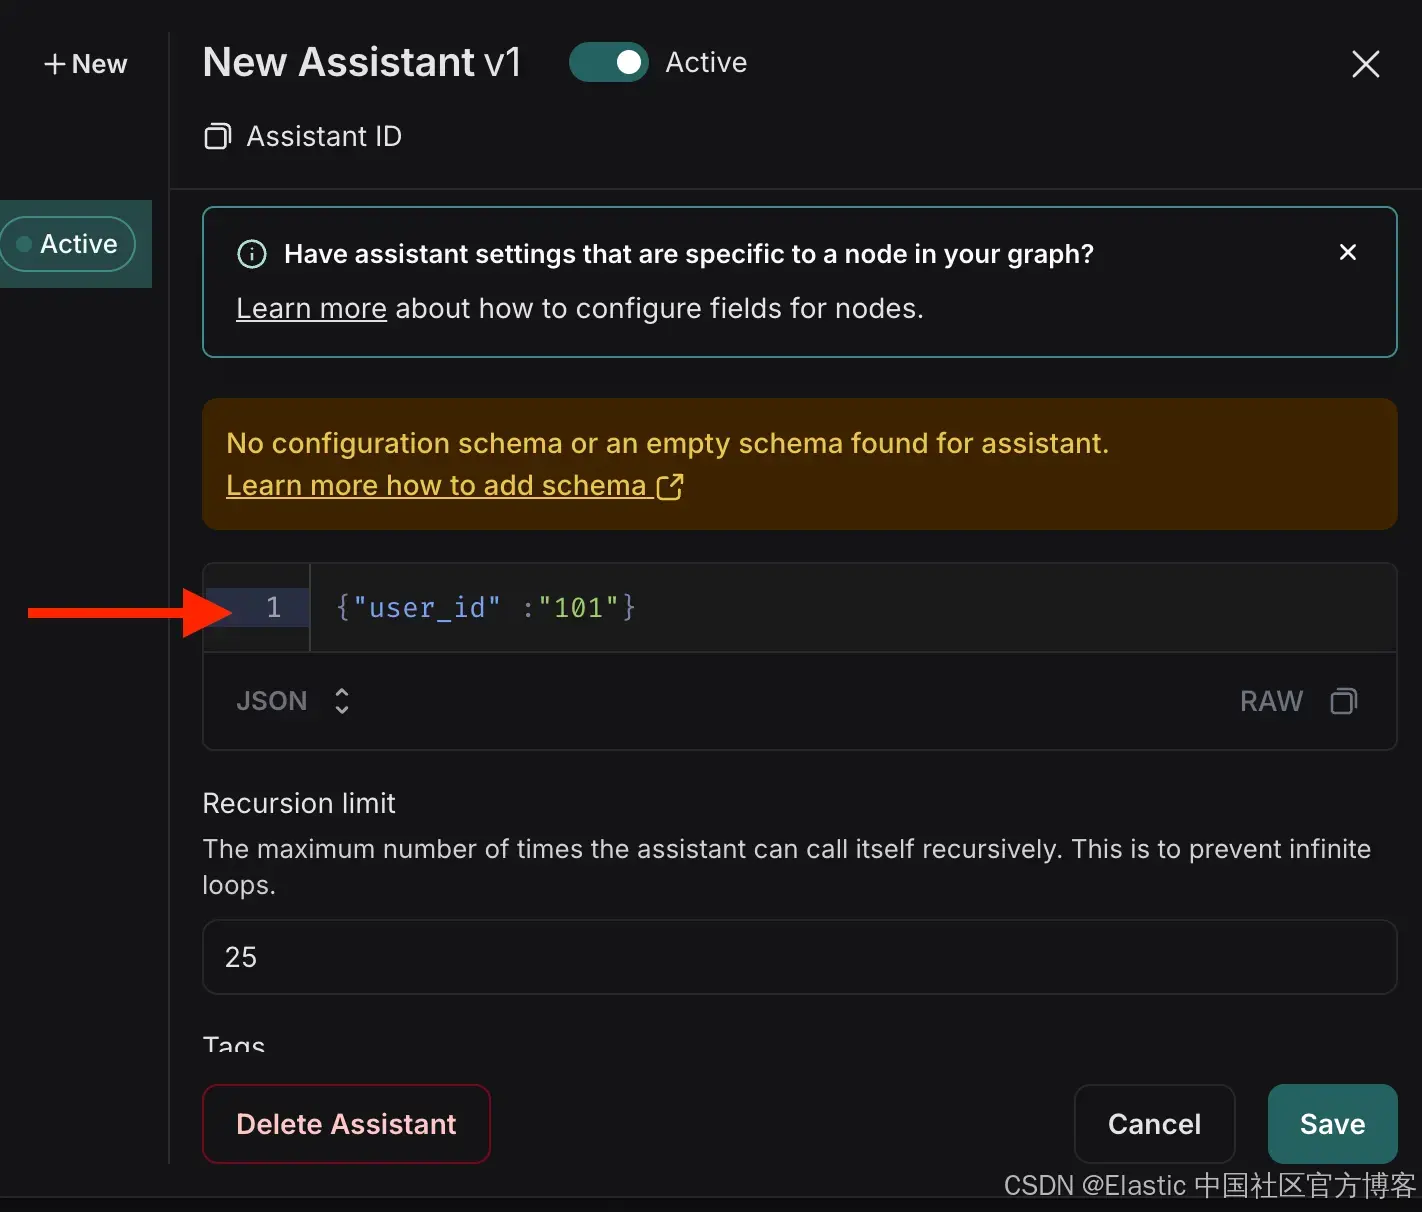
- 点击管理助手 (Manage Assistants)。
- 点击 “添加新助手” (Add New Assistant),输入指定的用户详情,然后关闭窗口。
{"user_id": "101"}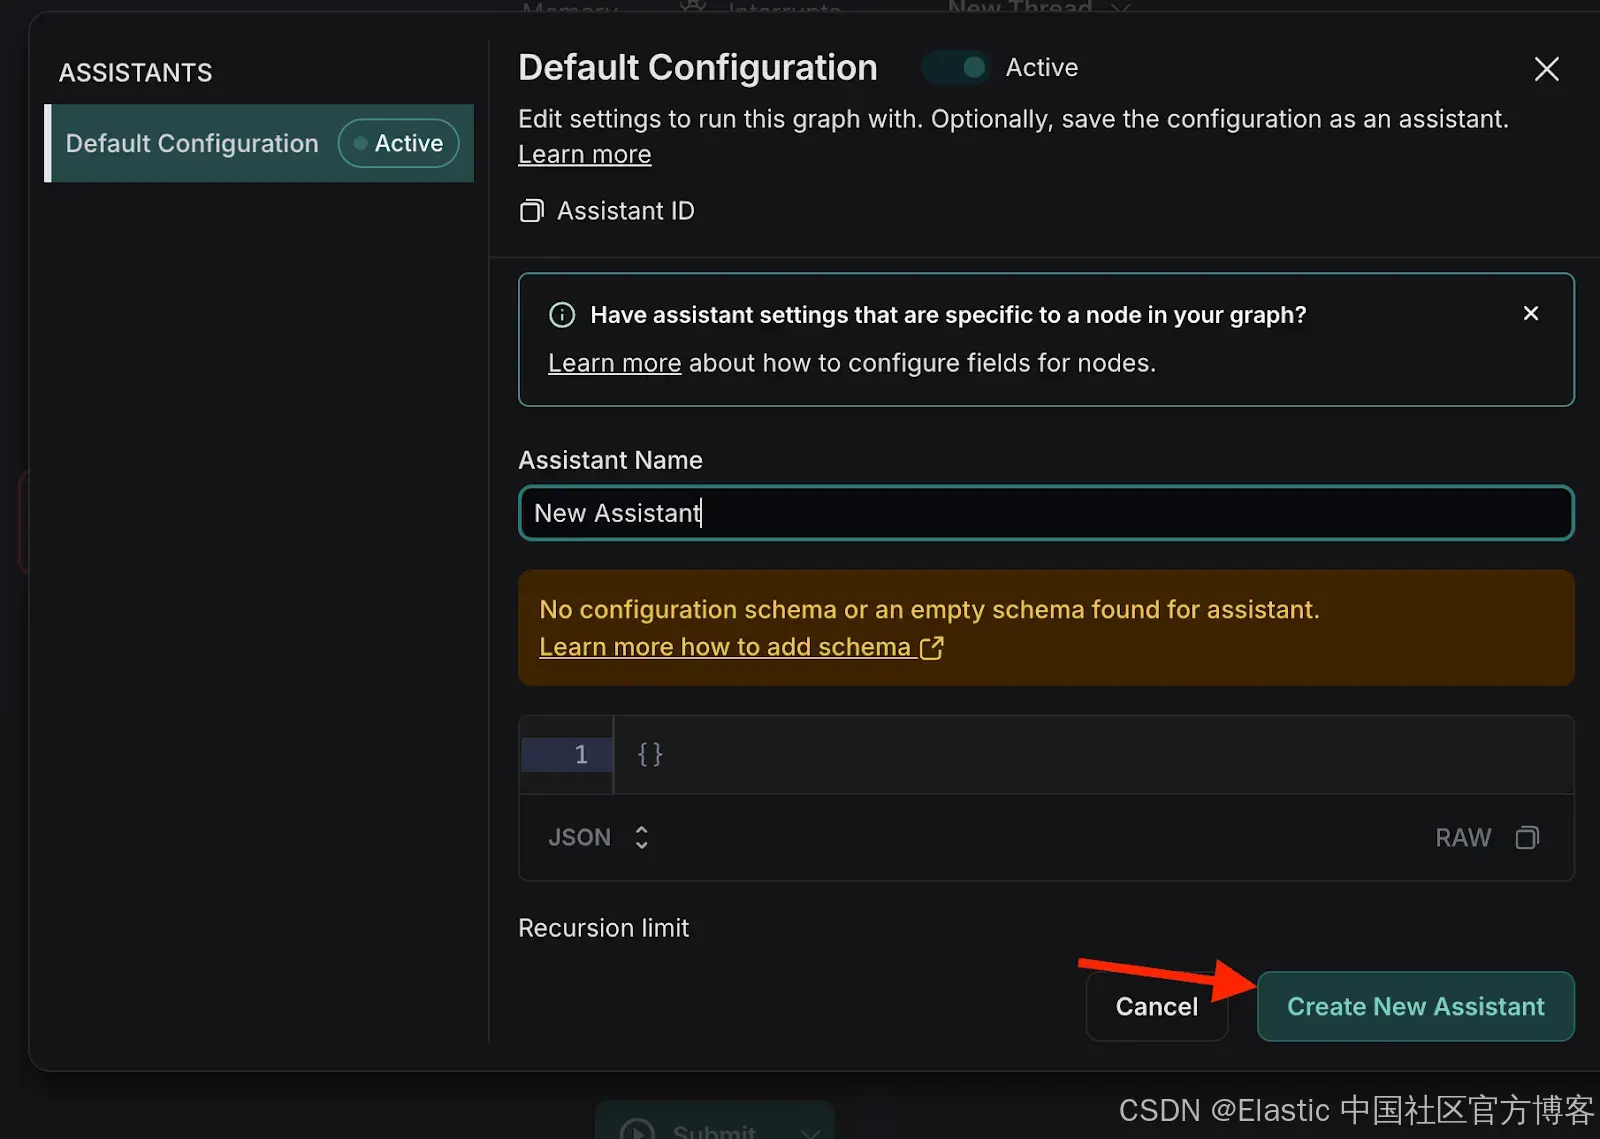
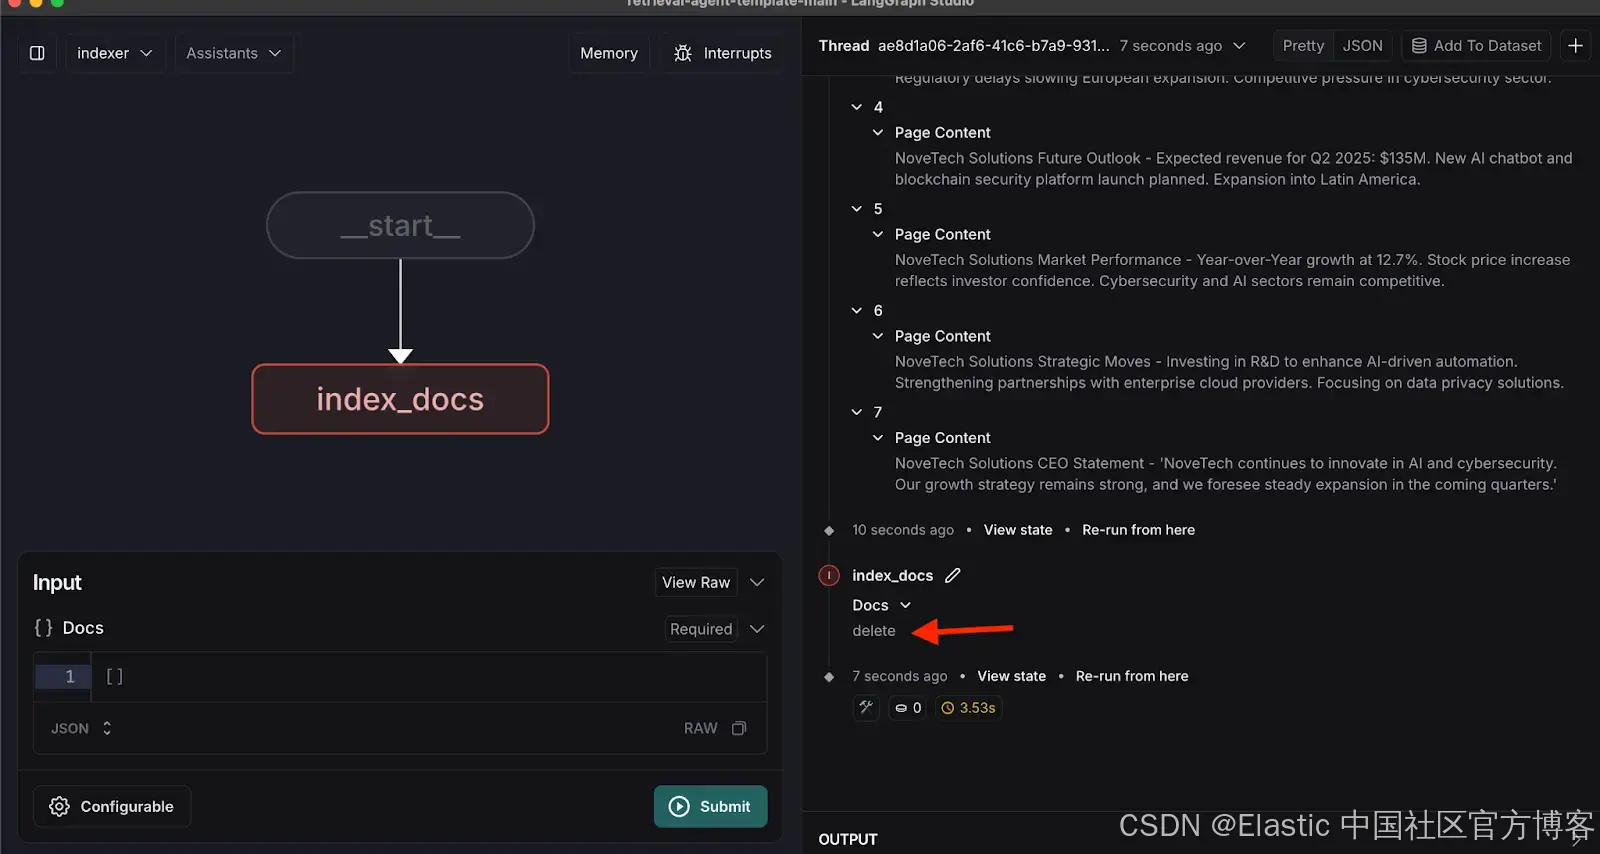
3. 索引示例文档
索引以下示例文档,这些文档代表组织 NoveTech 的假设季度报告:
[{    "page_content": "NoveTech Solutions Q1 2025 Report - Revenue: $120.5M, Net Profit: $18.2M, EPS: $2.15. Strong AI software launch and $50M government contract secured."},{"page_content": "NoveTech Solutions Business Highlights - AI-driven analytics software gained 15% market share. Expansion into Southeast Asia with two new offices. Cloud security contract secured."},{"page_content": "NoveTech Solutions Financial Overview - Operating expenses at $85.3M, Gross Margin 29.3%. Stock price rose from $72.5 to $78.3. Market Cap reached $5.2B."},{"page_content": "NoveTech Solutions Challenges - Rising supply chain costs impacting hardware production. Regulatory delays slowing European expansion. Competitive pressure in cybersecurity sector."},{"page_content": "NoveTech Solutions Future Outlook - Expected revenue for Q2 2025: $135M. New AI chatbot and blockchain security platform launch planned. Expansion into Latin America."},{"page_content": "NoveTech Solutions Market Performance - Year-over-Year growth at 12.7%. Stock price increase reflects investor confidence. Cybersecurity and AI sectors remain competitive."},{"page_content": "NoveTech Solutions Strategic Moves - Investing in R&D to enhance AI-driven automation. Strengthening partnerships with enterprise cloud providers. Focusing on data privacy solutions."},{"page_content": "NoveTech Solutions CEO Statement - 'NoveTech Solutions continues to innovate in AI and cybersecurity. Our growth strategy remains strong, and we foresee steady expansion in the coming quarters.'"}
]
一旦文档被索引,你将在线程中看到一条删除消息,如下所示。
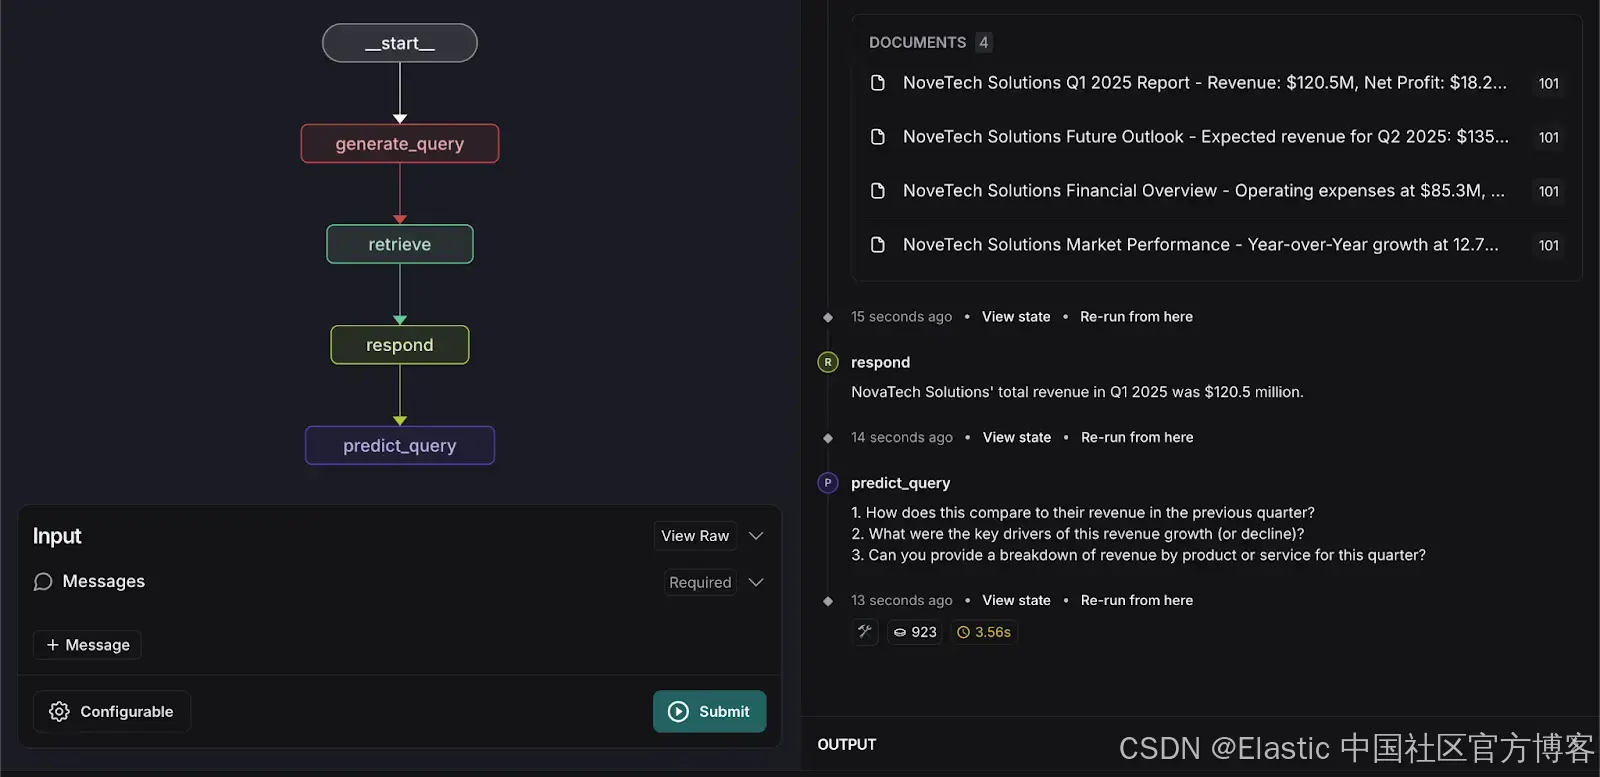
4. 运行检索图(retrieval graph)
切换到检索图。 输入以下搜索查询:
What was NovaTech Solutions total revenue in Q1 2025?系统将返回相关文档,并根据已索引的数据提供准确的答案。
自定义检索代理
为了增强用户体验,我们在检索图中引入了一个自定义步骤,用于预测用户可能提出的下三个问题。这个预测基于以下内容:
-
从检索到的文档中的上下文
-
之前的用户交互
-
上一个用户查询
实现查询预测功能需要以下代码更改:
1. 更新 graph.py
添加 predict_query 函数:
async def predict_query(state: State, *, config: RunnableConfig
) -> dict[str, list[BaseMessage]]:logger.info(f"predict_query predict_querypredict_query predict_query predict_query predict_query")  # Log the queryconfiguration = Configuration.from_runnable_config(config)prompt = ChatPromptTemplate.from_messages([("system", configuration.predict_next_question_prompt),("placeholder", "{messages}"),])model = load_chat_model(configuration.response_model)user_query = state.queries[-1] if state.queries else "No prior query available"logger.info(f"user_query: {user_query}")logger.info(f"statemessage: {state.messages}")#human_messages = [msg for msg in state.message if isinstance(msg, HumanMessage)]message_value = await prompt.ainvoke({"messages": state.messages,"user_query": user_query,  # Use the most recent query as primary input"system_time": datetime.now(tz=timezone.utc).isoformat(),},config,)next_question = await model.ainvoke(message_value, config)return {"next_question": [next_question]}
修改 respond 函数以返回 response 对象,而不是消息:
async def respond(state: State, *, config: RunnableConfig
) -> dict[str, list[BaseMessage]]:"""Call the LLM powering our "agent"."""configuration = Configuration.from_runnable_config(config)# Feel free to customize the prompt, model, and other logic!prompt = ChatPromptTemplate.from_messages([("system", configuration.response_system_prompt),("placeholder", "{messages}"),])model = load_chat_model(configuration.response_model)retrieved_docs = format_docs(state.retrieved_docs)message_value = await prompt.ainvoke({"messages": state.messages,"retrieved_docs": retrieved_docs,"system_time": datetime.now(tz=timezone.utc).isoformat(),},config,)response = await model.ainvoke(message_value, config)# We return a list, because this will get added to the existing listreturn {"response": [response]}
更新图结构以添加新的节点和边用于 predict_query:
builder.add_node(generate_query)
builder.add_node(retrieve)
builder.add_node(respond)
builder.add_node(predict_query)
builder.add_edge("__start__", "generate_query")
builder.add_edge("generate_query", "retrieve")
builder.add_edge("retrieve", "respond")
builder.add_edge("respond", "predict_query")
2. 更新 prompts.py
为查询预测(Query Prediction)编写 prompt:
PREDICT_NEXT_QUESTION_PROMPT = """Given the user query and the retrieved documents, suggest the most likely next question the user might ask.**Context:**
- Previous Queries:
{previous_queries}- Latest User Query: {user_query}- Retrieved Documents:
{retrieved_docs}**Guidelines:**
1. Do not suggest a question that has already been asked in previous queries.
2. Consider the retrieved documents when predicting the next logical question.
3. If the user's query is already fully answered, suggest a relevant follow-up question.
4. Keep the suggested question natural and conversational.
5. Suggest at least 3 questionSystem time: {system_time}"""
3. 更新 configuration.py
添加 predict_next_question_prompt:
predict_next_question_prompt: str = field(default=prompts.PREDICT_NEXT_QUESTION_PROMPT,metadata={"description": "The system prompt used for generating responses."},)4. 新 state.py
添加以下属性:
response: Annotated[Sequence[AnyMessage], add_messages]
next_question : Annotated[Sequence[AnyMessage], add_messages]
5. 重新运行 Retrieval Graph
再次输入以下搜索查询:
What was NovaTech Solutions total revenue in Q1 2025?系统将处理输入并预测用户可能会问的三个相关问题,如下所示。
结论
在 LangGraph Studio 和 CLI 中集成 Retrieval Agent 模板提供了几个关键优势:
- 加速开发:模板和可视化工具简化了检索工作流的创建和调试,减少了开发时间。
- 无缝部署:内置对 API 和自动扩展的支持,确保在不同环境中的顺利部署。
- 简易更新:修改工作流、添加新功能和集成额外节点变得简单,便于扩展和增强检索过程。
- 持久化记忆:系统保留代理的状态和知识,提升一致性和可靠性。
- 灵活的工作流建模:开发人员可以根据特定用例自定义检索逻辑和通信规则。
- 实时交互和调试:能够与运行中的代理进行交互,有效进行测试和问题解决。
通过利用这些功能,组织可以构建强大、高效且可扩展的检索系统,增强数据访问性和用户体验。
该项目的完整源代码可在 GitHub 上找到。
原文:Build a powerful RAG workflow using LangGraph and Elasticsearch - Elasticsearch Labs