python的mtcnn检测图片中的人脸并标框
python的mtcnn检测图片中的人脸并标框,标记鼻尖位置
import cv2
from mtcnn import MTCNN# 初始化 MTCNN 检测器
# stages:指定检测阶段
# 指定运行设备为CPU
detector = MTCNN(stages="face_and_landmarks_detection", device="CPU:0")# 配置参数
config = {'mtcnn_params': {'min_face_size': 20,        # 最小检测人脸尺寸'scale_factor': 0.709,      # 图像金字塔缩放因子'threshold_pnet': 0.6,      # P-Net人脸概率阈值'nms_pnet1': 0.5,           # P-Net第一次NMS阈值'nms_pnet2': 0.7,           # P-Net第二次NMS阈值'threshold_rnet': 0.7,      # R-Net人脸概率阈值'nms_rnet': 0.7,            # R-Net的NMS阈值'threshold_onet': 0.8,      # O-Net人脸概率阈值'nms_onet': 0.7             # O-Net的NMS阈值},'confidence_threshold': 0.85,    # 最终置信度阈值'nms_threshold': 0.3,            # 后处理NMS阈值(未使用)'depth_smooth_size': 3,          # 深度平滑参数(未使用)'display_scale': 0.75,           # 显示缩放(未使用)'async_interval': 2              # 异步间隔(未使用)
}# 读取图像
image = cv2.imread('test.png')  # 替换为你的图像文件路径# 进行人脸检测
faces = detector.detect_faces(image, **config['mtcnn_params'])# 遍历检测到的人脸
for face in faces:if face['confidence'] >= config['confidence_threshold']:# 获取人脸的边界框x, y, w, h = face['box']# 绘制边界框cv2.rectangle(image, (x, y), (x + w, y + h), (0, 255, 0), 2)# 获取人脸关键点landmarks = face['keypoints']# 获取鼻尖位置nose_tip = landmarks['nose']print(f"鼻尖位置: {nose_tip}")# 绘制鼻尖点cv2.circle(image, nose_tip, 5, (0, 0, 255), -1)# 显示图像
cv2.imshow('Face Detection', image)
cv2.waitKey(0)
cv2.destroyAllWindows()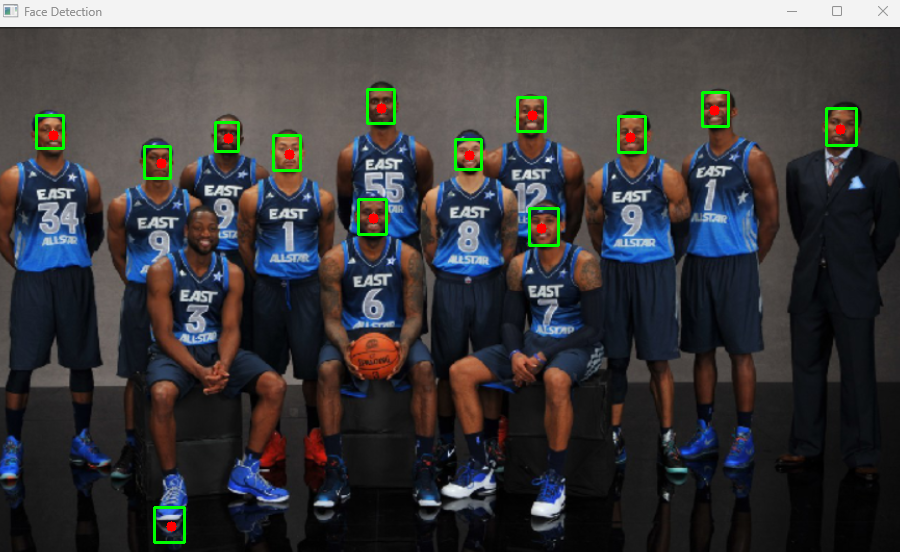
- min_face_size:增大可过滤小尺寸误检。
- 提高 P-Net、R-Net、O-Net 的阈值,提高可增强筛选严格性。
- scale_factor:值越小,生成的金字塔图像越多,但会增加计算量。适当降低可减少误检。