Springboot 手搓 后端 滑块验证码生成
目录
一、效果演示
二、后端滑块验证码生成思路
三、原理解析
四、核心代码拿走
滑块验证码react前端实现,见我的这篇博客:前端 React 弹窗式 滑动验证码实现_react中使用阿里云滑块验证码2.0前端接入及相关视觉-CSDN博客
一、效果演示
生成的案例图片:


视频演示:
滑块验证码演示
二、后端滑块验证码生成思路
1、后端需要生成对应的两个图片(拼图图片和拼图背景图片,图片内存尽量小一点)和对应位置(x和y, 等高拼图只需要记录x即可);
2、验证码生成服务,生成唯一的标识uuid(可考虑雪花算法生成),将生成图片生成后得到的位置信息即x(非登高拼图x和y)记录到缓存中,建议使用redis存储,即使分布式也能使用;
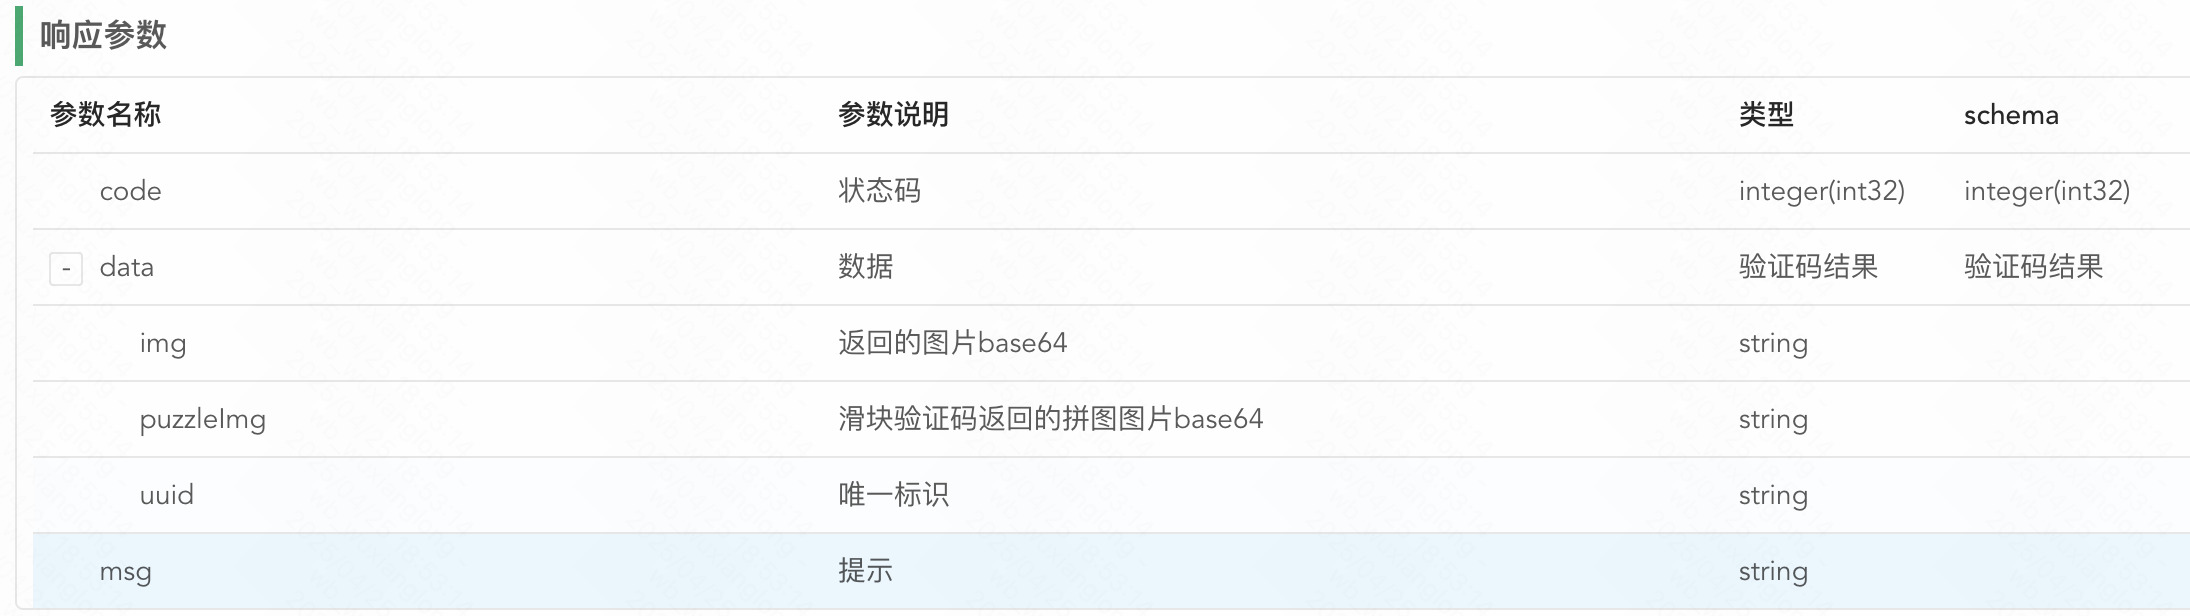
3、将验证码数据返回给前端,格式参考如下:
三、原理解析
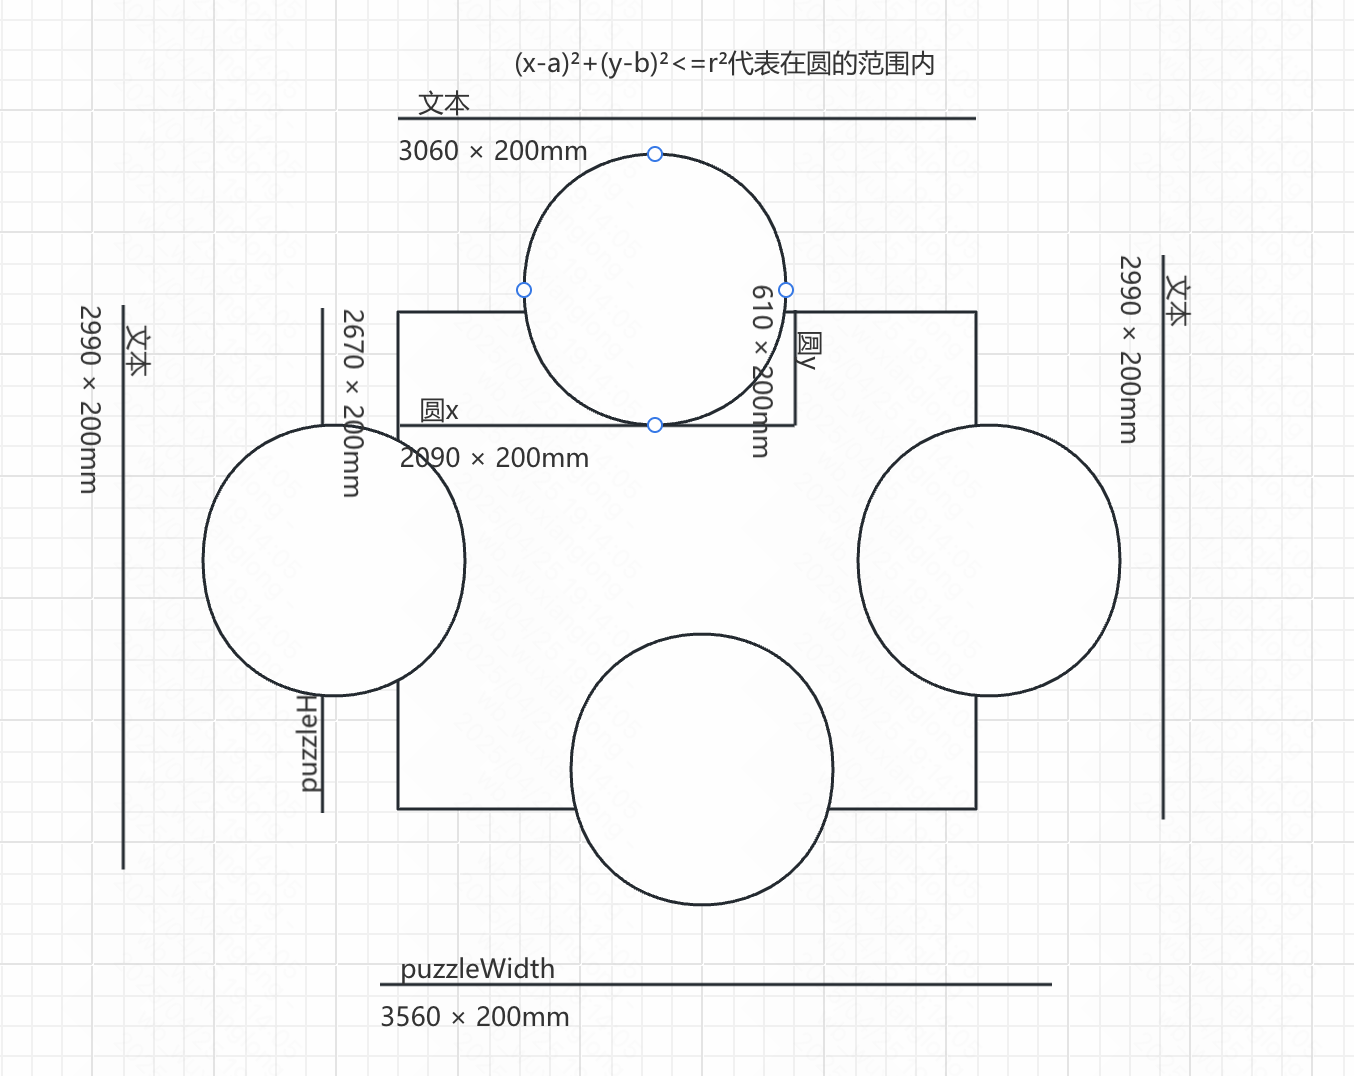
要想生成拼图形状的拼图,我们需要运用到一些数学知识,核心代码如下:
通过 圆的标准方程 (x-a)²+(y-b)²=r²,标识圆心(a,b),半径为r的圆,>=的在外侧,<的内侧。
简单来看就是这样的一个模型:
/*** 随机生成拼图图轮廓数据** @param randomR1 圆点距离随机值* @return 0和1,其中0表示没有颜色,1有颜色*/private static int[][] createTemplateData(int randomR1) {// 拼图轮廓数据int[][] data = new int[puzzleWidth][puzzleHeight];// 拼图去掉凹凸的白色距离int xBlank = puzzleWidth - distance;int yBlank = puzzleHeight - distance;// 记录圆心的位置值int topOrBottomX = puzzleWidth / 2;int leftOrRightY = puzzleHeight / 2;// 凹时对应的位置int topYOrLeftX = distance - randomR1 + radius;int rightX = puzzleWidth - topYOrLeftX;int bottomY = puzzleHeight - topYOrLeftX;// 凸时对应的位置int topYOrLeftXR = distance + randomR1 - radius;int rightXR = puzzleWidth - topYOrLeftXR;int bottomYR = puzzleHeight - topYOrLeftXR;double rPow = Math.pow(radius, 2);/* 随机获取判断条件 */Random random = new Random();Integer[] randomCondition = new Integer[]{random.nextInt(3),random.nextInt(3),random.nextInt(3),random.nextInt(3)};/*计算需要的拼图轮廓(方块和凹凸),用二维数组来表示,二维数组有两张值,0和1,其中0表示没有颜色,1有颜色圆的标准方程 (x-a)²+(y-b)²=r²,标识圆心(a,b),半径为r的圆*/for (int i = 0; i < puzzleWidth; i++) {for (int j = 0; j < puzzleHeight; j++) {/* 凹时对应的圆点 */// 顶部的圆心位置为(puzzleWidth / 2, topYOrLeftX)double top = Math.pow(i - topOrBottomX, 2) + Math.pow(j - topYOrLeftX, 2);// 底部的圆心位置为(puzzleWidth / 2, puzzleHeight - topYOrLeftX)double bottom = Math.pow(i - topOrBottomX, 2) + Math.pow(j - bottomY, 2);// 左侧的圆心位置为(topYOrLeftX, puzzleHeight / 2)double left = Math.pow(i - topYOrLeftX, 2) + Math.pow(j - leftOrRightY, 2);// 右侧的圆心位置为(puzzleWidth - topYOrLeftX, puzzleHeight / 2)double right = Math.pow(i - rightX, 2) + Math.pow(j - leftOrRightY, 2);/* 凸时对应的圆点 */// 顶部的圆心位置为(puzzleWidth / 2, topYOrLeftXR)double topR = Math.pow(i - topOrBottomX, 2) + Math.pow(j - topYOrLeftXR, 2);// 底部的圆心位置为(puzzleWidth / 2, puzzleHeight - topYOrLeftXR)double bottomR = Math.pow(i - topOrBottomX, 2) + Math.pow(j - bottomYR, 2);// 左侧的圆心位置为(topYOrLeftXR, puzzleHeight / 2)double leftR = Math.pow(i - topYOrLeftXR, 2) + Math.pow(j - leftOrRightY, 2);// 右侧的圆心位置为(puzzleWidth - topYOrLeftXR, puzzleHeight / 2)double rightR = Math.pow(i - rightXR, 2) + Math.pow(j - leftOrRightY, 2);/* 随机获取条件 */Boolean[][] conditions = new Boolean[][]{new Boolean[]{(j <= distance && topR >= rPow),(j <= distance || top <= rPow),(j <= distance)},new Boolean[]{(j >= yBlank && bottomR >= rPow),(j >= yBlank || bottom <= rPow),(j >= yBlank)},new Boolean[]{(i <= distance && leftR >= rPow),(i <= distance || left <= rPow),(i <= distance)},new Boolean[]{(i >= xBlank && rightR >= rPow),(i >= xBlank || right <= rPow),(i >= xBlank)}};boolean hide = false;for (int c = 0; c < randomCondition.length; c++) {if (conditions[c][randomCondition[c]]) {hide = true;break;}}if (hide) {// 不显示的像素data[i][j] = 0;} else {data[i][j] = 1;}}}return data;}绘制好需要截取的数据位置后,再来进行剪切:
/*** 裁剪拼图** @param bgImg - 原图规范大小之后的大图* @param puzzleImg - 小图* @param slideTemplateData - 拼图轮廓数据* @param x - 坐标x* @param y - 坐标y*/private static void cutByTemplate(BufferedImage bgImg, BufferedImage puzzleImg, int[][] slideTemplateData, int x, int y) {int[][] matrix = new int[3][3];int[] values = new int[9];// 虚假的x坐标int fakeX = getRandomFakeX(x);// 创建shape区域,即原图抠图区域模糊和抠出小图/*遍历小图轮廓数据,创建shape区域。即原图抠图处模糊和抠出小图*/for (int i = 0; i < puzzleImg.getWidth(); i++) {for (int j = 0; j < puzzleImg.getHeight(); j++) {// 获取大图中对应位置变色int rgb_ori = bgImg.getRGB(x + i, y + j);// 0和1,其中0表示没有颜色,1有颜色int rgb = slideTemplateData[i][j];if (rgb == 1) {// 设置小图中对应位置变色puzzleImg.setRGB(i, j, rgb_ori);// 大图抠图区域高斯模糊readPixel(bgImg, x + i, y + j, values);fillMatrix(matrix, values);bgImg.setRGB(x + i, y + j, avgMatrix(matrix));// 抠虚假图readPixel(bgImg, fakeX + i, y + j, values);fillMatrix(matrix, values);bgImg.setRGB(fakeX + i, y + j, avgMatrix(matrix));} else {// 这里把背景设为透明puzzleImg.setRGB(i, j, rgb_ori & 0x00ffffff);}}}}四、核心代码拿走
SliderCaptchaUtil:
package com.xloda.common.tool.captcha.util;import com.xloda.common.tool.captcha.constant.SliderCaptchaConfig;
import com.xloda.common.tool.captcha.pojo.SliderCaptcha;import java.awt.*;
import java.awt.image.BufferedImage;
import java.io.IOException;
import java.util.Random;/*** @author Dragon Wu* @since 2025/04/23 10:52* 滑块验证码生成器*/public class SliderCaptchaUtil implements SliderCaptchaConfig {/*** 生成滑块验证码** @param bgImg     1. 传入随机背景图* @param accordant 是否生成登高拼图* @return SliderCaptcha 验证码结果* @throws IOException IO异常*/public static SliderCaptcha generateCaptcha(BufferedImage bgImg, boolean accordant) throws IOException {// 2. 随机生成离左上角的(X,Y)坐标,上限为 [width-puzzleWidth, height-puzzleHeight]。最好离大图左边远一点,上限不要紧挨着大图边界Random random = new Random();// X范围:[puzzleWidth, width - puzzleWidth)int x = random.nextInt(width - 2 * puzzleWidth) + puzzleWidth;// Y范围:[puzzleHeight, height - puzzleHeight)int y = random.nextInt(height - 2 * puzzleHeight) + puzzleHeight;// 3. 创建拼图图像BufferedImage puzzleImg = new BufferedImage(puzzleWidth, puzzleHeight, BufferedImage.TYPE_4BYTE_ABGR);// 4. 随机获取位置数据int randomR1 = getRandomR1();// 5. 随机生成拼图轮廓数据int[][] slideTemplateData = createTemplateData(randomR1);// 6. 从大图中裁剪拼图。抠原图,裁剪拼图cutByTemplate(bgImg, puzzleImg, slideTemplateData, x, y);// 7. 给拼图加边框puzzleImg = ImageUtil.addBorderWithOutline(puzzleImg, borderSize, Color.white);// 8. 判断是否为登高拼图if (accordant) {puzzleImg = reshapeAccordant(puzzleImg, y);return new SliderCaptcha(ImageUtil.toBase64(bgImg),ImageUtil.toBase64(puzzleImg), x);}// 非登高拼图,记录x和yreturn new SliderCaptcha(ImageUtil.toBase64(bgImg),ImageUtil.toBase64(puzzleImg), x, y);}// 随机获取小圆距离点private static int getRandomR1() {Integer[] r1List = new Integer[]{radius * 3 / 2,radius,radius / 2,};int index = new Random().nextInt(r1List.length);return r1List[index];}/*** 随机生成拼图图轮廓数据** @param randomR1 圆点距离随机值* @return 0和1,其中0表示没有颜色,1有颜色*/private static int[][] createTemplateData(int randomR1) {// 拼图轮廓数据int[][] data = new int[puzzleWidth][puzzleHeight];// 拼图去掉凹凸的白色距离int xBlank = puzzleWidth - distance;int yBlank = puzzleHeight - distance;// 记录圆心的位置值int topOrBottomX = puzzleWidth / 2;int leftOrRightY = puzzleHeight / 2;// 凹时对应的位置int topYOrLeftX = distance - randomR1 + radius;int rightX = puzzleWidth - topYOrLeftX;int bottomY = puzzleHeight - topYOrLeftX;// 凸时对应的位置int topYOrLeftXR = distance + randomR1 - radius;int rightXR = puzzleWidth - topYOrLeftXR;int bottomYR = puzzleHeight - topYOrLeftXR;double rPow = Math.pow(radius, 2);/* 随机获取判断条件 */Random random = new Random();Integer[] randomCondition = new Integer[]{random.nextInt(3),random.nextInt(3),random.nextInt(3),random.nextInt(3)};/*计算需要的拼图轮廓(方块和凹凸),用二维数组来表示,二维数组有两张值,0和1,其中0表示没有颜色,1有颜色圆的标准方程 (x-a)²+(y-b)²=r²,标识圆心(a,b),半径为r的圆*/for (int i = 0; i < puzzleWidth; i++) {for (int j = 0; j < puzzleHeight; j++) {/* 凹时对应的圆点 */// 顶部的圆心位置为(puzzleWidth / 2, topYOrLeftX)double top = Math.pow(i - topOrBottomX, 2) + Math.pow(j - topYOrLeftX, 2);// 底部的圆心位置为(puzzleWidth / 2, puzzleHeight - topYOrLeftX)double bottom = Math.pow(i - topOrBottomX, 2) + Math.pow(j - bottomY, 2);// 左侧的圆心位置为(topYOrLeftX, puzzleHeight / 2)double left = Math.pow(i - topYOrLeftX, 2) + Math.pow(j - leftOrRightY, 2);// 右侧的圆心位置为(puzzleWidth - topYOrLeftX, puzzleHeight / 2)double right = Math.pow(i - rightX, 2) + Math.pow(j - leftOrRightY, 2);/* 凸时对应的圆点 */// 顶部的圆心位置为(puzzleWidth / 2, topYOrLeftXR)double topR = Math.pow(i - topOrBottomX, 2) + Math.pow(j - topYOrLeftXR, 2);// 底部的圆心位置为(puzzleWidth / 2, puzzleHeight - topYOrLeftXR)double bottomR = Math.pow(i - topOrBottomX, 2) + Math.pow(j - bottomYR, 2);// 左侧的圆心位置为(topYOrLeftXR, puzzleHeight / 2)double leftR = Math.pow(i - topYOrLeftXR, 2) + Math.pow(j - leftOrRightY, 2);// 右侧的圆心位置为(puzzleWidth - topYOrLeftXR, puzzleHeight / 2)double rightR = Math.pow(i - rightXR, 2) + Math.pow(j - leftOrRightY, 2);/* 随机获取条件 */Boolean[][] conditions = new Boolean[][]{new Boolean[]{(j <= distance && topR >= rPow),(j <= distance || top <= rPow),(j <= distance)},new Boolean[]{(j >= yBlank && bottomR >= rPow),(j >= yBlank || bottom <= rPow),(j >= yBlank)},new Boolean[]{(i <= distance && leftR >= rPow),(i <= distance || left <= rPow),(i <= distance)},new Boolean[]{(i >= xBlank && rightR >= rPow),(i >= xBlank || right <= rPow),(i >= xBlank)}};boolean hide = false;for (int c = 0; c < randomCondition.length; c++) {if (conditions[c][randomCondition[c]]) {hide = true;break;}}if (hide) {// 不显示的像素data[i][j] = 0;} else {data[i][j] = 1;}}}return data;}/*** 裁剪拼图** @param bgImg             - 原图规范大小之后的大图* @param puzzleImg         - 小图* @param slideTemplateData - 拼图轮廓数据* @param x                 - 坐标x* @param y                 - 坐标y*/private static void cutByTemplate(BufferedImage bgImg, BufferedImage puzzleImg, int[][] slideTemplateData, int x, int y) {int[][] matrix = new int[3][3];int[] values = new int[9];// 虚假的x坐标int fakeX = getRandomFakeX(x);// 创建shape区域,即原图抠图区域模糊和抠出小图/*遍历小图轮廓数据,创建shape区域。即原图抠图处模糊和抠出小图*/for (int i = 0; i < puzzleImg.getWidth(); i++) {for (int j = 0; j < puzzleImg.getHeight(); j++) {// 获取大图中对应位置变色int rgb_ori = bgImg.getRGB(x + i, y + j);// 0和1,其中0表示没有颜色,1有颜色int rgb = slideTemplateData[i][j];if (rgb == 1) {// 设置小图中对应位置变色puzzleImg.setRGB(i, j, rgb_ori);// 大图抠图区域高斯模糊readPixel(bgImg, x + i, y + j, values);fillMatrix(matrix, values);bgImg.setRGB(x + i, y + j, avgMatrix(matrix));// 抠虚假图readPixel(bgImg, fakeX + i, y + j, values);fillMatrix(matrix, values);bgImg.setRGB(fakeX + i, y + j, avgMatrix(matrix));} else {// 这里把背景设为透明puzzleImg.setRGB(i, j, rgb_ori & 0x00ffffff);}}}}/*** 随机获取虚假x坐标的值** @param x 真正的x坐标* @return fakeX*/private static int getRandomFakeX(int x) {int puzzleRealWidth = puzzleWidth + 2 * borderSize + 2;Random random = new Random();int fakeX = random.nextInt(width - 2 * puzzleRealWidth) + puzzleRealWidth;if (Math.abs(fakeX - x) <= puzzleRealWidth) {fakeX = width - x;}return fakeX;}/*** 通过拼图图片生成登高拼图图片** @param puzzleImg 拼图图片* @param offsetY   随机生成的y* @return 登高拼图图片*/private static BufferedImage reshapeAccordant(BufferedImage puzzleImg, int offsetY) {BufferedImage puzzleBlankImg = new BufferedImage(puzzleWidth + 2 * borderSize + 2, height, BufferedImage.TYPE_4BYTE_ABGR);Graphics2D graphicsPuzzle = puzzleBlankImg.createGraphics();graphicsPuzzle.drawImage(puzzleImg, 1, offsetY, null);graphicsPuzzle.dispose();return puzzleBlankImg;}private static void readPixel(BufferedImage img, int x, int y, int[] pixels) {int xStart = x - 1;int yStart = y - 1;int current = 0;for (int i = xStart; i < 3 + xStart; i++) {for (int j = yStart; j < 3 + yStart; j++) {int tx = i;if (tx < 0) {tx = -tx;} else if (tx >= img.getWidth()) {tx = x;}int ty = j;if (ty < 0) {ty = -ty;} else if (ty >= img.getHeight()) {ty = y;}pixels[current++] = img.getRGB(tx, ty);}}}private static int avgMatrix(int[][] matrix) {int r = 0;int g = 0;int b = 0;for (int[] x : matrix) {for (int j = 0; j < x.length; j++) {if (j == 1) {continue;}Color c = new Color(x[j]);r += c.getRed();g += c.getGreen();b += c.getBlue();}}return new Color(r / 8, g / 8, b / 8).getRGB();}private static void fillMatrix(int[][] matrix, int[] values) {int filled = 0;for (int[] x : matrix) {for (int j = 0; j < x.length; j++) {x[j] = values[filled++];}}}
}
RandomUtil:
package com.xloda.common.tool.captcha.util;import com.xloda.common.tool.captcha.constant.CaptchaConstants;import java.util.Random;/*** @author Dragon Wu* @since 2025/04/23 18:07* 随机生成器工具*/public class RandomUtil {// 随机获取背景图路径public static String randomBgImgPath() {int index = new Random().nextInt(CaptchaConstants.BG_IMAGES.length);return CaptchaConstants.BG_IMAGES[index];}
}
ImageUtil:
package com.xloda.common.tool.captcha.util;import com.xloda.common.tool.captcha.constant.CaptchaConstants;import javax.imageio.ImageIO;
import java.awt.*;
import java.awt.geom.Area;
import java.awt.image.BufferedImage;
import java.io.ByteArrayOutputStream;
import java.io.IOException;
import java.util.Base64;/*** @author Dragon Wu* @since 2025/04/25 10:18* 图片处理工具*/public class ImageUtil {public static BufferedImage addBorderWithOutline(BufferedImage image, int borderWidth, Color borderColor) {// 创建新图像,尺寸扩大以容纳边框BufferedImage result = new BufferedImage(image.getWidth() + borderWidth * 2,image.getHeight() + borderWidth * 2,BufferedImage.TYPE_INT_ARGB);Graphics2D g2d = result.createGraphics();g2d.setRenderingHint(RenderingHints.KEY_ANTIALIASING, RenderingHints.VALUE_ANTIALIAS_ON);// 获取图像的非透明区域Area area = new Area();for (int y = 0; y < image.getHeight(); y++) {for (int x = 0; x < image.getWidth(); x++) {if ((image.getRGB(x, y) >> 24) != 0x00) {area.add(new Area(new Rectangle(x, y, 1, 1)));}}}// 绘制边框g2d.setColor(borderColor);g2d.setStroke(new BasicStroke(borderWidth * 2));g2d.translate(borderWidth, borderWidth);g2d.draw(area);// 绘制原始图像g2d.drawImage(image, 0, 0, null);g2d.dispose();return result;}// 图片转Base64public static String toBase64(BufferedImage image) throws IOException {// 创建一个字节数组输出流ByteArrayOutputStream os = new ByteArrayOutputStream();// 将BufferedImage写入到输出流中,这里指定图片格式为"png"或"jpg"等ImageIO.write(image, CaptchaConstants.IMG_FORMAT, os);// 将输出流的字节数组转换为Base64编码的字符串String imageBase64 = Base64.getEncoder().encodeToString(os.toByteArray());// 关闭输出流os.close();return CaptchaConstants.BASE64_PREFIX + imageBase64;}
}
SliderCaptcha:
package com.xloda.common.tool.captcha.pojo;import lombok.*;/*** @author Dragon Wu* @since 2025/04/23 10:49* 滑块验证码*/
@AllArgsConstructor
@Getter
@ToString
public class SliderCaptcha {// 验证码背景图private String bgImg;// 验证码滑块private String puzzleImg;// 验证码正确的x位置(此值需自行存入缓存,用于验证码判断)private int x;// 等高拼图时,返回0(非登高拼图,此值需自行存入缓存,用于验证码判断)private int y;public SliderCaptcha(String bgImg, String puzzleImg, int x) {this.bgImg = bgImg;this.puzzleImg = puzzleImg;this.x = x;}
}
CaptchaConstants:
package com.xloda.common.tool.captcha.constant;/*** @author Dragon Wu* @since 2025/04/23 10:53*/
public interface CaptchaConstants {// 图片格式String IMG_FORMAT = "png";// base64前缀String BASE64_PREFIX = "data:image/" + IMG_FORMAT + ";base64,";// 图片存储的目录String FOLDER = "/static/img/captcha/";// 背景图列表(引入依赖后,记得在项目资源目录的该路径下添加对应图片)String[] BG_IMAGES = new String[]{FOLDER + "bg01.png",FOLDER + "bg01.png"};
}
SliderCaptchaConfig
package com.xloda.common.tool.captcha.constant;/*** @author Dragon Wu* @since 2025/04/23 11:09* 滑块验证码的配置*/public interface SliderCaptchaConfig {// 大图宽度(原图裁剪拼图后的背景图)int width = 280;// 大图高度int height = 173;// 小图宽度(滑块拼图),前端拼图的实际宽度:puzzleWidth + 2 * borderSize + 2int puzzleWidth = 66;// 小图高度,前端拼图的实际高度:puzzleHeight + 2 * borderSize + 2int puzzleHeight = 66;// 边框厚度int borderSize = 1;// 小圆半径,即拼图上的凹凸轮廓半径int radius = 8;// 图片一周预留的距离,randomR1最大值不能超过radius * 3 / 2int distance = radius * 3 / 2;
}
接下来继续手搓旋转验证码前后端。
本节,总结到此,学点数学挺有用的!